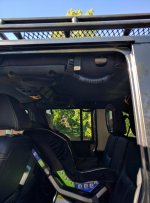
GraniteCrystal build thread

Ddays

Hooked
See response above in this post. It's leaking out of the cap no matter how much I tighten it.

Thats really surprising. Mine swelled up like balloons when I was in Moab over the July 4th weekend but they never leaked. Sure there isnt a nick on the opening of the container or bad gasket?
 

GraniteCrystal

New member
Thats really surprising. Mine swelled up like balloons when I was in Moab over the July 4th weekend but they never leaked. Sure there isnt a nick on the opening of the container or bad gasket?

Hmmm. That's good to know. I'll give it a more thorough exam tomorrow and see if I can find anything. I think this one was a discounted refurbished one. Could explain why original owner returned it.
 
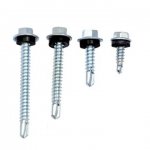
Roofing screws, like for metal roofs or buildings, have a rubber washer or gasket already on them up by the head. You screw one in on the top of the can opposite the cap. Same spot as where the vents were on the old cans. I'll have to take some pictures.

Here is what the screws look like.
image.jpeg
 

swampdog

New member
He is saying put the screw in opposite of the spout side and leave in in, as the gasket will seal the screw hole. Then, for venting or when pouring, back the screw out a few turns to allow air to enter through your new vent (screw) hole.
 

Ddays

Hooked
Roofing screws, like for metal roofs or buildings, have a rubber washer or gasket already on them up by the head. You screw one in on the top of the can opposite the cap. Same spot as where the vents were on the old cans. I'll have to take some pictures.

Here is what the screws look like.
View attachment 220239

He is saying put the screw in opposite of the spout side and leave in in, as the gasket will seal the screw hole. Then, for venting or when pouring, back the screw out a few turns to allow air to enter through your new vent (screw) hole.

I don't see why you should HAVE to do this. If you live in the really hot areas I could see maybe this would work ok but why not just open the spout a couple clicks on the spout nut to relieve pressure? Screws in plastic always wear the threads out so then that will be leaking next. The spouts are vented and work relatively well so you don't need this to pour. Like I said, mine were swelled pretty damn big in the 105* heat a couple days. Enough so that when I walked around the Jeep it was like :eek: holy hell! They returned to normal overnight but went back up the next day. I think these are designed to take that with no problems. The plastic in these cans are very thick. these are not like a normal gas can we have in our sheds....
 

GraniteCrystal

New member
Roofing screws, like for metal roofs or buildings, have a rubber washer or gasket already on them up by the head. You screw one in on the top of the can opposite the cap. Same spot as where the vents were on the old cans. I'll have to take some pictures.

Here is what the screws look like.
View attachment 220239

Thanks for the pic. Haven't seen those before.

He is saying put the screw in opposite of the spout side and leave in in, as the gasket will seal the screw hole. Then, for venting or when pouring, back the screw out a few turns to allow air to enter through your new vent (screw) hole.

Putting it in the opposite side as the spout makes sense when pouring but makes me pretty nervous for the 99% of the time when the container will be mounted upright.

I don't see why you should HAVE to do this. If you live in the really hot areas I could see maybe this would work ok but why not just open the spout a couple clicks on the spout nut to relieve pressure? Screws in plastic always wear the threads out so then that will be leaking next. The spouts are vented and work relatively well so you don't need this to pour. Like I said, mine were swelled pretty damn big in the 105* heat a couple days. Enough so that when I walked around the Jeep it was like :eek: holy hell! They returned to normal overnight but went back up the next day. I think these are designed to take that with no problems. The plastic in these cans are very thick. these are not like a normal gas can we have in our sheds....

You're saying to just loosen the cap a bit to break the seal on the existing gasket and let the pressure bleed off right? That's what I've been doing right now, but when I screw it back down, it sometimes starts leaking. I'd also like to not have to stop and do this periodically throughout the day as elevation changes and temperatures rise. I'd prefer a system that can self bleed.

All this is leading me toward putting in some kind of rubber seal (with self-tapping roofing screw or otherwise) on the SAME end as the pour spout (so pointing up toward the sky). The thinking being that it will create a tight enough seal to prevent any gas from sloshing out on the highway but if the pressure rose the air could actually escape through it. Obviously it'd also have to not pop out when the can is inverted and pouring into my tank.

Thoughts?
 

Ddays

Hooked
The way the caps are made with the locking ring, if you wanted, you could press the tab on the locking ring and loosen the cap a couple clicks to let the pressure escape if you really wanted to. I still don't believe you should have to periodically bleed off the pressure though. Mine never leaked even though they swelled up. I only relieved the pressure once out of curiosity's sake. The following day I left it alone since it didn't leak the day before....

You're adding a leak path by drilling a hole and adding a self tapping screw into that plastic. Its one thing on a roof where you're never removing the screw again, but in this case that's gonna eventually leak because those threads will strip in the plastic. These things are pretty well made and if its leaking I think you have some kind of issue with your cap or container opening.

PS: after I got home to PA the cans went back to their normal shape. They did not stay expanded.
 
Thanks for the pic. Haven't seen those before.


Putting it in the opposite side as the spout makes sense when pouring but makes me pretty nervous for the 99% of the time when the container will be mounted upright.


You're saying to just loosen the cap a bit to break the seal on the existing gasket and let the pressure bleed off right? That's what I've been doing right now, but when I screw it back down, it sometimes starts leaking. I'd also like to not have to stop and do this periodically throughout the day as elevation changes and temperatures rise. I'd prefer a system that can self bleed.

All this is leading me toward putting in some kind of rubber seal (with self-tapping roofing screw or otherwise) on the SAME end as the pour spout (so pointing up toward the sky). The thinking being that it will create a tight enough seal to prevent any gas from sloshing out on the highway but if the pressure rose the air could actually escape through it. Obviously it'd also have to not pop out when the can is inverted and pouring into my tank.

Thoughts?

The Screw still goes on the top. it goes where the vent used to be on the old style of cans. If the spout is the front of the can it goes on the back so it is at the high point when you are pouring.
 

GraniteCrystal

New member
The Screw still goes on the top. it goes where the vent used to be on the old style of cans. If the spout is the front of the can it goes on the back so it is at the high point when you are pouring.

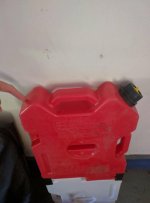
Right where my finger is in this pic?
 

Attachments

  • 1472496525928.jpg
    1472496525928.jpg
    37.3 KB · Views: 183

JK_Dave

Caught the Bug
Thanks. Haven't heard of them. Most of my research point to Gorilla or McGard but all with mixed reviews.

I can testify for the McGard ones. Got the black finish and not one scratch on them yet from all the tire rotations. Plus I like the security from the one security nut they include for each wheel that I didn't have with my stock lug nuts.
 

GraniteCrystal

New member
Side mirror storage

Inspired by something I saw someone do for doors, I whipped up some cheap and effective side mirror storage. Feels great to finally get these off the workbench and hung up out of the way.

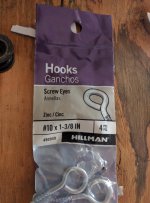
Here is the part you'll need from Lowes (or Home Depot):
IMG_20160905_100502.jpg

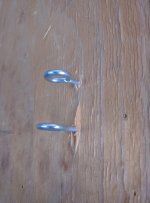
Just screwed them in by hand:
IMG_20160905_100522.jpg

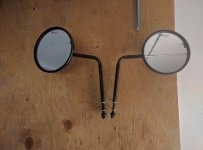
And everything hung up:
IMG_20160905_102234.jpg

Also grabbed two red carabiners for the existing yellow straps. That was something we discovered on our last trip that made the straps much more useful and prevented them from unraveling in the wind:
IMG_20160905_102537.jpg
 

GraniteCrystal

New member
For anyone curious, here is what the inside of the Jeep looks like with the top fully on (including freedom panels) with the Dirty Dog sunshade still on. The ability to leave it on with the hard top was a selling point for me. Less hassle and it gets rid of the white-washed look everyone deplores about the inside of the hardtop.

Back seat:
IMG_20160917_095545.jpg

Front seat:
IMG_20160917_095621.jpg
 

COLOJK

New member
That looks great! I have a spiderweb shade and it's supposed to work with the hard top but when I tried to do it, it didn't work very well and I got frustrated and took it off
 

aermid

New member
Wow nice build! Just spent the last few hours reading it all. It's awesome to see it on a granite crystal! I haven't seen many builds with our color. Definitely gave me a bunch of ideas :daydream: can't wait to see more.
 

GraniteCrystal

New member
Wow nice build! Just spent the last few hours reading it all. It's awesome to see it on a granite crystal! I haven't seen many builds with our color. Definitely gave me a bunch of ideas :daydream: can't wait to see more.

Thanks! Love this color too. Glad you got some ideas as you build up yours. I'm jealous of your 35s!
 
Top Bottom