You are using an out of date browser. It may not display this or other websites correctly.
You should upgrade or use an alternative browser.
You should upgrade or use an alternative browser.
LED Light Upgrade for your Power Window Switches
- Thread starter Charlie Mike
- Start date
Bluegrass James
New member
good lord id lose every part twice.
steadfast91
New member
Great write up! I have the same problem in my 08.
Charlie Mike
New member
Thanks for the write up. Just finished my 2007. Only difference is it only has the 2 lights.
went without a hitch following your instructions. Awesome!
Thanks Again.
Glad to hear it worked out! :beer:
MattAlpha
Caught the Bug
Took to the next level
Following these great instructions I replaced the bulbs in my window switches and then climate controls. During long trips I would have to "dim" down the backlighting because the surface of the switches got hot enough that I was afraid the plastic might melt. I've seen it happen in a few late 1990's Grand Cherokees.
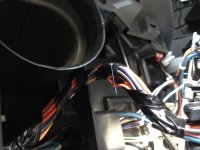
You can see in the pictures below that I powered the LEDs using the orange wire with the grey stripe (it's smaller in diameter than the rest of the wires in both harnesses, I think it's a 22). That allows the LEDs to dim with the rest of the Jeep's back lighting. I ordered 10 LEDs from mentioned website and I had them four days later. I used the warm white color and they worked great.
Here are some pictures of what I did:
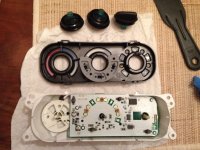
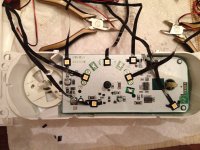
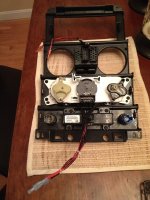
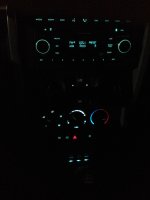
I removed the old light bulbs/housings and used little pieces of electrical tape to cover up the old contacts. I installed the LEDs in the exact area where each bulb was removed. As you can see from the "final project" picture that I should have put an extra LED in the lower left and right corner areas. Aside from that they provide better light coverage than the stock bulbs. All buttons and switches still work perfectly. They dim with the rest of the interior lighting as I wanted them to work. When I need to go in there again, I'll install a few more LEDs to have complete back lighting coverage.
I also disassembled the locker/e-disco switch panel. I didn't find any normal light bulbs in their so I left them alone and re-installed it the way it was. I have pictures of it too if anyone is interested in what the internals look like.
-Matt
Following these great instructions I replaced the bulbs in my window switches and then climate controls. During long trips I would have to "dim" down the backlighting because the surface of the switches got hot enough that I was afraid the plastic might melt. I've seen it happen in a few late 1990's Grand Cherokees.
You can see in the pictures below that I powered the LEDs using the orange wire with the grey stripe (it's smaller in diameter than the rest of the wires in both harnesses, I think it's a 22). That allows the LEDs to dim with the rest of the Jeep's back lighting. I ordered 10 LEDs from mentioned website and I had them four days later. I used the warm white color and they worked great.
Here are some pictures of what I did:


I removed the old light bulbs/housings and used little pieces of electrical tape to cover up the old contacts. I installed the LEDs in the exact area where each bulb was removed. As you can see from the "final project" picture that I should have put an extra LED in the lower left and right corner areas. Aside from that they provide better light coverage than the stock bulbs. All buttons and switches still work perfectly. They dim with the rest of the interior lighting as I wanted them to work. When I need to go in there again, I'll install a few more LEDs to have complete back lighting coverage.
I also disassembled the locker/e-disco switch panel. I didn't find any normal light bulbs in their so I left them alone and re-installed it the way it was. I have pictures of it too if anyone is interested in what the internals look like.
-Matt
Man I wish I had you guys around to help with my LED lights. I took apart my dash a few times to replace my window switch lights on my '09 and failed every time. Can't figure the correct wires to tap etc. should be pretty straight forward but hasn't been so easy for me. This is something I want to accomplish though.
MattAlpha
Caught the Bug
Take a look at the picture I posted of the wire with the finishing nail pushed through it in my above post. That is the wire you need to tap into to power your LED back lights. It's smaller in diameter than the rest of the wires in the harnesses for each unit in the console (climate controls, window switches, etc). You also need to tap into a ground wire or run your own to a hard point on the body. I choose to run my own. Just take your time and use a volt meter to check the wires, remember to turn your Jeep's power on to the interior lighting (just to turn on your auxiliaries and running lights, no need to start the engine) so that the power will be running through the wire.
-Matt
-Matt
The lights on the power window switches stopped working at about 8 months on my 2011 JKUR. Had the dealer replace it and now they have failed again. I'm going to try this fix. Hopefully it will last longer than the stock lighting. Has anyone tried this fix on the rear window switches located on the back of the center console?
MAK
MAK
MattAlpha
Caught the Bug
MAK,
You can do it the same way. Just be careful with routing the flat wire from the LEDs (there isn't as much room back there to route them). That unit opens up very similar to the front windows controls. Look up a replacement thread for the rear window switches to help you open of the console for access to that switch module.
I installed rear USB power outlets was I in there. It's just a pain to remove the outer plastic housing to get access to the switch module, just try not to force it off.
-Matt
MattAlpha
Caught the Bug
I have tried and tried and I can't desolder the anchors well enough to disconnect the board from the switch plate. Any pointers?
I had to use a solder vacuum (got it at radio shack). Definitely a pain in the ass.
BTW, make sure to use flux when you solder everything back together. That bit me too.
MattAlpha
Caught the Bug
I'm glad you were able to get it with the wick.
I tried to do it with just the desoldering wick first and it was a major PIA (~45 minutes for one post). I've used the wick before on small joints, those tabs were a hole other kind of solder joint. So I bought the vacuum and did the other 3 posts in less than 15 minutes.
I tried to do it with just the desoldering wick first and it was a major PIA (~45 minutes for one post). I've used the wick before on small joints, those tabs were a hole other kind of solder joint. So I bought the vacuum and did the other 3 posts in less than 15 minutes.
desertbuzz
New member
FANTASTIC write up ! Thanks a gazillion ... :thumb::thumb:
Not meaning to hijack ... But I was wondering if it's possible to make the power window switches operate with a one touch up instead of the current one touch down.
Is it possible ? What would it take ?
Thanks
Not meaning to hijack ... But I was wondering if it's possible to make the power window switches operate with a one touch up instead of the current one touch down.
Is it possible ? What would it take ?
Thanks
Last edited by a moderator:
MattAlpha
Caught the Bug
You can't make it one-click up because of the way the circuit board is constructed. The pin for each switch (only the front windows for "07-'11 model years) is only designed to be activated for the downward direction. If you look at the pictures for the boards you'll see what I mean. The pins activate their respective buttons that send the electrical signal that causes the window to operate until it's completely down. You would have to re-construct the entire board to incorporate the one touch up function. Not impossible if you have the skills, time, etc.
bradhilldesign
New member
Nice write up
I'd love to tackle this. But Photobucket is being stingy with your photos. Do you still have the original images?
I'd love to tackle this. But Photobucket is being stingy with your photos. Do you still have the original images?
