Rebuilt of a Billet Silver mall crawler

VeruGE*144

Caught the Bug
You'll notice that your control arm drop brackets are two piece as well. I don't care for the design of them as they seem weak. I went with the heavy 1 piece welded Rancho ones and they are great. Some (most?) don't like running the drops at all because of ground clearance issues. My logic was I'll bolt in new ones if they get too torn up, the factory ones need to be welded to be replaced, and the ride and handling is fantastic. You might want to upgrade if its going to be a few years to either the adjustable arms or the welded drops. Otherwise the problem will take care of itself going to a long arm setup. Keep up the good work on the build!

Yeah I was thinking of just saving up for a long arm kit and replacing coils with evo plush ones for time being.
I want to upgrade to long arms, I only wheel light to moderate, there's not many places to go around here. I do plan on going trail riding out west in the future.
I don't know if it's worth welding up better drops. Ill look into it though, I met a guy on here that has a welder and is willing to help out for a fair price( he did my c gussets). On the other hand I might as well just go staring to long arm, and baby the jeep till then. I guess I got some homework to do...
I wish I knew better before, but I guess that's how we learn. Its my first jeep and none of my friends are into Jeeps so I didn't have any advice. I'll do better on he next one.
I wish I joined a forum much sooner.

Thanks for your input bud. [emoji4]


.....…...............................................................
MY BUILT/REBUILD: http://wayalife.com/showthread.php?44123-Rebuilt-of-a-Billet-Silver-mall-crawler&p=859931#post859931
 

VeruGE*144

Caught the Bug
I installed my own ball joints over the weekend and I would like to share the experience with my install. I didn't document it very well with pictures (sorry), I will try to explain with words.


I have all the necessary tools need for this install, except the ball joint press which I figured I didn't have to buy since I would only use it one time. I leased a set from Advance Auto Parts, they will charge about $260 for lease and when you are done and bring it back they will refund the total amount paid. So it actually comes out to be FREE, no one can beat free.

DYNATRAC ADAPTERS ARE NECESSARY WITH A BALL JOINT PRESS LIKE THIS ONE


Here is a set I used

IMG_4180.JPG

In my research on ball joint install I found out that there is special 'slightly slanted adapter' that is required when working with Dana axle. The special adapter is one of the circled ones, it is not very big, but big enough to allow sufficient space to install ProSteers


After all necessary components has been removed it was time to press the old ball joints out. I found it easier to press the lower one out first (oppose to dynatrac instructions), maybe due to press design and available adapters that came in the set.

IMG_4187.jpg


For the top I flipped the press over and went threw the hole of the lower joint. First I used an adapter right up against the stud of the ball joint and pressed that fucker out right through the top cap. It was funny to see how weak the factory ball joint really is (unfortunately I didn't take a picture of this step). With the stud of the way I switched the adapters to press the rest of the upper ball joint out.

IMG_4189.jpg

Next step was to press the ProSteers in. After cleaning the forging and juggling juggling with adapters and ball joints for a bit I decided to press the top one in first. The press was hitting up against the spring bucket a little, but I decided to just go with it and touched up the spring bucket with black paint after I was done (had to do this on both sides). The lower ball joint is much easier to work with, especially with the press I had. The 'slanted adapter' is absolutely necessary to press the lower ball joint in straight.

I am sorry but I didn't take any pictures while pressing the ProSteers in, I was to paranoid with making sure I won’t fuck this up. I must say it is tight with this press (and any other that can be leased out from autostore) but absolutely doable.


Here are pictures of both upper and lower pressed in

IMG_4190.jpg
IMG_4191.jpg

If you look at the upper ball joint it looks like it might not be pressed in all the way in. I looks like might be 1/16" up form the forging. Ball joint has a slight taper around the edge there. It is pressed all the way in.


Next I have a picture with knuckle installed

IMG_4193.jpg
IMG_4194.jpg

If you look closely you can see that there is a gap between the top of the knuckle and forging of the upper c. I checked the side that still had the factory setup, measured the gap it was same size as with new ball joints. The only difference is the rubber boot on factory side that made it look different. I guess the rubber boot isn’t really necessary with ProSteers.


The press I had accepted a 22mm socket at the end, and with a 2-foot breaker bar it went somewhat smooth. It does take some force to press in and out. It wasn’t that hard or I just might be really strong lol.


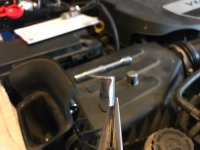
Here is a picture of different tools I used for this install, it was a few.

IMG_4195.jpg

And here both sides finished and all the components put back together.

IMG_4204.jpg
IMG_4205.jpg

I had one hiccup during the Install. I snapped the speed/abs sensor while trying to gently pry it out of the hub. It pretty much just snapped off with very little pressure (this costed me couple extra hours on this install).

For the other side, instead of prying the sensor out of the hub I went ahead and unplugged it at the frame side. I removed the axleshaft and hub as an assembly with the whole wire that connects to the main harness. Worked great!!!!!


Sensor stuck in the hub

IMG_4188.jpg

After few suggestions form Wayalife members I was able to get the rest of the sensor out of the hub and my little hiccup costed me $25 for the new senor and about 3 extra hours including the trip to a dealer for the new sensor.

Here is a picture of the sensor out.

IMG_4200.jpg
IMG_4199.jpg

I used a dremel and picks. I ended up breaking couple picks out of the cheesy two little sets I had. It is time for a more serious pick set I guess lol.


All in all, it is not rocket science and between having the right tools, taking my time, thinking ahead, following instructions and OCD-ing about not fucking this up, it was fairly easy install. I would of took me 7-8 hours total with setup and cleanup, but with my little hiccup I came in just under 11 hrs.


.....…...............................................................
MY BUILT/REBUILD: http://wayalife.com/showthread.php?44123-Rebuilt-of-a-Billet-Silver-mall-crawler&p=859931#post859931
 

MattAlpha

Caught the Bug
Nice work and thank you for sharing!

Did you end up greasing the ball joints after you pressed them in or after everything was reassembled?


'07 JKUR ... mod'ing never stops...
 

VeruGE*144

Caught the Bug
Nice work and thank you for sharing!

Did you end up greasing the ball joints after you pressed them in or after everything was reassembled?


'07 JKUR ... mod'ing never stops...

It didn't say to grease them in the instructions. One of the members here spoke to Dynatrac about that and they said it is not necessary, but it wouldn't hurt. I did just under two pumps with a grease gun in each fitting
I mill most likely grease them a little every oil change. The fittings are easily accessible and on top of that I grease my drive shafts every oil change anyway (11 grease fitting between 2 driveshafts) and now 4 more fittings for ball joints. No biggie


.....…...............................................................
MY BUILT/REBUILD: http://wayalife.com/showthread.php?44123-Rebuilt-of-a-Billet-Silver-mall-crawler&p=859931#post859931
 

MattAlpha

Caught the Bug
It didn't say to grease them in the instructions. One of the members here spoke to Dynatrac about that and they said it is not necessary, but it wouldn't hurt. I did just under two pumps with a grease gun in each fitting
I mill most likely grease them a little every oil change. The fittings are easily accessible and on top of that I grease my drive shafts every oil change anyway (11 grease fitting between 2 driveshafts) and now 4 more fittings for ball joints. No biggie


.....…...............................................................
MY BUILT/REBUILD: http://wayalife.com/showthread.php?44123-Rebuilt-of-a-Billet-Silver-mall-crawler&p=859931#post859931

Thanks!

I'm about to buy the prosteers and I haven't seen any mention of when or the period between greasing them.

I grease all of my joints at each oil change too and my control arms again before I hit the trail.


'07 JKUR ... mod'ing never stops...
 

VeruGE*144

Caught the Bug
Thanks!

I'm about to buy the prosteers and I haven't seen any mention of when or the period between greasing them.

I grease all of my joints at each oil change too and my control arms again before I hit the trail.


'07 JKUR ... mod'ing never stops...

You got it man.

I am hoping on adding long arm this May, it'll be a birthday gift to myself. I'll have even more fittings to grease every oil change [emoji23]


.....…...............................................................
MY BUILT/REBUILD: http://wayalife.com/showthread.php?44123-Rebuilt-of-a-Billet-Silver-mall-crawler&p=859931#post859931
 

VeruGE*144

Caught the Bug
Is it necessary to remove the steering knuckle from the tie rod?

I don't think it is. But why not, makes it a little easier when you don't have the knuckle still attached to the tire rod and trying to suspend everything out of the way. It also gives you a chance to inspect everything, I also got inside the boot of every tie rod connection with a grease needle and pumped a little grease in them [emoji41]
On diver side you have a drag link that is also connected to the knuckle right above the tire rod. I removed every connection to separate knuckle by itself before breaking it free.


.....…...............................................................
MY BUILT/REBUILD: http://wayalife.com/showthread.php?44123-Rebuilt-of-a-Billet-Silver-mall-crawler&p=859931#post859931
 

VeruGE*144

Caught the Bug
Great job! It was a fun thing to learn how to do and now you know more than you did before you started, win win


Sent from my iPad using WAYALIFE mobile app

Well worth the experience, and the $550 in my pocket that it didn't cost me in labor.
Thanks for your input on the ball joint press question I had.


.....…...............................................................
MY BUILT/REBUILD: http://wayalife.com/showthread.php?44123-Rebuilt-of-a-Billet-Silver-mall-crawler&p=859931#post859931
 

VeruGE*144

Caught the Bug
Installed a 'genesis dual battery kit' over the weekend. I went with X2 batteries which are rebranded Northstars.
IMG_4170.jpg

Removing factory battery is probably the hardest and longest step of this install. I find it easier to just disconnect all the wiring form the fuse box and remove it as well. I had to take it out once before when I was installing an Arb twin compressor under the passenger seat. Putting the factory battery tray back in its place is a total pain in the ass.

IMG_4237.jpg

I also get a chance to seal the grommet Under the battery tray through which I ran wiring for the compressor and a 'g screen wire' now. It was hunting me ever since I cut a big slit in it year and half ago and never really sealed it of. I don't want any water getting in there. The best part about this battery tray is that it still allows access to that grommet, all that has to be taken out are the batteries and I can run more stuff through there if ever needed.
IMG_4241.jpg
IMG_4250.jpg
IMG_4251.jpg
IMG_4245.jpg

Here is probably a best tool for this job, especially when doing this on a lifted jeep. I am 6'1" and i wouldn't be able to it without a step ladder.
IMG_4244.jpg

New tray in place

IMG_4255.jpg

Evap Solenoid relocated

IMG_4256.jpg

For some reason factory positive post clamp kept coming off the battery post. I tighten it a much as I was comfortable with before ruling stripping the threads on the clamp. I ended up getting battery terminal shims and grinding them down and even completely ripping half of it off. Finally made it work and clamp tight.
IMG_4257.jpg
IMG_4261.jpg


I also purchased their g screen to monitor the batteries. I wasn't panning on getting it right away but I also didn't want to remove the battery tray agin to run this wire through, so I got it with the kit. I wanted to mount it on the windshield pillar, but I would like to add a roll cage in the future and the screen would get covered. I ended up getting a replacement housing for my spod and will mount the screen in there. I know spod isn't really welcome here but I had mine for a long time now I have to just fly with it.
I am hoping to finish running/installing the screen sometime during this week or this weekend.

IMG_4231.jpg


.....…...............................................................
MY BUILT/REBUILD: http://wayalife.com/showthread.php?44123-Rebuilt-of-a-Billet-Silver-mall-crawler&p=859931#post859931
 

Attachments

  • IMG_4261.jpg
    IMG_4261.jpg
    54.5 KB · Views: 231

hinrichs

Caught the Bug
Cant wait to see how those batteries hold up, was looking at them when I was considering the dual battery setup.
 

hinrichs

Caught the Bug
Hmm, well that good to know. If I ever make the jump I will prolly go with those then, just not sure if the siwtchpro setup fits with the dual batteries.
 

TrainWreck618

Caught the Bug
Top Bottom