Scorpicon Build Thread

StrizzyChris

New member
Hey Everyone! Finally got around to making my build thread for the 2013 Dune JKU Rubicon, named Scorpion, that I ordered and received just over a month ago.


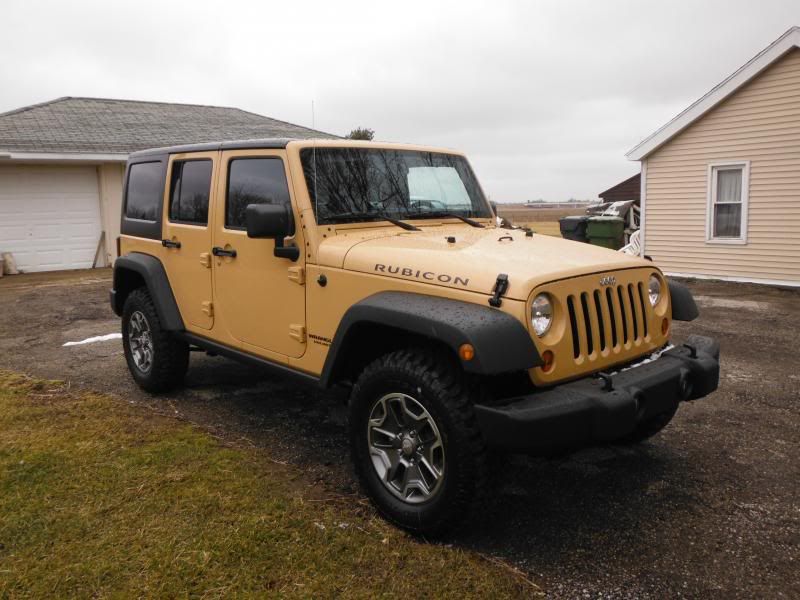
This will be a SLOW build, but I will lay out my plan in phases below, that I hope and plan to get me on 40's and 1-tons by the end(within 2 years). I attempted to do this build last year, and shortly after I began to purchase parts I determined I wanted to perform the build on a 2013 JKUR. The determining factor was the new(2012+) 3.6L, rather than my 2007 JKU Sahara with the slug of a 3.8L. And while doing so, I determined a Rubicon would be a better choice for the sway bar, transfer case, lockers, 4.10 stock option gears, etc. This, combined with traveling for work put a temporary hold on my build, but I am now back on track.

Again, this will be a somewhat slow build due to funds, and access to a garage and tools, but the plan remains the same. So bare with me and give me ANY advice you may be able to give in the product and parts I am looking to purchase! Items in red are already purchased items.

Phase-1
•Drag link flip - Rancho front raise TB bracket w/Crown flipped drag link
•Adjustible Track Bar - JKS Gen-II Bar
•Front Drive Shaft - Adams 1310
•Adjustable Front Lower Control Arms - Rock Krawler High Clearance Arms
•Skid system - EVO MFG Full ProTek Skid System
•Flat fender flares - Stock Fender Cut
•4 door Sliders - LOD Signiture Series Sliders
•Bolt on Coilover system - EVO MFG Front and Rear
•Winch Mount Stubby Bumper - EVO MFG 1/4 pounder with Stinger
•Speedometer recalibration/Tuner - AEV Procal
•Recovery Gear - Always adding to this
•CB Radio, antenna, and wiring - Cobra 29LX LCD CB
•35” MT tires - Nitto Mud Grappler 35x12.50r17
•Rear Tire carrier - Genright Tire Carrier
•Wheel Spacers - 1.5" Spidertrax
•Inner C-gussets - EVO MFG C2 Gussets

Phase-2
•Bolt-on Long Arm bracketry and control arms
•Electrical wiring system with dash or a-pillar rocker switches
•Hydraulic Assist Steering
•Onboard Air System
•LED Off Road Lighting - Outlaw LED A-Pillar lights with PSC Brackets
•9.5-12K Winch - Warn 9.5ti
•Cat Back Exhaust - DynoMax Evolution Competition Series Exhaust
•Air Bump-stops - King Front Airbumps
•37" MT Tires - Nitto 37x12.50r17 Trail Grapplers

Phase-3
•1 ton axles with 5.13's, 8 on 6.5 lug, ARB, full float rear
•Beadlock 17” 8on6.5 wheels - ATX Slabs
•40” x 17” tires
•Sport cage
•4 point Racing Seats
 
Last edited:

StrizzyChris

New member
This is a copy and past from my last build thread. Some of it has changed, but much remains the same. I am being a little more realistic this time in the timeframe that I'll be able to perform this build. It'll be over 1-2 years(hopefully no more) rather than a couple of months like planned/desired before.

The purpose of this thread is to have fun. I will use it to keep the build on track and to hold myself accountable for the build. I also hope it serves as a source of information to other people that are new to Building Big!

Just like many other threads, my continued posts will be pics and info of the build. I will post complications encountered, and solutions to those snags, in as much detail as possible. Please feel free to chime in with recommendations, possible complications I should prepare for! Thanks for reading guys!

Buliding Background
So when I purchased my JK, I knew I couldn’t wait to get it topless, go for a cruise on the weekends, and every other spare chance I got. I imagined taking it down in the creek beds and hill sides of my Southern Ohio home town. I have been around fairly stock jeeps my entire life. The majority of add-ons I have helped with were slightly larger than stock MT tires and VERY mild bolt on lifts. These jeeps were a great time and capable of taking me many of the places I wanted to go. Theeeeeeeeen came my JK.

My original plans were to build it like all the old jeeps I’ve always been in and around. Keep it near stock, place a little bit of money in suspension upgrades, go with 33”-35” tires, and install a mild lift. I then found online forums. They sucked me in with numbers, specs, and possibilities. I read and watching people with these insane (in my mind at the time) lift systems that were capable of running 37”, 40”, and even 42” tires. I couldn’t quit reading of the changes they made to accommodate these upgrades.

Then came all the horror stories and failures from improperly building their rig for the functions they wanted it to perform. Many of these failures were due to shotty aftermarket kits and parts that were built for looks and not function. Many were from going too big on a budget and breaking parts (i.e. Axle tubes or inner knuckles) they could have saved by taking their time and “building it backwards”.

Building it Backwards
As I continued to read I realized that to properly build my rig, I needed to consider the next part “upstream”. Larger tires place stress on the knuckles and axle tubes. They often require an upgrade in gearing to make up for the loss in torque and fuel economy. A lift system (that is lacking proper components) will misalign the track bars, drive shafts, draglink, etc.

Then you will have to think of all the future added weight. Add a sport cage, heavy bumpers, winch, roof rack, heavy full sized spare tire, etc. and you will place added strain on these components that weren't designed for extreme use.

My original thoughts of 33”-35” tires went quickly to 37’s. I started to think out the build and my mind began flirtting with the possibility of 40’s. I know myself all too well, and that I will later regret not building it capable of handling bigger. I also know that I hate to spend money twice! I then made my mind up to build it for the magic number 40!

Building it Bolt-on
I looked at the required components to make an extremely reliable rig and the numbers started to add up. I knew I wanted a Long Arm lift and began noticing that there were MANY good lift systems. Some were bolt-on and some were weld on…..(disclaimer--> I know how to wrench but when it comes to welding and electrical work, my skills are TREMENDOUSLY sub-par. So for anything weld on I would require a professional’s assistance)

I next began contacting shops and quickly realized the labor cost involved in installing the weld on lift kits would range up to and even over $2,500. That’s sometimes more than the cost of the lift itself!!! I could buy my front and rear bumpers with a winch for $2,500!!! Then you factor in other components and you quickly see the cost of install adding up.

This has driven me to research my build for a year. I want to build the best rig I can, while taking all the money saved from installation and reinvesting it into upgraded, more capable, parts.
 

catahoula

Caught the Bug
Can't wait to see the progress. Loving the color. I thought I saw yours in another post. Do you have any pics with the tires?
 
Last edited:

StrizzyChris

New member
Can't wait to see the progress. Loving the color. I thought I saw yours in another post. Do you have any pics with the tires?

I do, but I am wanting to do a few posts here of the "in progress" shots of the items in the order I installed them. just working on uploading and organizing the pics.
 

StrizzyChris

New member
After picking up scorpicon from the stealership, from a head replacement, i got a call from ORE that my stinger was ready. Saw a few familiar faces there being "serviced". To me, it looked more like a slap and tickle. :yup:

Sent from a migrant connectivity device
 

Attachments

  • 1366425438551.jpg
    1366425438551.jpg
    51.6 KB · Views: 3,505
  • 1366425455780.jpg
    1366425455780.jpg
    51.7 KB · Views: 3,522
  • 1366425470837.jpg
    1366425470837.jpg
    53.8 KB · Views: 3,500
  • 1366425479417.jpg
    1366425479417.jpg
    34.4 KB · Views: 3,497

StrizzyChris

New member
So my first installed Item was the LOD Sliders that I ordered from Northridge. They had an awesome sale around christmas where many vendors were between 15-30% off and almost the whole site was on sale. They seem to run the best deals around that time(at least the last 3 years from what I have observed) They also have free shipping, so combined the prices couldnt be beat. The wait time kind of stunk though and took almost 2 months to get them to me, but it was well worth it!

Install was easy. I just removed the stock rock rails. You then slide the sliders up into place for position of final install. You line it up with two existing bolts in the frame where stock belly armor mount to.


You then mark the frame at the spot of the other holes. I used a perm marker.


You'll want to center punch or score the frame to help the drill in starting the frame holes


Next you drill and use some cutting oil. I didnt have any so I used old motor oil to help. My tap for 7/16" bolt says to use a 25/64" drill bit so I had to go out and buy one of those. Also one HUGE WARNING, is to be careful while drilling these holes. I almost snapped my wrist when the drill bit "caught" as it passed through the frame and spun the entire drill. <-Dont say I didnt warn you! :bleh:


After drilling the hole(I used multiple bits to slowly open the hole to be easier on my bits) you will want to get a 7/16" tap. As you can barely see in the picture, I used an adapter and a socket wrench with the tap due to too little of clearance to spin a standard tap handle.


Then you put the sliders back in place and bolt it on!


There are three guards that are screwed onto the face of the sliders to give it a finished look. I believe the older sliders, these were welded in place. I would consider them optional, but I liked the look.


Pics after installing, during the day, and running through some mud.


Prime8

New member
Looks great! Subscribed! My LoD sliders are the old type that have the guards welded in. It's a pain to get mud out of there...
 
i am good any day/evening, except this coming weekend i will be out of town. but we can chat at the S&G and put something together!

andrew -
 
Last edited:

StrizzyChris

New member
sadly, I am moving to San Francisco on the 30th. Im excited, but wanted to go out down here on some runs with you guys before I left. Not sure if we will have enough time before I leave to plan this :sigh:
 

StrizzyChris

New member
Found a Guy selling a brand new AEV Procal for 105 shipped so snagged that up immediately! Just got it in today and reprogrammed my Speedo and disabled my TPMS system

 
Top Bottom