You are using an out of date browser. It may not display this or other websites correctly.
You should upgrade or use an alternative browser.
You should upgrade or use an alternative browser.
ARB High Output On-Board Air Compressor Under the Hood JK Installation Write-Up
- Thread starter wayoflife
- Start date
Yes!! Thank you all for your input but every single one of us was wrong :crazyeyes: ...
It was just corroded battery terminals, it didn't have a good connection. That is why we would get it sometimes to work then other times it wouldn't. We were stumped and baffled as to why we got 12v on the multimeter when testing the battery but still wouldn't turn on. Washed up the terminals and BAM worked like a charm! This thing airs up my 35s no problem LOVE IT! Besides my stupidity this write-up worked wonderfully. Thank you Eddie for taking the time to write and post these up! :beer:
:cheesy: That's awesome and glad that you were finally able to get it figured out :clap2:
cozdude
Guy with a Red 2-Door
How well does this on board air stand up for locker use and filling up 37s, has anyone had any problems or had it break! i like the price and the kit but am scared that it will get a ton of work filling 37s!
great for lockers but slow for 37's from what im told. the twin would be faster since its 100% duty cycle for airing up and the same for lockers.
great for lockers but slow for 37's from what im told. the twin would be faster since its 100% duty cycle for airing up and the same for lockers.
I was airing up 37's with the one in this write-up and it would take about 3-4 min a tire to get from about 15 psi to 30. Granted, my PowerPlant will do that in half the time but still, I didn't think it was that bad.
cozdude
Guy with a Red 2-Door
I was airing up 37's with the one in this write-up and it would take about 3-4 min a tire to get from about 15 psi to 30. Granted, my PowerPlant will do that in half the time but still, I didn't think it was that bad.
that isnt to bad then. i just like how my twin does it in just over a min for my 35's lol
i remember Don complaining about the diference in the powerplant's fill time to the fill time with the single when he was helping me fill my tires last fall when he came out with us. i think that is what made me get the twin lol
Oh yeah, had the twin been out back then, it's what I would have gone with for sure.
Serg5000
New member
How well does this on board air stand up for locker use and filling up 37s, has anyone had any problems or had it break! i like the price and the kit but am scared that it will get a ton of work filling 37s!
Using the twin compressor, I'm filling up 37's from 15psi to 32 psi in 2 to 2 1/2 minutes each. Not to shabby.
Schweaty
New member
Quick question. I'm doing this install in conjunction with the DIY Spod. I'm basically just running a line from the SPOD to the compressor to supply power, everything else (fuse, relay, ground) will be provided within the DIY Spod. But what about the pressure switch? Split the accessory line going to the compressor to supply power to the switch? Help is greatly appreciated.
pvanweelden
New member
^ answered in diy spod thread.
Sent from my SM-N900V using WAYALIFE mobile app
Sent from my SM-N900V using WAYALIFE mobile app
Sharkey
Word Ninja
Finally got around to installing the compressor. Fired it up to take it for a test drive around the block and now my Traction Control dummy light is on and will not shut off. Anyone have any ideas as to what might have happened?
What wire did you tap for the in-cab switch?
IIWorlds
New member
Just wanted to make a quick addition to this writeup after finishing the install on my 2014. First off as someone mentioned earlier I found it nearly impossible to install the mounting bracket and then the compressor. I ended up removing the bracket, mounting the compressor to it, and then bolting them up as a single unit.
Second, I used the Rugged Ridge a pillar switch panel for my install rather than the Daystar. Several people have mentioned they had a difficult time locating a place to connect the blue/white wire. Rather than attempt to run a wire over to the window switch area, I connected it in the drivers door wire harness to an orange/grey wire. Seems to be working well.
That is all. Hopefully it helps someone out.
Sent from my DROID RAZR using WAYALIFE mobile app
I am also using the Rugged Ridge A pillar switch panel, and am not very electrically inclined. My understanding is that the blue/white wire illuminates the switch, and the red/yellow powers the switch. Does your switch illuminate, and what did you hook your red/yellow wire to?
And when you say you connected to an orange/gray wire, what did you use to connect the two? Maybe I'm over thinking this, and it's very simple, but I want to do it right. Thanks!
tatonka56
New member
Hey folks, thought I'd add some pics / explanations to Eddie's write-up. Considering I have a 2014 JKU Rubi-X with the new Evo mount, my install looks quite a bit different. I followed the original write-up as close as I could however, there were some things I just had to change or else I would not have gotten my compressor under my hood. I hope the pics help for all of you out there that have a 2012+. Needless to say, I'm waiting on Northridge4x4 to get me an air filter because ARB apparently thought it'd be a good idea to leave it out of my box. 
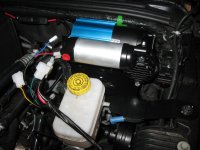
This is what the unit looks like installed behind the master cylinder. ** I had to use a Dremel and cut the back two protruding carriage bolts (closest to the fire wall) to get the mount to fit. No one that I know of had mentioned this before so I have no idea how you managed to get the mount to fit without trimming the carriage bolts. **
Instead of mounting the relay vertically using a zip-tie I decided to bolt it here using the pre-existing bolt. Worked well and I didn't have to drill/tap anything. Why no one said this before, who knows...that's why I took a pic of it.
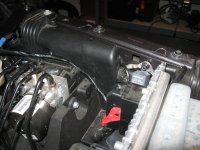
I had to relocate the horn. I know some folks had mentioned this before, but no one attached any pics so I had to get creative. Works like a charm!
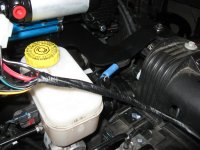
I used the original horn mount and just bolted it on using the driver's side master cylinder bolt.
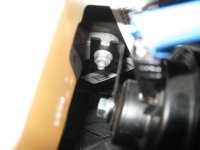
Instead of running my switch wires in from the passenger side, I simply did the same thing as the write-up described but went through the driver's side.
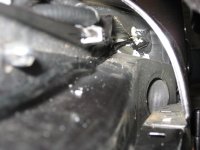
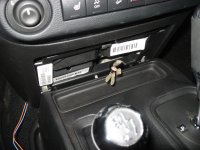
There wasn't a good pic of the isolation switch wires coming up from the bottom of the console, so this is what it looks like. There was just enough play to wire the switch.
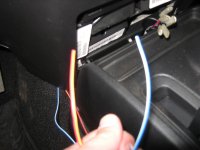
These are the remaining two wires everyone seems to have difficulties with. I'm assuming since I'm not running more than one switch (no air-lockers) I'll run the orange wire back to the battery. If that doesn't work I'll run both wires back to the battery to give my switch light power.
I hope I've helped some of you out there like me who had been scratching their head. This is a good write-up, but it definitely needs some updating for the 2012+ JK's out there. Thanks again!
This is what the unit looks like installed behind the master cylinder. ** I had to use a Dremel and cut the back two protruding carriage bolts (closest to the fire wall) to get the mount to fit. No one that I know of had mentioned this before so I have no idea how you managed to get the mount to fit without trimming the carriage bolts. **

Instead of mounting the relay vertically using a zip-tie I decided to bolt it here using the pre-existing bolt. Worked well and I didn't have to drill/tap anything. Why no one said this before, who knows...that's why I took a pic of it.

I had to relocate the horn. I know some folks had mentioned this before, but no one attached any pics so I had to get creative. Works like a charm!

I used the original horn mount and just bolted it on using the driver's side master cylinder bolt.

Instead of running my switch wires in from the passenger side, I simply did the same thing as the write-up described but went through the driver's side.

There wasn't a good pic of the isolation switch wires coming up from the bottom of the console, so this is what it looks like. There was just enough play to wire the switch.

These are the remaining two wires everyone seems to have difficulties with. I'm assuming since I'm not running more than one switch (no air-lockers) I'll run the orange wire back to the battery. If that doesn't work I'll run both wires back to the battery to give my switch light power.

I hope I've helped some of you out there like me who had been scratching their head. This is a good write-up, but it definitely needs some updating for the 2012+ JK's out there. Thanks again!
Hey folks, thought I'd add some pics / explanations to Eddie's write-up. Considering I have a 2014 JKU Rubi-X with the new Evo mount, my install looks quite a bit different. I followed the original write-up as close as I could however, there were some things I just had to change or else I would not have gotten my compressor under my hood. I hope the pics help for all of you out there that have a 2012+. Needless to say, I'm waiting on Northridge4x4 to get me an air filter because ARB apparently thought it'd be a good idea to leave it out of my box.
This is what the unit looks like installed behind the master cylinder. ** I had to use a Dremel and cut the back two protruding carriage bolts (closest to the fire wall) to get the mount to fit. No one that I know of had mentioned this before so I have no idea how you managed to get the mount to fit without trimming the carriage bolts. **
View attachment 85754
Instead of mounting the relay vertically using a zip-tie I decided to bolt it here using the pre-existing bolt. Worked well and I didn't have to drill/tap anything. Why no one said this before, who knows...that's why I took a pic of it.
View attachment 85760
I had to relocate the horn. I know some folks had mentioned this before, but no one attached any pics so I had to get creative. Works like a charm!
View attachment 85755
I used the original horn mount and just bolted it on using the driver's side master cylinder bolt.
View attachment 85756
Instead of running my switch wires in from the passenger side, I simply did the same thing as the write-up described but went through the driver's side.
View attachment 85757
There wasn't a good pic of the isolation switch wires coming up from the bottom of the console, so this is what it looks like. There was just enough play to wire the switch.
View attachment 85758
These are the remaining two wires everyone seems to have difficulties with. I'm assuming since I'm not running more than one switch (no air-lockers) I'll run the orange wire back to the battery. If that doesn't work I'll run both wires back to the battery to give my switch light power.
View attachment 85759
I hope I've helped some of you out there like me who had been scratching their head. This is a good write-up, but it definitely needs some updating for the 2012+ JK's out there. Thanks again!
You're a little arrogant with your first real post, aren't you? Just in case it wasn't "mentioned".
tatonka56
New member
You're a little arrogant with your first real post, aren't you? Just in case it wasn't "mentioned".
Really? Sorry, guess I didn't know that if I hadn't posted a bunch I didn't know what I was talking about. Let me know how many posts I should have before I try help others.
Really? Sorry, guess I didn't know that if I hadn't posted a bunch I didn't know what I was talking about. Let me know how many posts I should have before I try help others.
Has nothing to do with post count. There's a difference between helping others and criticizing someone's write up by saying "don't know why it wasn't mentioned".( More than once even)
MTG
Caught the Bug
Hey folks, thought I'd add some pics / explanations to Eddie's write-up. Considering I have a 2014 JKU Rubi-X with the new Evo mount, my install looks quite a bit different. I followed the original write-up as close as I could however, there were some things I just had to change or else I would not have gotten my compressor under my hood. I hope the pics help for all of you out there that have a 2012+.
...
No one that I know of had mentioned this before so I have no idea how you managed to get the mount to fit without trimming the carriage bolts. **
...
Why no one said this before, who knows...that's why I took a pic of it.
...
I had to relocate the horn.
...
This is a good write-up, but it definitely needs some updating for the 2012+ JK's out there. Thanks again!
Funny, EVO's "new" bracket is a couple of years old. I've been running it for about that long and I "somehow" managed to get mine installed without cutting the carriage bolts, relocating the horn, or running wires across the brake reservoir. In fact, most of the stuff you mentioned I've never heard before. I agree that your post seems more intent on being critical than helpful. :thinking:
