wwood
Member
Just got the Genright carrier (aluminum version) delivered yesterday.
I had a bunch of questions before ordering that were answered when I got my hands on it.
Here are some pics and info which might help anybody thinking about a swing out tire carrier.
First of all the carrier arrived in huge box and it was in good shape. One reason I chose the alum version was my assumption that the carrier was shipped bare, no box. I had seen other pics of new carriers and they were bare and had UPS stickers on them. I might have ordered the steel version powder coated if I knew it would come in a good box and not have half the powder coat scratched off by UPS.
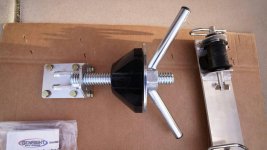
Second, the carrier looks beefier and better in real life than in pics. It really is nicely made and certainly looks strong as hell. The hardware also looks first class. I hate cheezy, flimsy stuff of any type.... not a problem with this carrier. The passenger side hinges are all 3/16" steel... big, heavy, plenty strong looking. They rotate on 9/16" grade 8 bolts with big hard plastic/rubber bushings. Looks to be very solid. The driver's side mounting plate is all aluminum with the same big plastic/rubber bushings and bumpers secured by 1/2" push in/out pins. I don't like the looks of the push pins. Not doubting they will work fine but to me they are ugly so I will look for something better looking.
I am going to install the carrier over PSC rear corner guards. That is going to require some fiddling, grinding, etc since the passenger side guard does not fit around the Genright hinges and needs to be reshaped a little. Will post more when I get to that install.
The aluminum carrier itself weighs 21 lbs. The box of hardware parts weighs 14 lbs, so that's about 13 lbs actual hardware minus the box itself, for a total weight of 34 lbs. The shipping weights Genright gave me were about 20 lbs heavier for the steel version, so the steel version should come out to about 54 lbs? I used an accurate postal package scale to weigh this stuff. The light weight is the main reason I went with the Genright instead of the EVO carrier which I really love the looks of. Plus the EVO rear corner guards look like a bear to install whereas the PSC corners are very well form fitted and lighter (1/8" steel plate instead of EVO's 3/16" plate).
Could not tell from forum pics exactly how the tire is held on the carrier. Now I see. The wheel/tire hangs on a threaded steel bar that goes thru the bore of the wheel, no lugs or lug nuts to worry about. The tire itself contacts the inside of the carrier and is held there by a threaded nut with bar handles which forces a cone shaped hard plastic/rubber gizmo into the wheel bore that also centers the bore of the wheel on the threaded bar so there is no metal to metal contact between the wheel bore and the threaded bar. Very easy to use and very secure. The wheel itself make no contact with any other metal, the only thing touching the wheel is the cone shaped plastic gizmo in the bore pushing the tire against the carrier. The tire makes no contact with the tailgate. Have not installed anything yet but rubber bumpers on the tailgate might be helpful depending on tire size. I have 35x12.50 Toyos, don't yet know how close to the tailgate the tire will ride.
Here are the pics:


Any questions or requests for different pics, just ask.
I had a bunch of questions before ordering that were answered when I got my hands on it.
Here are some pics and info which might help anybody thinking about a swing out tire carrier.
First of all the carrier arrived in huge box and it was in good shape. One reason I chose the alum version was my assumption that the carrier was shipped bare, no box. I had seen other pics of new carriers and they were bare and had UPS stickers on them. I might have ordered the steel version powder coated if I knew it would come in a good box and not have half the powder coat scratched off by UPS.
Second, the carrier looks beefier and better in real life than in pics. It really is nicely made and certainly looks strong as hell. The hardware also looks first class. I hate cheezy, flimsy stuff of any type.... not a problem with this carrier. The passenger side hinges are all 3/16" steel... big, heavy, plenty strong looking. They rotate on 9/16" grade 8 bolts with big hard plastic/rubber bushings. Looks to be very solid. The driver's side mounting plate is all aluminum with the same big plastic/rubber bushings and bumpers secured by 1/2" push in/out pins. I don't like the looks of the push pins. Not doubting they will work fine but to me they are ugly so I will look for something better looking.
I am going to install the carrier over PSC rear corner guards. That is going to require some fiddling, grinding, etc since the passenger side guard does not fit around the Genright hinges and needs to be reshaped a little. Will post more when I get to that install.
The aluminum carrier itself weighs 21 lbs. The box of hardware parts weighs 14 lbs, so that's about 13 lbs actual hardware minus the box itself, for a total weight of 34 lbs. The shipping weights Genright gave me were about 20 lbs heavier for the steel version, so the steel version should come out to about 54 lbs? I used an accurate postal package scale to weigh this stuff. The light weight is the main reason I went with the Genright instead of the EVO carrier which I really love the looks of. Plus the EVO rear corner guards look like a bear to install whereas the PSC corners are very well form fitted and lighter (1/8" steel plate instead of EVO's 3/16" plate).
Could not tell from forum pics exactly how the tire is held on the carrier. Now I see. The wheel/tire hangs on a threaded steel bar that goes thru the bore of the wheel, no lugs or lug nuts to worry about. The tire itself contacts the inside of the carrier and is held there by a threaded nut with bar handles which forces a cone shaped hard plastic/rubber gizmo into the wheel bore that also centers the bore of the wheel on the threaded bar so there is no metal to metal contact between the wheel bore and the threaded bar. Very easy to use and very secure. The wheel itself make no contact with any other metal, the only thing touching the wheel is the cone shaped plastic gizmo in the bore pushing the tire against the carrier. The tire makes no contact with the tailgate. Have not installed anything yet but rubber bumpers on the tailgate might be helpful depending on tire size. I have 35x12.50 Toyos, don't yet know how close to the tailgate the tire will ride.
Here are the pics:
Any questions or requests for different pics, just ask.