Smittybilt Atlas

okeedoky0

New member
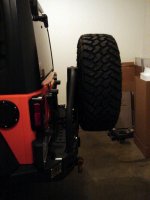
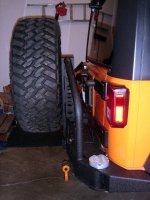
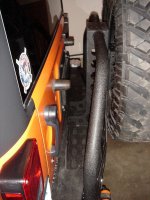
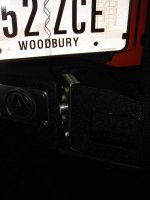
Just finished installing the Atlas rear bumper and tire carrier. The instructions, once I received the correct ones, sucked to say the least. Everything fit except for the bracket that is inserted into the frame rail to attach the bumper to. I had to enlarge the oblong opening on the drivers side about 1/8 inch to get the bolt to hit the hole on the mounting bracket. I am having some trouble with the latching mechanism. I can get it to latch on the first stage but then if I bump the tire carrier it comes undone. It will not engage the 2nd stage of the latch. I have added a washer to the latch post just to be sure it is not hitting the end of the post and it is dead center. I am sure there is a way to adjust the mechanism to allow it to latch but I have not figured it out. I am very pleased with the finish and look of this bumper but I wish they would think when they are writing the install instructions. Most of teh time it would just say "Install such and such part" but would not say which bag of nuts and bolts to use to do it or show any detailed pics of what they wanted installed.
 

marcmarcJK

New member
I have been looking at this bumper. I like you can add things onto the carrier such as cans and jack. Do you have any pics of the instal or completion?

Thanks
 

okeedoky0

New member
Here are a few pics of my Smittybilt Atlas bumper and tire carrier. I will post more as I take them.
A few things I noticed on the install were:
1. I had to enlarge the bolt hole on the drivers side frame rail to get the bolt to line up with the receiving nut on the frame bracket.
2. I had to grind out the powder coating in the bottom hole for the tire carrier pin in order for it to seat all the way down.
3. If you dont have a press then you will need a vise to hold the tire carrier bracket so you can get the tire studs in the holes by threading a nut on and tightening it up.
4. The latch will more than likely not work from the factory and you will need to loosen the 4 bolts and slide it forward as far as it will go.
5. I had to add a washer to the latch stud in order for the latch to catch it correctly.
6. If you are going to use the 3rd brake light assembly you will have to reroute your wiring and add some length to it. To do it right you will need to drill a hole in the tire carrier arm and fish the wires through.
7. Not sure how to cover the hole in the tailgate left by the original 3rd brake light wiring yet. Any suggestions?
8. Instructions from Smittybilt suck and they may provide you with some extra parts. Be prepared for the part numbers in the instructions to be different than the ones on the seperate bags.....
9. A 315/70/17 tire mounted on a rim is heavy to lift almost above your head.....

With that said, I am very happy with the outcome and I should be used to things not going as they should at the age of 43 ... but I am not.
If anyone receives this kit and does not receive the directions I will be scanning them in and posting them in a seperate post titled Smittybilt Atlas 76896.
I also may get ambitious and get some detailed pics so I can create a write up for the install.
 

Attachments

  • Smittybilt Atlas Install 1.jpg
    Smittybilt Atlas Install 1.jpg
    103.6 KB · Views: 86
  • Smittybilt Atlas Install 2.jpg
    Smittybilt Atlas Install 2.jpg
    141.6 KB · Views: 85
  • Smittybilt Atlas Install 3.jpg
    Smittybilt Atlas Install 3.jpg
    144.4 KB · Views: 82
  • Smittybilt Atlas Install 4.jpg
    Smittybilt Atlas Install 4.jpg
    76.3 KB · Views: 84
Top Bottom