Rock Hard Rear Bumper/Tire Carrier Install

pastorwug

New member
Anyone have a copy or a link to the Rock Hard brand rear bumper and carrier.
Rock Hard doesn't post them on their website, neither does Quadratech.

I bought this used and it didn't come with any info, I'm having some sloppiness issues with it and it might help for me to see the install instructions.

Thanks
 

2013CGJKU

Member
The closest thing I could find for you was a writeup over on JK-forum.com. I'm not going to direct link to another forum but I found it by googling.

Levi

2013 CG JKU 6-speed
 

13gecko

New member
Anyone have a copy or a link to the Rock Hard brand rear bumper and carrier.
Rock Hard doesn't post them on their website, neither does Quadratech.

I bought this used and it didn't come with any info, I'm having some sloppiness issues with it and it might help for me to see the install instructions.

Thanks

I had that rear bumper before my EVO one. Maybe you could kinda explain what the sloppiness is? That way I could try to help you out.

Sent from my SCH-I545 using WAYALIFE mobile app
 

pastorwug

New member
There were two rubber bumpers that came with the tire carrier that bolt into the former OEM (Tramp Stamp) area.
The guy I got the bumper/carrier from said the rubber bumpers could be purchased at any hardware store like Home Depot.
Mine slowly wore out and so I went to HD to find that they don't have them, neither does OSH.
I call Rock Hard and explain my dilemma and they (very kindly) send me two rubber bumpers for free.
I'm just guessing that the carrier requires two rubber bumpers that the swinging carrier pushed up against to keep it from constantly rattling.

One of the rubber bumpers they sent me was small and rather hard, the other was twice as big (diameter) and seemed out of place on the tramp stamp bar.

I'll get some pictures later after the wedding I have to do today.

Any help appreciated.
 

13gecko

New member
Well i guess i can't help at all....lol I didn't get a bar for the tramp stamp...guess I got screwed. I see what you mean from looking online at some pics. I ran mine without the bar obviously and mine didn't rattle hardly at all after Eddie kindly helped out. Let me see if I can find the link.

Sent from my SCH-I545 using WAYALIFE mobile app


***EDIT***
Couldn't copy and past the link from my phone for some reason, so here is what Eddie told me.


Eddie said, "I have worked with the guys at Rock Hard for a long time and I really like them but, I have to say that this is one of the reasons why I have a hard time recommending their rear bumper tire carrier. When running a big heavy spare, there is enough leverage to cause the tire carrier to move around and cause an annoying thumping or rattle. One thing you can do to help mitigate this (on any bumper like it) is to do the following:

1. Remove the spare.
2. Loosen the frame mount bolts.
3. Open the tire carrier so that it sits 90° from the cross member.
4. Lift up the end of the tire carrier with a Hi-Lift so that the entire bumper rotates up as high as possible (shouldn't be too much with the bolts in place).
5. Tack weld the base of the mounting flanges to the frame.
6. Tighten up the bolts.

This will help keep the tire carrier pressed more firmly up against the tailgate and that should help"
 
Last edited:

13gecko

New member
Well i guess i can't help at all....lol I didn't get a bar for the tramp stamp...guess I got screwed. I see what you mean from looking online at some pics. I ran mine without the bar obviously and mine didn't rattle hardly at all after Eddie kindly helped out. Let me see if I can find the link.


Sent from my SCH-I545 using WAYALIFE mobile app


Sent from my SCH-I545 using WAYALIFE mobile app
 

pastorwug

New member
I can see how Eddie's suggestion/fix would work well, but don't have a welder at home anymore.

I think I'll live with it until after the Rubicon Run in June and then spring the Savings open again for a EVO tire carrier.
Thanks for your help.
 

13gecko

New member
I can see how Eddie's suggestion/fix would work well, but don't have a welder at home anymore.

I think I'll live with it until after the Rubicon Run in June and then spring the Savings open again for a EVO tire carrier.
Thanks for your help.

Sorry I couldn't actually help you out. If it's any comfort I really liked the Rock Hard bumper and tire carrier. It's definitely very well made.

Sent from my SCH-I545 using WAYALIFE mobile app
 

madmax

New member
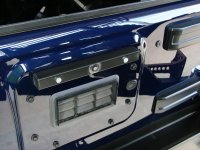
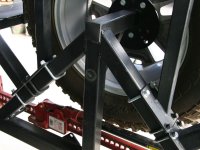
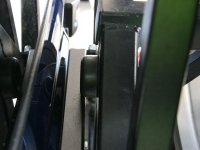
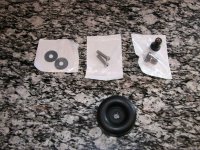
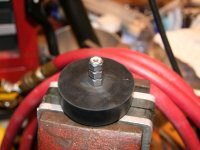
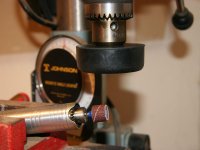
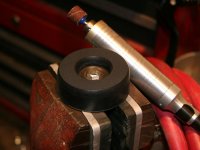
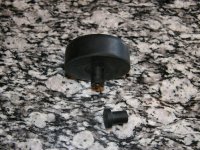
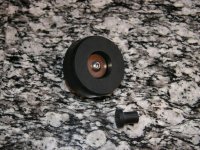
I guess I've lurked on this site for long enough and it's time for my first post. I had the same issue with my Rock Hard rear bumper / tire swing. They give your two rubber bumpers to choose from - one too small and one too large. I started out with the smaller one and used a couple of fender washers to make it the right thickness. The method they use to attach the bumper to the tire swing is not well thought out. Using a self tapping screw (course threads) to attach something to a relatively thin wall tube will not lead to anything good. On one of my first off road trips after installing the rear bumper / tire swing, the self tapping screw snapped off. I drilled it out to a larger size and although the larger screw didn't snap, there is just not enough thread "purchase" to stay tight. I realized I had to figure out a better way to do this. As you can see in picture 1, the rub rail shows a lot of wear from the bumper becoming loose and the screw head coming into contact with the rub rail. A little sanding and some spray paint took care of this. Picture 2 shows wear marks on the tire swing as well. Picture 3 shows the tire swing closed and the larger bumper resting on the rub rail (to show that it is too thick). Picture 4 shows some 1" fender washers, some 1/4X20X1" socket head bolts, some 1/4X20 rubber "well nuts" and the thicker bumper. Picture 5 shows that I have taken a longer 1/4X20 bolt and attached it to the rubber bumper with some nuts with nylon inserts. Line the nuts up so that your drill press chuck jaws can grab them properly. Picture 6 shows that I used a sanding drum in a rotary tool to reduce the thickness of the rubber bumper. Picture 7 shows the final results. Obviously, you will have to measure and take a little off at a time so that you don't remove too much material. You want a very snug fit. Picture 8 shows that I have cut off the head of the well nut with a razor blade (so that the rubber bumper can sit against the tire swing) and attached it to the bumper. Drill the tire swing out to accept the well nut, put it in place, tighten the socket head bolt and the rubber will expand and hold the bumper in place. This rubber joint is much better than using a self tapping screw to attach the bumper as it soaks up the vibrations and does not loosen up. Since I made this modification, I have not had any problems. It now takes a really rough road before I hear any noise from the tire swing.
 

Attachments

  • 1.jpg
    1.jpg
    111.6 KB · Views: 84
  • 2.jpg
    2.jpg
    99.4 KB · Views: 82
  • 3.jpg
    3.jpg
    72.7 KB · Views: 81
  • 4.jpg
    4.jpg
    186.7 KB · Views: 79
  • 5.jpg
    5.jpg
    96.7 KB · Views: 79
  • 6.jpg
    6.jpg
    77.2 KB · Views: 78
  • 7.jpg
    7.jpg
    84.8 KB · Views: 79
  • 8.jpg
    8.jpg
    161.9 KB · Views: 78
  • 9.jpg
    9.jpg
    164.4 KB · Views: 77

pastorwug

New member
Thanks Madmax for helping out on your first post on this Forum - welcome! :standing wave:

AND, I'm going to try exactly what you suggested. :thumb:
 
Top Bottom