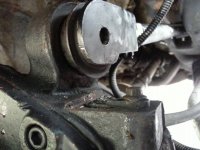
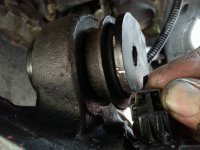
Problem with Currie Control arms

rinkishjk

New member
I got my new Currie control arms, and went to install the fronts yesterday.... I removed and started with the left upper. I set the arms to the length of the old tf ones, and once I went to install it the end that goes on to the axle was to big and was hitting the plug on the top of the axle housing for the locker. It would not go down far enough to put the bolt through. This was puzzling that it didn't fit. So in fear of breaking that plug I reluctantly ground down the ear on the control arm end to clear the plug. I went to install it and it still hit the plug, and it snapped it off! Now I'm kinda pissed that I had to modify this control arm to fit a stock Rubicon axle... So I called Currie and spoke to Tom. He said they have sold tons, and installed a ton of these arms and never heard of this issue. I sent him these two pics and I am still waiting to hear back. He was gonna talk to John Currie about it. I also called Northridge where I bought em, and was pretty much told the same thing that this has never happened. So my question is has anyone on here had this issue? I never had any clearance problems with the tf arms.
 

Attachments

  • 1402659906243.jpg
    1402659906243.jpg
    63.3 KB · Views: 324
  • 1402659919881.jpg
    1402659919881.jpg
    60.3 KB · Views: 327

cozdude

Guy with a Red 2-Door
wow thats weird indeed. im sure they will work with you to resolve the issue. keep us updated!
 

rinkishjk

New member
Wrong side? Upside down?

Levi

2013 CG JKU 6-speed

They really can only go on one way. And both sides are the same.
I think I'm gonna change out that bushing in the axle since I have one and the plug is now out of the way unfortunately.
 

utiadam

LOSER
My guess would be the bushing isn't all the way seated. Maybe its starting to walk out or was never fully seated to begin with. It doesnt appear to be a height issue but more of a width issue.

edit - I'll try to get under mine in a little while to snap a pic of the upper bushing. Ill post it up afterwards.
 

utiadam

LOSER
I at a jeep meet last night and I took a quick look at a friends jeep. He has all 8 Currie control arms but not rubicon so no locker connector. As far as the bushing goes it looked just like yours.
 

rinkishjk

New member
I at a jeep meet last night and I took a quick look at a friends jeep. He has all 8 Currie control arms but not rubicon so no locker connector. As far as the bushing goes it looked just like yours.

Thanks for confirming that. I got all the arms in and didn't have any issues with any other arms. Feels solid on the road. Still have to get the that plug and replace it.
 

rinkishjk

New member
An update on this since I haven't heard from Tom at Currie until today. They brought up this issue at their weekly meeting I was told. No one has had this problem. They are sending me a Johnny joint kit for the axle housing, which I think is way above and beyond of them. They also would like me to measure how much space is between the bushing flange and the housing. They have a pic with 0.26" clearance. I still have to get the plug for the housing, but I'm quite happy the way this turned out.
 
An update on this since I haven't heard from Tom at Currie until today. They brought up this issue at their weekly meeting I was told. No one has had this problem. They are sending me a Johnny joint kit for the axle housing, which I think is way above and beyond of them. They also would like me to measure how much space is between the bushing flange and the housing. They have a pic with 0.26" clearance. I still have to get the plug for the housing, but I'm quite happy the way this turned out.

:thumbup: Way to go Tom and Currie!:thumbup:

sent while sitting on the crapper
 
On the 3 rubicon lifts I have done, 1 Currie arms, 1, Metalcloak arms, and 1 Rock Krawler arms. They all hit the plug until the bolt was in and tight. Once torqued there was plenty of room. I just left the connector off until I got em' tight.

I don't know if this would work for you but its what I did.
 

rinkishjk

New member
On the 3 rubicon lifts I have done, 1 Currie arms, 1, Metalcloak arms, and 1 Rock Krawler arms. They all hit the plug until the bolt was in and tight. Once torqued there was plenty of room. I just left the connector off until I got em' tight.

I don't know if this would work for you but its what I did.

U should call Currie and tell them that. The plug snapped off where it goes into the housing. The end is fine, and once I get the new plug that goes into the housing the wiring will plug right onto it.
 
U should call Currie and tell them that. The plug snapped off where it goes into the housing. The end is fine, and once I get the new plug that goes into the housing the wiring will plug right onto it.

I'm not sure why I should call... To tell them their arm is close like everyone elses I've installed but works okay in the end? :thinking:
 

rinkishjk

New member
I'm not sure why I should call... To tell them their arm is close like everyone elses I've installed but works okay in the end? :thinking:

I was kidding about calling. I never had an issue with my tf arms I removed. Plenty of room in that area due to the design of the end of the arm.
 
Oh... gotcha...

I don't know anything about TF arms but I could see where this could be an issue. The stock arms have a "hat" or gusset that holds the bolting flanges in place through the welding process. Many aftermarket arms (all of the ones I have seen) just bend the flat stock for the bolt flanges. Then, when it gets welded to the arm itself, the metal pulls and slightly spreads the flanges open. Once the bolt is in and tight the flanges get squeezed and there is no issue, but until then the wider spacing interferes with the connector.

You can see in your picture that there is a gap where the flange isn't touching the bushing....

(I have made a bunch of assumptions on the manufacturing process here, but I have been in a bunch of factories and have automated a bunch of processes... This is how I would tackle making this part.)

A fix would be to: 1) overbend the part before welding, but then you would have to know exactly what the pull would be. Ambient temperatures and the metallurgy itself would all be a factor, or 2) rebend the flanges after the weld, but this is double handling and that means $$$. In the end, the manufacturing solutions are expensive for a relatively easy issue to get around at install.

Anyway, glad you got taken care of! and happy Jeeping.
 
Top Bottom