wwood
Member
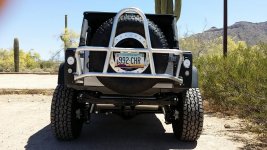
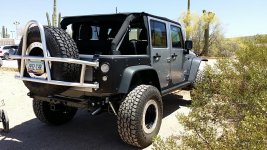
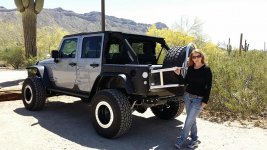
When I was planning my Jeep build last fall I wanted to know if I could install a GenRight Off Road (GOR) tire carrier over Poison Spyder Custom (PSC) JK Rear Corners and make it work and look OEM. Called GOR and PSC and asked their tech support people. Both said we never tried it so we can't say for sure but it probably can be made to work. Google found one photo showing it could be done but no detailed writeup or close up pics. Decided to give it a try and very glad I did, the combo looks and works perfect - my favorite mod by far.
There are plenty of install videos and writeups on the GenRight carrier and PSC corners separately so I won't go into those details. I will just point out how I handled the combination of the carrier and rear corners and some other stuff that was not in the instructions or videos. Here are the videos I used to help with the install (I also used the PSC and GOR written instructions that came with the parts):
http://www.youtube.com/watch?v=6a3u6CQRJoY#t=735
http://www.youtube.com/watch?v=jxldAD6mWTc
http://www.youtube.com/watch?v=wzUa9UnZw8A
My Install Sequence:
1) Install GOR hinges
2) Fit passenger side PSC corner cutouts around GOR hinges
3) Install passenger side PSC rear corner
4) Install driver's side PSC rear corner
5) Install carrier on GOR hinges
6) Install GOR latch plate on driver's side PSC rear corner
7) Install spare tire/wheel on carrier, adjust carrier/latch plate fit
8) Install lights
Nutserts:
The PSC rear corners require 25 (5/16") nutserts for a full installation - you will use only 22, the 3 nutserts on the driver's side corner nearest the tailgate are omitted if installing the GOR carrier because the latch plate covers the nutsert holes and makes them unnecessary.
Drilling nutsert holes accurately and installing them properly is the hardest part of the job but it is pretty easy if you get the right tools. Good tools are expensive but, in my opinion, worth every penny.
Drilling round, accurately placed, burr free holes in Jeep sheetmetal with standard twist drills (even new cobalt drill bits) is not easy. I tried a few test holes and concluded that using twist drills was too risky for me (brand new 2013 Jeep) so I bit the bullet and ordered better tools.
Recommended special tools:
1) Rotabroach hole cutters - these bits are specifically designed to drill accurately placed, perfectly round, burr free holes in sheetmetal in one step. These babies are fantastic, they are way faster than twist drills because they cut less metal (only cut the outer circle, the middle comes out as a plug), do not require a pilot hole and they cut perfect holes that can be exactly centered on a punch mark. And it only takes a test hole or 2 to get the "feel" for starting the bit and drilling the hole correctly. I drilled over 50 nutsert holes in my Jeep during my build project and every one is perfect. Never could have done that without these bits. You will need a 17/32" bit for the rear corner nutserts and 1/4", 5/16" and 1/2" bits for the GOR latch plate holes.
If you decide to use standard twist drill bits, definitely follow PSC's install instructions to clamp the corners on the Jeep very solidly and use the factory predrilled holes in the corners as drill bit guides. The twist drill method requires a 5/16" bit for the pilot hole using the clamped on corner as a drill guide, then the corner is removed and the holes are enlarged with a 17/32" bit. If you use this method I suggest practicing on similar sheetmetal until you are able to drill clean holes without distorting the sheetmetal or creating significant burrs on the inside of the hole.
Here is the Rotabroach website for more info and sales:
http://shop.blairequipment.com/Rotabroach-Cutters-s/2.htm
I bought the 1/4" and 17/32" bits directly from Blair but bought this kit from Amazon (about $65) since it was cheaper there. The kit includes the 5/16" and 1/2" bits and the arbor/pilot to hold the bits:
http://www.amazon.com/Blair-Equipment-11090N-Rotabroach-Cutter/dp/B000LQOCRK
PSC uses these bits to install their corners and armor on customer Jeeps.
2) Another tool that made a big drilling accuracy difference is a transfer punch set instead of a standard center punch. Transfer punches come in a set like drill bits, you choose the punch that fits the mounting hole in the item you are attaching to the Jeep. The punch makes a nice deep mark on the Jeep sheetmetal that is automatically centered in the mounting hole, thereby eliminating any inaccuracy that occurs trying to guess center of the hole with a center punch. The Rotabroach bits have a centerpunch like pilot that fits into the transfer punch mark and insures perfect alignment.
I bought punch set from Amazon (Flexbar) for about $20 but that set is no longer available from Amazon so here is the maker's webpage:
http://www.flexbar.com/shop/pc/TRANSFER-PUNCH-SET-p3099.htm - current price $20.
3) The third tool is the Marson 325-RN, nutsert install tool. This is a pro level tool that really works and with a little practice insures that you will get your nutserts installed properly, not tilted, not too tight, not too loose. Cheaper tools can be made to work but you might get a few messed up nutserts that spin or otherwise need to be replaced. If you get the Marson make sure you also order the 5/16-18 mandrel and nosepiece. PSC also uses the Marson tool for installing nutserts. There are other nutsert tools, some a lot cheaper. In my experience, you get what you pay for in tools.
Here is where I bought my Marson, on sale for $138:
https://www.blindrivetsupply.com/325RN.html - current price last time I checked $186 - wait for another sale or try Zoro:
http://www.zoro.com/g/00038178/k-G2...Ck0kqvuj-XqVE8-tLzqePrwQrXAZmt07QJBoCmxzw_wcB - current price last time I checked $138
I strongly recommend that you test install at least several nutserts in actual Jeep sheetmetal before touching your Jeep. I used the round area where the tail lights go which gets cut out. You need several tests to get the tool adjusted and get the feel for using the tool. The nutserts will not spin under normal torque for the screws used to install the corners if installed correctly. Messed up nutserts are a major pain to fix so doing them right the first time is well worth the effort.
Fitting the PSC corners around the GOR hinges:
The PSC passenger side rear corner has cutouts that are designed to fit around the Jeep factory tailgate hinges but the GOR replacement hinges are bigger than the factory hinges and won't fit into the factory PSC hinge cutouts. This requires removing material to make the PSC hinge cutouts big enough to fit around the GOR hinges. I used a metal cutoff wheel and a metal grinding wheel in a 4.5" angle grinder and a smaller cutoff wheel in a die grinder then rounded off the sharp edges of the cuts with a file. I enlarged the PSC cutouts in stages a little at a time so they would fit with a small gap around the GOR hinges. You can see from my pics how it turned out. Based on my test fits you cannot make the cutouts much if any smaller than I ended up with. It would be a lot easier to make the cutouts bigger than I did and it would still look fine if you prefer bigger gaps. I like the close fit but it does require more time and trial fitting to keep the gaps small and keep them consistent around both hinges. I do not recommend that you simply measure the GOR hinges and then cut the hinge cutouts to final size without making gradual cuts and trial fits. This would be fast and easy but might not work out because the gaps might be different on the top and bottom hinges due to variations in Jeep dimensions and the PSC corner cutouts.
The sequence on this fitting work is important. If you are shooting for a close fit, it's best to first fit the corner cutouts around both GOR hinges before marking/drilling the nutsert holes for the passenger side corner. So the steps are: 1) install GOR hinges, 2) cut PSC hinge cutouts a little bigger, 3) test fit corner on Jeep, 4) mark cutout with magic marker where more material must be removed, 5) remove more material from corner cutout, 6) test fit corner again..... Repeat this process until the cutouts fit around both GOR hinges to your satisfaction. When test fitting on the Jeep, make sure you are holding/clamping the corner as it will actually fit when finally installed. Use painters tape or magic marker to make sure you have this right. When the corners fit the hinges correctly hold/clamp the corner to the Jeep and mark the nutsert holes with a transfer punch.
When installing the GOR latch plate.....
Take your time here as well, the location of the latch plate is very important to the looks and proper opening/closing of the carrier. The latch plate is attached with 7 stainless bolts (five 1/4" diameter bolts and two 5/16" diameter bolts). The basic idea is to drill holes through the rear corner and Jeep tub, including the inner layer of sheetmetal. This job is complicated by the inner layer of Jeep sheetmetal which is not flush against the outer layer or parallel in some places. Plus if you are using Rotabroach bits, they only drill to a depth of 1/4" so they will not reach the inner layer of sheetmetal where the gap between the layers is more than 1/4".
Before installing the latch plate, the PSC driver's side rear corner must be installed (temporarily) and bolted to the Jeep tub (except for the last 3 nutserts nearest the tailgate opening which are omitted). The GOR carrier must also be installed on the passenger side hinges and rough leveled (no tire/wheel mounted) with the hinge bolts snugged up fairly tight. The latch plate is then attached to the driver's side carrier arms with the hinge pins (no mounting bolts in the latch plate) so it can be pushed against the Jeep tub to mark the mounting holes.
Close the carrier to push the latch plate against the rear corner and adjust the plate height so the main carrier tubes are level/parallel with the top of the tailgate. I would not rely on a level on the carrier (too many variables). Instead, stand back and eyeball the carrier and prop it up/dn until level/parallel with top edge of the tailgate. Then adjust the latch plate position side-to-side. There is some play in the latch plate hinge pin holes and the latch plate can be pushed a little toward the passenger side or drivers side. Position the plate to clear your tail lights on the left side and as close to the tailgate opening as possible without extending beyond the PSC rear corner metal.
On my Jeep, I located the latch plate in the middle of the hinge pin play to make it easy to insert/remove the pins. In that position, the right edge of my latch plate was too close to the tailgate opening, it also overlapped the leading edge of the rear corners a little which looked bad. So I trimmed about 1/8" off the right side long edge of the latch plate with an angle grinder, turned out perfect.
When you have the latch plate where you want it, clamp it to the tub, swing the carrier out of the way and mark the mounting holes with a transfer punch.
If you have the skill and experience to drill accurately placed clean holes in automotive sheet metal with twist drills simply follow the Genright video and written instructions. If not, I strongly recommend Rotabroach bits for this job as well.
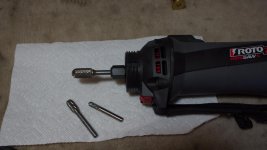
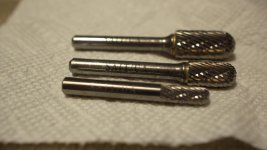
Keep in mind that the Jeep tub sheetmetal has 2 layers in the area where the GOR latch plate is attached. The gap between the outer layer and the inner layer varies considerably depending on where you drill. In some places the inner layer is not parallel to the outer layer but is on a slant. The slanted spots make drilling through the inner layer difficult. Twist drills want to "walk" downhill. Rotabroach bits handle the slope fine using the outer layer hole as a guide but they only cut 1/4" deep so in some places the Rotabroach bit will not reach the inner layer. On my 2013 Jeep the holes for the 5/16" rubber bump stop bolts were both on a slanted section of inner sheetmetal and the Rotabroach bit was not long enough to cut completely through the inner layer. So I used a rotary file on a die grinder to complete the hole in the inner layer. You could also use a metal cutting bit in a Dremel.
Here is the sequence I used with Rotabroach bits:
1) Mark only the top 2 latch plate holes with a transfer punch. Remove the latch plate, then, using a 1/4" bit, drill though the PSC corner, remove the plug, mark the center with a transfer punch or simply drill through the Jeep sheetmetal (outer and inner layer) using the hole drilled in the corner metal as a guide.
2) Install 1/4" bolts in the top 2 holes of the latch plate, snug them up with nuts from the inside of the Jeep and align the right side long edge of the plate with the tailgate opening. When aligned perfectly, re-clamp the plate and mark the 3 remaining 1/4" holes and the 2 (two) 5/16" holes with a transfer punch, then remove the latch plate.
3) Using a 1/4" Rotabroach bit, drill through the rear corner metal at each of the three 1/4" holes until the plug is cut out, remove the plug and then mark the Jeep sheetmetal with a transfer punch. Do not drill the Jeep sheetmetal with the 1/4" bit, these 3 holes must be 1/2".
4) Using a 5/16" Rotabroach bit, drill the 2 holes for the rubber bumpstop bolts through the rear corner metal, remove the plug, mark center with a transfer punch or simply drill through the outer layer of the Jeep sheetmetal using the corner metal hole as a guide. As noted above, on my Jeep the Rotabroach bit was not long enough to drill through the inner layer of sheetmetal which was on a slant and I had to use a small rotary file to cut a hole about 5/16" in that layer.
5) Remove the rear corner.
6) Using a 1/2" Rotabroach bit, drill through the outer Jeep sheetmetal only at each of the 3 holes you just marked with the transfer punch. These are the 3 holes where the nylon spacers go to prevent the mounting bolts from crushing the outer and inner layers of sheetmetal together when the bolts are tightened.
7) Next drill a 1/4" hole in the inner layer sheetmetal of each of the 3 holes where the spacers go. I marked the center with a 1/2" transfer punch then used a standard 1/4" twist drill since a Rotabroach bit would not reach. The inner layer of sheetmetal was parallel to the outer layer in this area and easy to drill with standard bits.
When you have all the latch plate holes drilled, test mount the plate and snug up the mounting bolts.
At this point, when I first tightened the mounting bolts in my latch plate (which causes the plate to bend inward and conform to the curved Jeep tub shape) the carrier arms would no longer go into the latch plate pockets easily and smoothly. So I loosened the upper and lower latch plate mounting bolts a little which allowed to plate to straighten out and then the carrier arms again fit perfectly and slid in/out of the pockets beautifully. This issue may or may not occur with other Jeeps, it may be affected by the shape of the PSC corners or may be unique to my Jeep or vary Jeep to Jeep. In any event, I resolved the issue by installing shim washers on the upper and lower mounting bolts between the latch plate and the rear corner to keep the latch plate straight and prevent it from bending inward when the bolts were tightened which allowed the carrier arms to go in/out of the pockets perfectly. I covered the gap created by the shims with black silicone sealer which disappeared against the black powder coat on the corners and looks perfect.
After you confirm proper location and operation of your latch plate, remove the latch plate and rear corners and prepare them for permanent mounting. At this point I had my rear corners powder coated satin black, a close match to the Jeep factory fenders. Remember to install the nylon spacers in the 3 (three) 1/2" holes. On my Jeep 2 of the spacers were too short to fill the gap and some crushing would have occurred. I bought longer spacers at ACE Hardware and cut them to the correct length with a cutoff wheel in a Dremel to prevent this. Install sequence is: install spacers in Jeep sheetmetal, install rear corner, install latch plate, tighten latch plate mounting bolts. Then mount your spare tire/wheel and finalize adjustment of the passenger side upper hinge bolt to get the carrier arms centered up/dn on the latch plate pockets so there is no droop or lifting necessary to open/close the carrier with the spare mounted. I also recommend installing the corners with a bead of silicone to prevent water/dirt/mud from getting behind the corners which will definitely cause rust.
Lights
I used PSC push-in 24 LED tail lights, 2.5" reverse lights and LED resistors. All look and work great and they were relatively cheap compared to some LEDs. The tail and reverse lights are both made by TruckLite- the tail lights are run, stop and turn and can be ordered in red or clear with red LEDs. They were easy to wire up using the PSC instructions and hopefully dependable. The tail lights push into in a rubber grommet which supposedly fits a 4 1/2" hole. The tail light hole in the PSC corners was about 4.5" but the tail lights were SUPER hard to push into the grommet in the factory taillight hole. So I took about 1/16" off the inside edge of the holes with a rotary file on a die grinder which enlarged the hole about 1/8". That made installation a lot easier. I highly recommend that step if you try these lights and your light holes are too tight. Remember you need to be able to remove the light if it fails or you need to get into the wiring for some reason. Before I enlarged the factory hole there was no way I could remove the light without smashing it out with a big hammer.") The only other issue was finding a place to mount the LED resistors. The resistors are metal and fairly heavy, too heavy to let them dangle loose on their wires and bang around in there. I screwed the resistor to some sheet metal on the passenger side and to an aluminum bar which I installed on the drivers side since there was no other place I could drill mounting holes for the resistor. The aluminum bar also serves as a big washer behind the GOR latch plate rubber bumper mounting bolts. To connect the wiring for testing I used twist on connectors and clamp on connectors (soldered as well) for the permanent connection.
The only other issue was finding a place to mount the LED resistors. The resistors are metal and fairly heavy, too heavy to let them dangle loose on their wires and bang around in there. I screwed the resistor to some sheet metal on the passenger side and to an aluminum bar which I installed on the drivers side since there was no other place I could drill mounting holes for the resistor. The aluminum bar also serves as a big washer behind the GOR latch plate rubber bumper mounting bolts. To connect the wiring for testing I used twist on connectors and clamp on connectors (soldered as well) for the permanent connection.
Bottom Line:
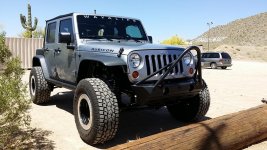
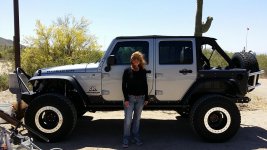
I have been using my carrier for a few months, we open and close it many times a day, removed/remounted the spare (I have Toyo 35s on the Jeep) a couple of times, slammed over lots of bumps, climbed on it, hung on it and it works perfect - there are no squeaks, no rattles, no problems whatsoever. This tire carrier works and looks terrific. The PSC corners are outstanding as well. I also installed PSC rock sliders and front bumper with stinger. The PSC stuff is very high quality, fits great and feels heavy duty. I have not had time for wheeling yet so none of this stuff has been hammered on but I am pretty confident it will hold up well.
Photos
Here is a Google Drive link to a bunch of pics of the install process and the finished Jeep. I am posting the link because there are a lot of pics, too many to include in a post. Open the link in any browser and you will be able to see them. You can see them on a phone but a computer is much better.
https://drive.google.com/folderview?id=0B3lwbPjD2VaWYWtpUHVzUVFkMzA&usp=sharing
I have lots more pics, if you need anything specific or have questions just ask.
There are plenty of install videos and writeups on the GenRight carrier and PSC corners separately so I won't go into those details. I will just point out how I handled the combination of the carrier and rear corners and some other stuff that was not in the instructions or videos. Here are the videos I used to help with the install (I also used the PSC and GOR written instructions that came with the parts):
http://www.youtube.com/watch?v=6a3u6CQRJoY#t=735
http://www.youtube.com/watch?v=jxldAD6mWTc
http://www.youtube.com/watch?v=wzUa9UnZw8A
My Install Sequence:
1) Install GOR hinges
2) Fit passenger side PSC corner cutouts around GOR hinges
3) Install passenger side PSC rear corner
4) Install driver's side PSC rear corner
5) Install carrier on GOR hinges
6) Install GOR latch plate on driver's side PSC rear corner
7) Install spare tire/wheel on carrier, adjust carrier/latch plate fit
8) Install lights
Nutserts:
The PSC rear corners require 25 (5/16") nutserts for a full installation - you will use only 22, the 3 nutserts on the driver's side corner nearest the tailgate are omitted if installing the GOR carrier because the latch plate covers the nutsert holes and makes them unnecessary.
Drilling nutsert holes accurately and installing them properly is the hardest part of the job but it is pretty easy if you get the right tools. Good tools are expensive but, in my opinion, worth every penny.
Drilling round, accurately placed, burr free holes in Jeep sheetmetal with standard twist drills (even new cobalt drill bits) is not easy. I tried a few test holes and concluded that using twist drills was too risky for me (brand new 2013 Jeep) so I bit the bullet and ordered better tools.
Recommended special tools:
1) Rotabroach hole cutters - these bits are specifically designed to drill accurately placed, perfectly round, burr free holes in sheetmetal in one step. These babies are fantastic, they are way faster than twist drills because they cut less metal (only cut the outer circle, the middle comes out as a plug), do not require a pilot hole and they cut perfect holes that can be exactly centered on a punch mark. And it only takes a test hole or 2 to get the "feel" for starting the bit and drilling the hole correctly. I drilled over 50 nutsert holes in my Jeep during my build project and every one is perfect. Never could have done that without these bits. You will need a 17/32" bit for the rear corner nutserts and 1/4", 5/16" and 1/2" bits for the GOR latch plate holes.
If you decide to use standard twist drill bits, definitely follow PSC's install instructions to clamp the corners on the Jeep very solidly and use the factory predrilled holes in the corners as drill bit guides. The twist drill method requires a 5/16" bit for the pilot hole using the clamped on corner as a drill guide, then the corner is removed and the holes are enlarged with a 17/32" bit. If you use this method I suggest practicing on similar sheetmetal until you are able to drill clean holes without distorting the sheetmetal or creating significant burrs on the inside of the hole.
Here is the Rotabroach website for more info and sales:
http://shop.blairequipment.com/Rotabroach-Cutters-s/2.htm
I bought the 1/4" and 17/32" bits directly from Blair but bought this kit from Amazon (about $65) since it was cheaper there. The kit includes the 5/16" and 1/2" bits and the arbor/pilot to hold the bits:
http://www.amazon.com/Blair-Equipment-11090N-Rotabroach-Cutter/dp/B000LQOCRK
PSC uses these bits to install their corners and armor on customer Jeeps.
2) Another tool that made a big drilling accuracy difference is a transfer punch set instead of a standard center punch. Transfer punches come in a set like drill bits, you choose the punch that fits the mounting hole in the item you are attaching to the Jeep. The punch makes a nice deep mark on the Jeep sheetmetal that is automatically centered in the mounting hole, thereby eliminating any inaccuracy that occurs trying to guess center of the hole with a center punch. The Rotabroach bits have a centerpunch like pilot that fits into the transfer punch mark and insures perfect alignment.
I bought punch set from Amazon (Flexbar) for about $20 but that set is no longer available from Amazon so here is the maker's webpage:
http://www.flexbar.com/shop/pc/TRANSFER-PUNCH-SET-p3099.htm - current price $20.
3) The third tool is the Marson 325-RN, nutsert install tool. This is a pro level tool that really works and with a little practice insures that you will get your nutserts installed properly, not tilted, not too tight, not too loose. Cheaper tools can be made to work but you might get a few messed up nutserts that spin or otherwise need to be replaced. If you get the Marson make sure you also order the 5/16-18 mandrel and nosepiece. PSC also uses the Marson tool for installing nutserts. There are other nutsert tools, some a lot cheaper. In my experience, you get what you pay for in tools.
Here is where I bought my Marson, on sale for $138:
https://www.blindrivetsupply.com/325RN.html - current price last time I checked $186 - wait for another sale or try Zoro:
http://www.zoro.com/g/00038178/k-G2...Ck0kqvuj-XqVE8-tLzqePrwQrXAZmt07QJBoCmxzw_wcB - current price last time I checked $138
I strongly recommend that you test install at least several nutserts in actual Jeep sheetmetal before touching your Jeep. I used the round area where the tail lights go which gets cut out. You need several tests to get the tool adjusted and get the feel for using the tool. The nutserts will not spin under normal torque for the screws used to install the corners if installed correctly. Messed up nutserts are a major pain to fix so doing them right the first time is well worth the effort.
Fitting the PSC corners around the GOR hinges:
The PSC passenger side rear corner has cutouts that are designed to fit around the Jeep factory tailgate hinges but the GOR replacement hinges are bigger than the factory hinges and won't fit into the factory PSC hinge cutouts. This requires removing material to make the PSC hinge cutouts big enough to fit around the GOR hinges. I used a metal cutoff wheel and a metal grinding wheel in a 4.5" angle grinder and a smaller cutoff wheel in a die grinder then rounded off the sharp edges of the cuts with a file. I enlarged the PSC cutouts in stages a little at a time so they would fit with a small gap around the GOR hinges. You can see from my pics how it turned out. Based on my test fits you cannot make the cutouts much if any smaller than I ended up with. It would be a lot easier to make the cutouts bigger than I did and it would still look fine if you prefer bigger gaps. I like the close fit but it does require more time and trial fitting to keep the gaps small and keep them consistent around both hinges. I do not recommend that you simply measure the GOR hinges and then cut the hinge cutouts to final size without making gradual cuts and trial fits. This would be fast and easy but might not work out because the gaps might be different on the top and bottom hinges due to variations in Jeep dimensions and the PSC corner cutouts.
The sequence on this fitting work is important. If you are shooting for a close fit, it's best to first fit the corner cutouts around both GOR hinges before marking/drilling the nutsert holes for the passenger side corner. So the steps are: 1) install GOR hinges, 2) cut PSC hinge cutouts a little bigger, 3) test fit corner on Jeep, 4) mark cutout with magic marker where more material must be removed, 5) remove more material from corner cutout, 6) test fit corner again..... Repeat this process until the cutouts fit around both GOR hinges to your satisfaction. When test fitting on the Jeep, make sure you are holding/clamping the corner as it will actually fit when finally installed. Use painters tape or magic marker to make sure you have this right. When the corners fit the hinges correctly hold/clamp the corner to the Jeep and mark the nutsert holes with a transfer punch.
When installing the GOR latch plate.....
Take your time here as well, the location of the latch plate is very important to the looks and proper opening/closing of the carrier. The latch plate is attached with 7 stainless bolts (five 1/4" diameter bolts and two 5/16" diameter bolts). The basic idea is to drill holes through the rear corner and Jeep tub, including the inner layer of sheetmetal. This job is complicated by the inner layer of Jeep sheetmetal which is not flush against the outer layer or parallel in some places. Plus if you are using Rotabroach bits, they only drill to a depth of 1/4" so they will not reach the inner layer of sheetmetal where the gap between the layers is more than 1/4".
Before installing the latch plate, the PSC driver's side rear corner must be installed (temporarily) and bolted to the Jeep tub (except for the last 3 nutserts nearest the tailgate opening which are omitted). The GOR carrier must also be installed on the passenger side hinges and rough leveled (no tire/wheel mounted) with the hinge bolts snugged up fairly tight. The latch plate is then attached to the driver's side carrier arms with the hinge pins (no mounting bolts in the latch plate) so it can be pushed against the Jeep tub to mark the mounting holes.
Close the carrier to push the latch plate against the rear corner and adjust the plate height so the main carrier tubes are level/parallel with the top of the tailgate. I would not rely on a level on the carrier (too many variables). Instead, stand back and eyeball the carrier and prop it up/dn until level/parallel with top edge of the tailgate. Then adjust the latch plate position side-to-side. There is some play in the latch plate hinge pin holes and the latch plate can be pushed a little toward the passenger side or drivers side. Position the plate to clear your tail lights on the left side and as close to the tailgate opening as possible without extending beyond the PSC rear corner metal.
On my Jeep, I located the latch plate in the middle of the hinge pin play to make it easy to insert/remove the pins. In that position, the right edge of my latch plate was too close to the tailgate opening, it also overlapped the leading edge of the rear corners a little which looked bad. So I trimmed about 1/8" off the right side long edge of the latch plate with an angle grinder, turned out perfect.
When you have the latch plate where you want it, clamp it to the tub, swing the carrier out of the way and mark the mounting holes with a transfer punch.
If you have the skill and experience to drill accurately placed clean holes in automotive sheet metal with twist drills simply follow the Genright video and written instructions. If not, I strongly recommend Rotabroach bits for this job as well.
Keep in mind that the Jeep tub sheetmetal has 2 layers in the area where the GOR latch plate is attached. The gap between the outer layer and the inner layer varies considerably depending on where you drill. In some places the inner layer is not parallel to the outer layer but is on a slant. The slanted spots make drilling through the inner layer difficult. Twist drills want to "walk" downhill. Rotabroach bits handle the slope fine using the outer layer hole as a guide but they only cut 1/4" deep so in some places the Rotabroach bit will not reach the inner layer. On my 2013 Jeep the holes for the 5/16" rubber bump stop bolts were both on a slanted section of inner sheetmetal and the Rotabroach bit was not long enough to cut completely through the inner layer. So I used a rotary file on a die grinder to complete the hole in the inner layer. You could also use a metal cutting bit in a Dremel.
Here is the sequence I used with Rotabroach bits:
1) Mark only the top 2 latch plate holes with a transfer punch. Remove the latch plate, then, using a 1/4" bit, drill though the PSC corner, remove the plug, mark the center with a transfer punch or simply drill through the Jeep sheetmetal (outer and inner layer) using the hole drilled in the corner metal as a guide.
2) Install 1/4" bolts in the top 2 holes of the latch plate, snug them up with nuts from the inside of the Jeep and align the right side long edge of the plate with the tailgate opening. When aligned perfectly, re-clamp the plate and mark the 3 remaining 1/4" holes and the 2 (two) 5/16" holes with a transfer punch, then remove the latch plate.
3) Using a 1/4" Rotabroach bit, drill through the rear corner metal at each of the three 1/4" holes until the plug is cut out, remove the plug and then mark the Jeep sheetmetal with a transfer punch. Do not drill the Jeep sheetmetal with the 1/4" bit, these 3 holes must be 1/2".
4) Using a 5/16" Rotabroach bit, drill the 2 holes for the rubber bumpstop bolts through the rear corner metal, remove the plug, mark center with a transfer punch or simply drill through the outer layer of the Jeep sheetmetal using the corner metal hole as a guide. As noted above, on my Jeep the Rotabroach bit was not long enough to drill through the inner layer of sheetmetal which was on a slant and I had to use a small rotary file to cut a hole about 5/16" in that layer.
5) Remove the rear corner.
6) Using a 1/2" Rotabroach bit, drill through the outer Jeep sheetmetal only at each of the 3 holes you just marked with the transfer punch. These are the 3 holes where the nylon spacers go to prevent the mounting bolts from crushing the outer and inner layers of sheetmetal together when the bolts are tightened.
7) Next drill a 1/4" hole in the inner layer sheetmetal of each of the 3 holes where the spacers go. I marked the center with a 1/2" transfer punch then used a standard 1/4" twist drill since a Rotabroach bit would not reach. The inner layer of sheetmetal was parallel to the outer layer in this area and easy to drill with standard bits.
When you have all the latch plate holes drilled, test mount the plate and snug up the mounting bolts.
At this point, when I first tightened the mounting bolts in my latch plate (which causes the plate to bend inward and conform to the curved Jeep tub shape) the carrier arms would no longer go into the latch plate pockets easily and smoothly. So I loosened the upper and lower latch plate mounting bolts a little which allowed to plate to straighten out and then the carrier arms again fit perfectly and slid in/out of the pockets beautifully. This issue may or may not occur with other Jeeps, it may be affected by the shape of the PSC corners or may be unique to my Jeep or vary Jeep to Jeep. In any event, I resolved the issue by installing shim washers on the upper and lower mounting bolts between the latch plate and the rear corner to keep the latch plate straight and prevent it from bending inward when the bolts were tightened which allowed the carrier arms to go in/out of the pockets perfectly. I covered the gap created by the shims with black silicone sealer which disappeared against the black powder coat on the corners and looks perfect.
After you confirm proper location and operation of your latch plate, remove the latch plate and rear corners and prepare them for permanent mounting. At this point I had my rear corners powder coated satin black, a close match to the Jeep factory fenders. Remember to install the nylon spacers in the 3 (three) 1/2" holes. On my Jeep 2 of the spacers were too short to fill the gap and some crushing would have occurred. I bought longer spacers at ACE Hardware and cut them to the correct length with a cutoff wheel in a Dremel to prevent this. Install sequence is: install spacers in Jeep sheetmetal, install rear corner, install latch plate, tighten latch plate mounting bolts. Then mount your spare tire/wheel and finalize adjustment of the passenger side upper hinge bolt to get the carrier arms centered up/dn on the latch plate pockets so there is no droop or lifting necessary to open/close the carrier with the spare mounted. I also recommend installing the corners with a bead of silicone to prevent water/dirt/mud from getting behind the corners which will definitely cause rust.
Lights
I used PSC push-in 24 LED tail lights, 2.5" reverse lights and LED resistors. All look and work great and they were relatively cheap compared to some LEDs. The tail and reverse lights are both made by TruckLite- the tail lights are run, stop and turn and can be ordered in red or clear with red LEDs. They were easy to wire up using the PSC instructions and hopefully dependable. The tail lights push into in a rubber grommet which supposedly fits a 4 1/2" hole. The tail light hole in the PSC corners was about 4.5" but the tail lights were SUPER hard to push into the grommet in the factory taillight hole. So I took about 1/16" off the inside edge of the holes with a rotary file on a die grinder which enlarged the hole about 1/8". That made installation a lot easier. I highly recommend that step if you try these lights and your light holes are too tight. Remember you need to be able to remove the light if it fails or you need to get into the wiring for some reason. Before I enlarged the factory hole there was no way I could remove the light without smashing it out with a big hammer.
The only other issue was finding a place to mount the LED resistors. The resistors are metal and fairly heavy, too heavy to let them dangle loose on their wires and bang around in there. I screwed the resistor to some sheet metal on the passenger side and to an aluminum bar which I installed on the drivers side since there was no other place I could drill mounting holes for the resistor. The aluminum bar also serves as a big washer behind the GOR latch plate rubber bumper mounting bolts. To connect the wiring for testing I used twist on connectors and clamp on connectors (soldered as well) for the permanent connection.Bottom Line:
I have been using my carrier for a few months, we open and close it many times a day, removed/remounted the spare (I have Toyo 35s on the Jeep) a couple of times, slammed over lots of bumps, climbed on it, hung on it and it works perfect - there are no squeaks, no rattles, no problems whatsoever. This tire carrier works and looks terrific. The PSC corners are outstanding as well. I also installed PSC rock sliders and front bumper with stinger. The PSC stuff is very high quality, fits great and feels heavy duty. I have not had time for wheeling yet so none of this stuff has been hammered on but I am pretty confident it will hold up well.
Photos
Here is a Google Drive link to a bunch of pics of the install process and the finished Jeep. I am posting the link because there are a lot of pics, too many to include in a post. Open the link in any browser and you will be able to see them. You can see them on a phone but a computer is much better.
https://drive.google.com/folderview?id=0B3lwbPjD2VaWYWtpUHVzUVFkMzA&usp=sharing
I have lots more pics, if you need anything specific or have questions just ask.