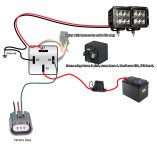
D2 Dually Wiring question

tonywjk

Member
Happy Presidents day!

Have a D2 Dually wiring question. I recently installed them in my bumper, connecting them to the factory harness. Didn't realize they would flicker when not in the "on"position. That being said I'm going to use the harness that came with them.

My 2 questions are:

1) Once i disconnect them from the factory harness will that cause any issues with the computer, i tossed out the original lights and connectors so i can't re-attach them and let them hang. I was planning on taping them up and attaching them to the back side of the bumper

2) Connecting the three leads to the Dually switch, i didn't receive any wiring instructions on connecting them, does anyone know what order they get connected? The three leads are Red, Green and Black, the switch has one gold lead and two silver.

Thanks!
 

trailraider

Active Member
[2) Connecting the three leads to the Dually switch, i didn't receive any wiring instructions on connecting them, does anyone know what order they get connected? The three leads are Red, Green and Black, the switch has one gold lead and two silver.

Thanks![/QUOTE]


more than likely the switch

i think the gold was black and the other two switch the power to the relay
 
Last edited:

jkuone

New member
Hmm, the instructions I had for mine..black wire to gold prong ( switch ground ) , blue wire to middle prong ( switch output ), red wire to remaining prong ( switch power ) maybe your green wire is same as blue wire. Hope that helps some..
 

SFNick

New member
ImageUploadedByWAYALIFE1424129254.469827.jpg

Tapping your fogs up won't hurt anything or you could run a relay.
 
Last edited:

Slappy32

New member
I used my factory fog light switch, tapping into the factory fog light wires coming out of the underside of the TIPM with an added relay. I used the Rigid harness with the relay and with the ground wires stripped out and the switch cut off. If you would like to do it this way, I can give more details. Very clean installation.
 
Last edited:

Ah2014jk

New member
I used my factory fog light switch, tapping into the factory fog light wires coming out of the underside of the TIPM with an added relay. I used the Rigid harness with the relay and with the ground wires stripped out and the switch cut off. If you would like to do it this way, I can give more details. Very clean installation.

I wouldn't mind hearing how you did that in detail. PM me the details
 

tonywjk

Member
I used my factory fog light switch, tapping into the factory fog light wires coming out of the underside of the TIPM with an added relay. I used the Rigid harness with the relay and with the ground wires stripped out and the switch cut off. If you would like to do it this way, I can give more details. Very clean installation.

X2-I'd like to know how you did that too, thanks.
 

sjd78

New member
I used my factory fog light switch, tapping into the factory fog light wires coming out of the underside of the TIPM with an added relay. I used the Rigid harness with the relay and with the ground wires stripped out and the switch cut off. If you would like to do it this way, I can give more details. Very clean installation.

Might as well post it up as I'm interested too.:thumb:
 

Slappy32

New member
I did this on my 2014 JKU Sport with Rigid D2's. It already had factory fog lights.

I used the existing wiring harness that came with the Rigid lights. The red (terminal 30) and black (terminal 85) wires with the ring terminals hook up to the battery's positive and negative. The only other wires we need are the blue trigger wire (terminal 86) to the relay, and the fog light positive power wire (terminal 87) on the relay. The red wires coming from terminal 87 lead to the waterproof Rigid connectors and the switch lamp, I think. In any case, you only need one of the wires, so cut one out at the relay and leave a couple of feet from the relay on the other as it will be used to tie into the factory harness at the TIPM. The rest of the wires can be cut out and the switch can be discarded. Save the wires with the Rigid waterproof connectors, since we will splice them in at the bumper. Most of the remaining wires are black for grounds, but since we are using the existing ground wiring on the vehicle wiring harness, they are not needed. The only black wire coming from terminal 85 that needs to be used is the one with the ring terminal that hooks to the battery negative or chassis ground.

The fog light circuit has no fuse in the TIPM and the connector for the fog light wiring is on the underside of the TIPM, so you'll need to unseat the TIPM from the four posts it is attached with to loosen it so you get at the right plug. The plug is the second plug in from the passenger side. It faces straight down, not the panel that faces the front or rear. The plug has a safety clip and then a lever to remove it from the TIPM. It is similar to most plugs on the JK in its operation.

Once you get it loose, look for an Orange/White wire and a Yellow/White wire. One goes directly to each fog lamp. You will have to cut both of them, so cut it in a way so you can work comfortably on both ends of the cut wires. In others words, don't cut it too close to the connector. One of the wires (either one) coming from the connector will not be used, so seal it up with heat shrink. We only need one wire to trigger the relay.

Take the remaining wire coming from the connector (either Orange/White or Yellow/White) and solder (preferred) or use butt connectors and heat shrink it to the blue trigger wire (terminal 86) on the relay. Next take both the orange/white and yellow/white wire ends that lead to the fog lights on the factory harness and connect both of them to the red wire that leads to terminal 87 on the relay. Both fog light wires will be powered by the single wire coming from terminal 87 on the relay. Essentially, what was done was to insert the Rigid relay in-line to the factory fog light circuit.

The next step is to connect the waterproof Rigid fog light connectors at the fog light locations at the bumper. I bought female connectors that plug into the factory fog light connectors and then spliced the Rigid connectors onto that because I don't like to cut factory connectors if I don't have to, but you can just as easily cut off the factory connectors and splice on the Rigid connectors. The Orange/White and Yellow/White wires are the positive wires for the connectors.

I didn't install the lights into the bumper until I tested the wiring to make sure everything worked.

Clear as mud! Let me know if you have any questions!

TIPM
TIPM%20copy.jpg


Terminal 87 to both factory fog light wires
IMG_2634.jpg


Wires cut out at relay
IMG_2636.JPG


Pigtail at bumper with female connector I bought and Rigid connector.
IMG_2638.jpg


Finished!
IMG_2367.JPG
 
Last edited:

KenB1010

New member
I recently installed a set of D2's and wired them directly to the factory fogs on my 14 JKU. They work fine, but when I'd turn them off they would flicker for 5-10 min.

I really didn't like the emergency light look so I did some research and wired a resistor parallel to the LEDs. I spec’d the resistor size using http://ledcalc.com/#calc. Ledcalc would only calculate the resistor up to a draw of 2000ma and D2's have a draw of 2500ma, so like a good garage mechanic I extrapolated some.

Ledcalc recommended a 1ohm 10watt resistor for a 2000ma LED, I tried an 8 ohm 2w and it worked, but the resistor got too hot to touch, next I tried 15 ohm 2w, but again it just got too hot.

I called my dad for help (retired electrical engineer), he got out his slide rule and said to try a 100ohms 25watt ceramic resistor.

I wired it parallel to the D2 and it works great. The D2 is nice and bright with no flicker when I turn it off. I ran the lights for an hour and the resistor was only about 10 degrees above ambient temp. So I wrapped it all up and put it in a wire loom. Then I ran the lights for a 2 hour drive. Lights work great and no flicker when I turn them off. Resistor is staying nice and cool.

As a side note, I called rigid and asked them about the flicker problem. They said to install a "warning canceller" like those found on amazon. I ordered one from amazon, I’ll try that out when it arrives.

I'm getting ready to install some lights on my Jeep as well and was curious if the warning canceller stopped the flicker? If so which did you use?
 
Top Bottom