mastrcruse
New member
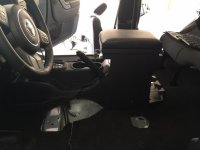
As I researched getting a new security console for my '14 JKU, I noticed that Tuffy didn't make a full console replacement. They have a half console available to us and there is a huge lack of information around it. So hopefully to help others looking at this option I have provided my thoughts below.
Overall review: The console came very well packaged and held up well to UPS's always fun basketball games. After opening the box, I was impressed with the stoutness of the console itself and how nice the powedercoat looked. After unpacking everything, its pretty easy to intuitively put the entire thing together in your head. I will say, the instructions are a bit hard to read. I removed both front seats and it made it much easier to manipulate and maneuver the console. I pre-assembled most of the console prior to installing it in the jeep. Hardest part was being anal about the wiring underneath the console. Making sure that all the wiring is in a nice row and not catching on any of the parking brake items or other things was tough.
Afterward, I will say I'm very impressed with the console. The extra inch of height and comfort arm rest is awesome. It fits really well with the OEM front console and is very stout.
My Tips....
1) Pre-Assemble most of the pieces before putting it in the jeep. You can put the legs on (don't tighten) and the electronics divider. Don't do anything with the window switch panel or rear cup holder
2) remove both front seats. Super easy (8 bolts). Undo 8 bolts and set them on the side of the jeep...don't take the buckles off just sit them outside.
3) if you have a cup holder with a light, remove the light. My console didn't come with a cutout do it. I'll be calling tuffy about this because they need to make a change to their design.
4) have a 8mm, 3/8" socket ready (small sized ratchet), and long and short Phillips screw drivers.
5). Pull the rear window wiring through the back hole as much as possible and then feed into console.
6) separate the rear LED courtesy light as much as possible from the rear window wiring.
7) make the legs (adjustable) level with the bump in the lower dash. I didnt have to adjust mine because the height was perfect
8) if you have a friend, use em' haha. Have them in the passenger side holding the console up while you wire the different accessories.
9). Have patience. I don't have patience but exercised more than usual with this one. Didn't want the console to cut any wiring
10) prior to buttoning up everything, make sure all electronics work.
11) prepare to bleed. Some things on the console are sharp and there is some other super sharp sh** underneath the console. Band aids are a good thing to have haha.
12) the instructions say to have t case in neutral and tranny in neutral with parking brake disengaged. My recommendation is to move the 3 levers anywhere you need them to make it easy to get stuff to fit. I had to use multiple combinations for the tranny and especially the parking brake. The t case stayed in neutral the entire time
Last edited: