Front Axle Rebuild, Help Please!

TMax173629

New member
So i have been looking for some sort of cheat sheet or install instructions. When I got my jeep it had been re-geared to 5.13s but improperly installed, my passenger side axle seal is leaking non-stop. I am going to rip everything apart and was looking to see if there was a "standard" starting point as far as the shims, backlashes, pinion tension, so I'm not pulling everything in and out too many times. Any help would be greatly appreciated.

Rubicon/ Dana 44s/ Eaton E-Lockers/ Yukon 5.13s


-Tyler
 

WJCO

Meme King
So i have been looking for some sort of cheat sheet or install instructions. When I got my jeep it had been re-geared to 5.13s but improperly installed, my passenger side axle seal is leaking non-stop. I am going to rip everything apart and was looking to see if there was a "standard" starting point as far as the shims, backlashes, pinion tension, so I'm not pulling everything in and out too many times. Any help would be greatly appreciated.

Rubicon/ Dana 44s/ Eaton E-Lockers/ Yukon 5.13s


-Tyler

No cheat sheet, but buy a workshop manual for your vehicle. That will have all of the listed specs and tolerances. Are you getting noise from the differential or is the axle seal leak your only concern? Any metal in the fluid?
 
J

JKDream

Guest
So i have been looking for some sort of cheat sheet or install instructions. When I got my jeep it had been re-geared to 5.13s but improperly installed, my passenger side axle seal is leaking non-stop. I am going to rip everything apart and was looking to see if there was a "standard" starting point as far as the shims, backlashes, pinion tension, so I'm not pulling everything in and out too many times. Any help would be greatly appreciated.

Rubicon/ Dana 44s/ Eaton E-Lockers/ Yukon 5.13s


-Tyler

As long as you keep the shims specific to each side when you take out the carrier you don't need to check them putting it back together.
Axle seals just need the carrier pulled, pinion does not need to be removed. Is it a front axle you're working on?
It might possibly be bent causing the shaft to sit cockeyed and making the seal leak. Just a thought.
 
Last edited by a moderator:

TMax173629

New member
No cheat sheet, but buy a workshop manual for your vehicle. That will have all of the listed specs and tolerances. Are you getting noise from the differential or is the axle seal leak your only concern? Any metal in the fluid?

I bought a manual so hopefully that will get me through this. My front locker wasn't working properly, my pinion nut keeps backing off because I don't believe the gears were set properly. The caps were on the wrong sides and the axle seal obviously leaking. Very little metal in the fluid, but I go through a bottle a week because its just flying out the axle so I cant really tell.

As long as you keep the shims specific to each side when you take out the carrier you don't need to check them putting it back together.
Axle seals just need the carrier pulled, pinion does not need to be removed. Is it a front axle you're working on?
It might possibly be bent causing the shaft to sit cockeyed and making the seal leak. Just a thought.

yes front axle. I am taking everything apart and starting at ground zero. I am hoping its not a bent shaft but you aren't the first one to tell me that, when I was getting it aligned he mentioned the seal leaking and said it was common for bent tubes on the D44.

This ^^^^
More than likely being caused by a bent axle tube.

Lets hope not..
 

geberhard

Douchebag
shafting.jpg Not clear if you are planning to correct the gear install (you mentioned possible issue on the install?) or just address the leaking seal issue. Agree with the other posts, the seal could be leaking due to a bent tube, but can you provide more background? Major or minor leak, and did it start after a wheeling trip or just started? I have seem guys gouging seals during install of the seals or when inserting the shafts back in.

Plan for about 3-4 hours. I will skip to removing the carrier, there are plenty of videos out there, below are just a few tips that hopefully will help out.

Removing the little connector for the front locker is a bit tricky, remove the top small bolt (I am thinking 7mm or around that) pull gently up and use a pin or pointy tool to help slide the two connector parts, then pull down gently from the inside. Take pics of the carrier and bolts prior to removing and make sure to use the same bolts in the same position as removed. also make sure to remove the carrier gently as the shims for the bearings will drop out and need to be put back on the correct side.

To remove the old seal, I used a rod and large washer and tapped from the outside. With some love it will come out (that is what she said :D) One trick to replace the seals (since you are there might as well replace both at the same time) is to use a long piece of pvc pipe, then I believe I used a 36mm socket which fit perfectly on the seal gap without impacting the seal. I recommend installing the short side seal first.

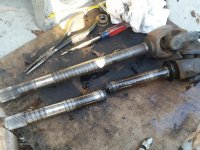
Pic of my broken shaft (also caused seal to leak). Mallcrawlling for life!

Good luck, take your time and have fun :D
 
Last edited:

TMax173629

New member
View attachment 239742 Not clear if you are planning to correct the gear install (you mentioned possible issue on the install?) or just address the leaking seal issue. Agree with the other posts, the seal could be leaking due to a bent tube, but can you provide more background? Major or minor leak, and did it start after a wheeling trip or just started? I have seem guys gouging seals during install of the seals or when inserting the shafts back in.

Plan for about 3-4 hours. I will skip to removing the carrier, there are plenty of videos out there, below are just a few tips that hopefully will help out.

Removing the little connector for the front locker is a bit tricky, remove the top small bolt (I am thinking 7mm or around that) pull gently up and use a pin or pointy tool to help slide the two connector parts, then pull down gently from the inside. Take pics of the carrier and bolts prior to removing and make sure to use the same bolts in the same position as removed. also make sure to remove the carrier gently as the shims for the bearings will drop out and need to be put back on the correct side.

To remove the old seal, I used a rod and large washer and tapped from the outside. With some love it will come out (that is what she said :D) One trick to replace the seals (since you are there might as well replace both at the same time) is to use a long piece of pvc pipe, then I believe I used a 36mm socket which fit perfectly on the seal gap without impacting the seal. I recommend installing the short side seal first.

Pic of my broken shaft (also caused seal to leak). Mallcrawlling for life!

Good luck, take your time and have fun :D


Thanks alot man! I did reinstall the gears and adjusted new shims because the backlash wasnt quite right, the patterns weren't close enough to where I wanted to be and we got it to about .8 in movement. Everything is now rebuilt and I have around 100 miles on it and so far no leaking out the seal side. I did not have a 7mm bolt to remove on top of the factory locker, I could see where the hole was but the bracket and or whatever was supposedto be there was missing. I ended up getting a small hook and wiggling it loose and out. I however broke the plug on the inside, anyone have a factory part number for this short harness? because I need one now.. haha. I siliconed it up real good but I have intentions on replacement soon, the proper way.

For anyone wanting to know time taken and project extent:

2 guys that had a clue but are not experts by any means, every tool you could ever need and a lift. Parts: New Races, New Bearings, New Shims, New Axle Seals, New U-Joints, New Ball joints. 7.5hrs, 3 pizzas and a 24 pack later

Thanks to everyone for the input!
 

geberhard

Douchebag
Thanks alot man! I did reinstall the gears and adjusted new shims because the backlash wasnt quite right, the patterns weren't close enough to where I wanted to be and we got it to about .8 in movement. Everything is now rebuilt and I have around 100 miles on it and so far no leaking out the seal side. I did not have a 7mm bolt to remove on top of the factory locker, I could see where the hole was but the bracket and or whatever was supposedto be there was missing. I ended up getting a small hook and wiggling it loose and out. I however broke the plug on the inside, anyone have a factory part number for this short harness? because I need one now.. haha. I siliconed it up real good but I have intentions on replacement soon, the proper way.

For anyone wanting to know time taken and project extent:

2 guys that had a clue but are not experts by any means, every tool you could ever need and a lift. Parts: New Races, New Bearings, New Shims, New Axle Seals, New U-Joints, New Ball joints. 7.5hrs, 3 pizzas and a 24 pack later

Thanks to everyone for the input!

I gotta rgue that I did one guy and beat a 24 pack :) JK. Glad it worked out. The little connector is a pos, I remember seeing someone posting a better replacement part and wil try finding the info. The stock connector likes to disintegrate on its own.

IIRC The part number for the intermediate locker connector is #68003570AA, about $20 at the dealer.

I put mine back together on the weekend, and all working like a charm.

Note to self (and others), installing tap on axle sleeves bring the suck!
 

geberhard

Douchebag
:doh::doh::doh::doh::doh::doh::doh::doh::doh::doh::doh::doh::doh::doh::doh::doh::doh::doh::doh::doh::doh::doh::doh::doh:
:beer::beer::beer::beer::beer::beer::beer::beer::beer::beer::beer::beer::beer::beer::beer::beer::beer::beer::beer::beer::beer::beer::beer::beer:
24 times :)

WTF LOL I obviously missed my writing-comprehension class :)
 

Honor2afault

Caught the Bug
:doh::doh::doh::doh::doh::doh::doh::doh::doh::doh::doh::doh::doh::doh::doh::doh::doh::doh::doh::doh::doh::doh::doh::doh:
[emoji481][emoji481][emoji481][emoji481][emoji481][emoji481][emoji481][emoji481][emoji481][emoji481][emoji481][emoji481][emoji481][emoji481][emoji481][emoji481][emoji481][emoji481][emoji481][emoji481][emoji481][emoji481][emoji481][emoji481]
24 times :)

WTF LOL I obviously missed my writing-comprehension class :)
That's ok, just know that our comprehension of said blurb is fully realized. [emoji90]

Sent from my SM-G930V using WAYALIFE mobile app
 
View attachment 239742 ..... then I believe I used a 36mm socket which fit perfectly on the seal gap without impacting the seal.......

Good luck, take your time and have fun :D
36mm socket works amazing for seals up to a '12. '13+ use a ridiculous two-part seal that a 36mm socket will knock the inner seal out. Anyone have any experience replacing those seals?

Sorry didn't mean to hijack....sorta;)
 
Top Bottom