Clutch setup problems

QuicksilverJK

Caught the Bug
So after having my Centerforce clutch in and working great for close to 10k miles it started acting up. Hard to shift into any gear at a stop, but would slide right into gear with no resistance with engine stoped. I decided that the clutch had to be dragging. Tried bleeding the clutch, also changed and bleed master cylinder. Slave was changed with the clutch last year. Still dragging. I jacked up the rear end and in first gear with foot on the clutch tires where spinning away roughly 1/2 speed. So now I had the task of pulling the trans again.

Here's where I found something interesting. My throwout bearing was toast but hadn't given me the standard throwout bearing noise. The trans input shaft retainer/sleeve was visibly worn and had ridges worn into it that were causing the throwout bearing to stick.

So here's my question. When I put everything back together how can I verify proper gap for the throwout bearing? I have to assume that the only way it failed this early is that it was too tight the first time. I have read that rule of thumb is 1/16 of an inch. With no access to the inside of the bell housing I don't have a clue how I can verify this.

Is there a spec for the distance of the release fork to the slave cylinder mounting face? Any help or insight will be greatly appreciated.


Sent from my iPhone using WAYALIFE mobile app

Step 1 : Install the clutch and bell housing on the engine. (VERY IMPORTANT THAT EVERYTHING IS INSTALLED AS IT WILL BE ON FINAL ASSEMBLY)

Step 2: The inside face of the throw out barring ride on the for bolts securing the input barring retainer, remove the bolts and place the washers until it measures eight thousands of an inch from the face of the transmission. (IF YOU HAVE A SUPPORT RAIL IT'S A LOT EASIER BUT IF YOU DON'T THEN IT'S FINE)

Step 3: Lay a straight edge across the center of the bell housing and measure to one of the clutch fins.

Step 4: Make sure the release bearing is fully compressed and slide it onto the transmission and use the same strait edge and lay it perpendicular and measure the distance to the transmission face. (MEASURE BOTH SIDES AND MAKE SURE THEY ARE EQUAL)

Step 5: Subtract your first measurement from your second measurement and that will be your release bearing clearance. (If it's too much or too little adjust with the shims provided)

Step 6: Once everything is together and have your final clearance you can put everything together.

Step 7: Test and make sure everything is within clearance and operating correctly

All Done
 
Last edited:

QuicksilverJK

Caught the Bug
Step 1 : Install the clutch and bell housing on the engine. (VERY IMPORTANT THAT EVERYTHING IS INSTALLED AS IT WILL BE ON FINAL ASSEMBLY)

Step 2: The inside face of the throw out barring ride on the for bolts securing the input barring retainer, remove the bolts and place the washers until it measures eight thousands of an inch from the face of the transmission. (IF YOU HAVE A SUPPORT RAIL IT'S A LOT EASIER BUT IF YOU DON'T THEN IT'S FINE)

Step 3: Lay a straight edge across the center of the bell housing and measure to one of the clutch fins.

Step 4: Make sure the release bearing is fully compressed and slide it onto the transmission and use the same strait edge and lay it perpendicular and measure the distance to the transmission face. (MEASURE BOTH SIDES AND MAKE SURE THEY ARE EQUAL)

Step 5: Subtract your first measurement from your second measurement and that will be your release bearing clearance. (If it's too much or too little adjust with the shims provided)

Step 6: Once everything is together and have your final clearance you can put everything together.

Step 7: Test and make sure everything is within clearance and operating correctly

All Done

Thank you, but I think this is referring to an internal hydraulic slave cylinder. Also the bell housing on the NSG370 is not removable, so the only access I have for measuring is through the slave cylinder hole it's self. This is on a 2008 JK.


Sent from my iPhone using WAYALIFE mobile app
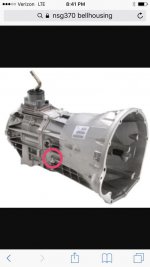
 
When I put everything back together how can I verify proper gap for the throwout bearing?

My bad i thought u were referring to throw out bearing.
 
Thank you, but I think this is referring to an internal hydraulic slave cylinder. Also the bell housing on the NSG370 is not removable, so the only access I have for measuring is through the slave cylinder hole it's self. This is on a 2008 JK.


Sent from my iPhone using WAYALIFE mobile app

Are u sure that housing is not removebale?

Is this your tranny?

nsg370-diagram-v5.jpg
 
Top Bottom