Need help jeep down. Arms, bumpstop issues etc.

RUBEERCON

New member
2015 jku rubicon

Currently dealing with the front 44 only.

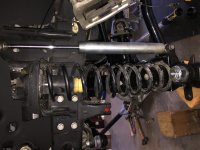
Started with Rancho 4” sport and correction brackets. Still running the 4” springs but with Rancho adjustable upper and lower arms that are going in now along with aftermarket steering components.

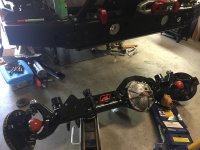
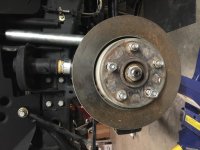
44 is on floor jacks but I stopped on the install when I read up on bumpstops. I added gussets/truss /pro steers/ RCV axles to the oem 44. ( I own a fab shop, just utilizing my weld staff on the 44 to see how it holds up until I get a PR44)

New parts list.
4 Rancho adj arms
Oliver’s driveshafts
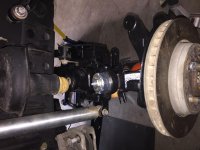
Stinky fab aluminum tie rod

(Parts below are from a company no longer welcomed around here)
top mount drag link
flip bracket
Adj. track bar

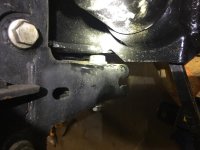
I currently have 2” bumpstops on the coil pads. I’m trying to figure out what size bump stops I will need. What’s the simple route or should I try the absorbing stops?

I’m also trying to gather info regarding control arm lengths to start with. I got lost in the sticky posts last night, could not follow the control arms install very well. I will look it over again, I did learn the lower arms do not adjust the caster like the uppers do.

I’m centering steering wheel and setting the tie rod to the same length that the oem rod was set at.

I’m taking the jeep to a shop for the alignment, I just need to get the thing back together in a functioning manner so that they can dial it in for me.

Thanks for any help! I love wrenching but i just don’t have the knowledge yet when it comes to lifts and geometry.

Steve
 

WJCO

Meme King
Your lower arms set your axle's position in the wheel well. With axle fully stuffed, your axle should be about in the center of the wheel well and bump pad hitting your bump stop. It is way easier to set up your bump stops with the springs off of the vehicle. Basically when your pad bottoms out on the bump cup (exclude the rubber itself from the measurement), you should still have about 1/2" of shock shaft showing. If your shock bottoms out first, that's a problem. Add the necessary spacer so that your bump stop pads hit before your shock piston bottoms out. Do this on both sides. Also, being that you added a truss, make sure none of those parts hit your oil pan or any other parts. If they do, you will also have to add bump spacers so that doesn't happen. Check one side at a time, but then also jack up both sides at the same time and really stuff the axle. Then you'll know what clears or doesn't. Once you're good, install the springs.

Then use your upper arms to dial in your caster.

TIP: Without actually removing the rubber bump stop, just measure it. So if the rubber is stopping the pad from hitting the cup and it still has 2 inches left to go, you should have 2.5 inches of shock shaft showing.
 

WJCO

Meme King
Do I setup my arms & bump stops with all the steering components installed? What about the drive shaft?

I would install everything. You could probably do it without the driveshaft though. While you're checking though, just imagine where it would be.
 

RUBEERCON

New member
Installed lower arms at 23-3/16. Looks slightly forward to me. Driveshaft has 2 bolts in it, upper arms not on yet. Track bar was off center and still is but I’m installing a new unit so I’ll fix that next.
 

Attachments

  • 768438BD-B853-4F42-BE93-42BE557069E7.jpg
    768438BD-B853-4F42-BE93-42BE557069E7.jpg
    82 KB · Views: 203
  • 68A34A27-EFA5-48E7-84BC-05471CEC2244.jpg
    68A34A27-EFA5-48E7-84BC-05471CEC2244.jpg
    81.7 KB · Views: 200

RUBEERCON

New member
Everything clears but the track bar and drag link will be close, it touches the pitman arm at fully stuffed position.
 

Attachments

  • 15617923-9A36-436D-A2C5-57C61CD764D2.jpg
    15617923-9A36-436D-A2C5-57C61CD764D2.jpg
    98.1 KB · Views: 184

RUBEERCON

New member
Oil pan, track bar bracket and a few other shots.
 

Attachments

  • BC5A8B8E-52DA-4EA0-81BE-8F066D4FB978.jpg
    BC5A8B8E-52DA-4EA0-81BE-8F066D4FB978.jpg
    81.4 KB · Views: 200
  • 5CD06BA5-E493-4D6D-97BD-770457C40B5F.jpg
    5CD06BA5-E493-4D6D-97BD-770457C40B5F.jpg
    67.4 KB · Views: 205
  • 52042513-982E-48EF-A11A-486627BEA12D.jpg
    52042513-982E-48EF-A11A-486627BEA12D.jpg
    82.2 KB · Views: 212

WJCO

Meme King
Once that rubber is compressed, it looks like your track bar and maybe drag link will hit the frame along with the pitman arm. May not be a bad idea to add an inch of bump stop extension on the passenger side to be safe. Also check that your truss isn't hitting those trans cooler lines, it's hard to see in the photos how close they are.

Other than that, I don't think the axle being slightly forward will hurt anything.
 

RUBEERCON

New member
Never thought about adding spacer to just one side...
I’ll have to get you a steak dinner for guiding me through this!

Trans lines are clearing.

Would you drop track bar a hole on bracket?
 

WJCO

Meme King
Would you drop track bar a hole on bracket?

Wait until you get the upper arms on and your drag link on and the Jeep back on the ground. Drag link should be pretty close to parallel with track bar. Don't just drop the track bar for clearance reasons, drop it only if you have to to make it parallel with drag link.
 

RUBEERCON

New member
Looks like you need more bumpstop. Put your coil spring in and then do that same test. See if your bumpstops hit. I bet they don’t.


Sent from my iPhone using WAYALIFE mobile app

Are you saying the springs installed will cause interference among the other parts? Can you compress both springs and the bumpstops at the same time, as in fully compressed on both sides without lifting the Jeep off jackstands?

I’ll cut some aluminum or stainless spacers at work tomorrow. I’ll make some 1/4 and 1/2 inch spacers to put under the 2” bumpstop from the Rancho kit.
 

A.J.

Active Member
Everything clears but the track bar and drag link will be close, it touches the pitman arm at fully stuffed position.

Track bar looks weird in that picture. I'd put the factory one back in if you have it. With your raised axle bracket it should be just right.
 
Last edited:

OverlanderJK

Resident Smartass
Are you saying the springs installed will cause interference among the other parts? Can you compress both springs and the bumpstops at the same time, as in fully compressed on both sides without lifting the Jeep off jackstands?

I’ll cut some aluminum or stainless spacers at work tomorrow. I’ll make some 1/4 and 1/2 inch spacers to put under the 2” bumpstop from the Rancho kit.

I’m saying when your springs are compressed I doubt your bumpstops will touch. You need to cycle your suspension with everything in in order to really determine anything. Doing so without the springs is kind of pointless.


Sent from my iPhone using WAYALIFE mobile app
 

RUBEERCON

New member
Ok I’ll add more parts in a few days. I was hoping to install everything once but it sounds like you go back and forth with the install until it’s dialed in.

I may get it trailer ready and have my shop finish it up. I enjoy wrenching but I want this done right.

Thanks everyone!
 

RUBEERCON

New member
Looks like I’m too far forward. Lowers are set at 23-1/4 both sides. Uppers are at 19-1/2 for starters to see how the bumpstops perform

My 2” bumpstops lack at least another 2” before they touch the factory upper bumper. Under compression either side the springs are awkwardly bowed forward and leaning towards the engine. Drivers leans so far it touches the track bar bracket on the frame.

Shocks show 2-1/2” of rod at compression.

Questions.
I didn’t change 4” lift springs and the bumpstops that came with the Rancho sport kit, wonder if they ever have touched?

Next step?
 

Attachments

  • 6957426D-8E0C-4247-9DA2-9048FFFC01DB.jpg
    6957426D-8E0C-4247-9DA2-9048FFFC01DB.jpg
    77.4 KB · Views: 106
  • D09116A1-EA48-4EB0-8C52-B2EA8FE498DB.jpg
    D09116A1-EA48-4EB0-8C52-B2EA8FE498DB.jpg
    93.5 KB · Views: 111

RUBEERCON

New member
Passenger side compressed
 

Attachments

  • C9C90355-4EC8-4D6A-8930-FD84E614C909.jpg
    C9C90355-4EC8-4D6A-8930-FD84E614C909.jpg
    81.5 KB · Views: 104
  • AD3CE88A-3744-404D-9D9A-96DF5F7A22D9.jpg
    AD3CE88A-3744-404D-9D9A-96DF5F7A22D9.jpg
    93.5 KB · Views: 93
Top Bottom