Rock Krawler 3.5 flex kit installed. Sore knuckles but great ride

Chapco

New member
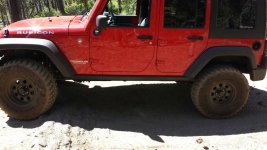
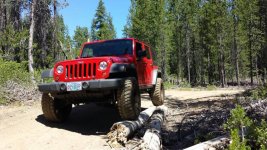
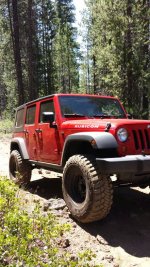
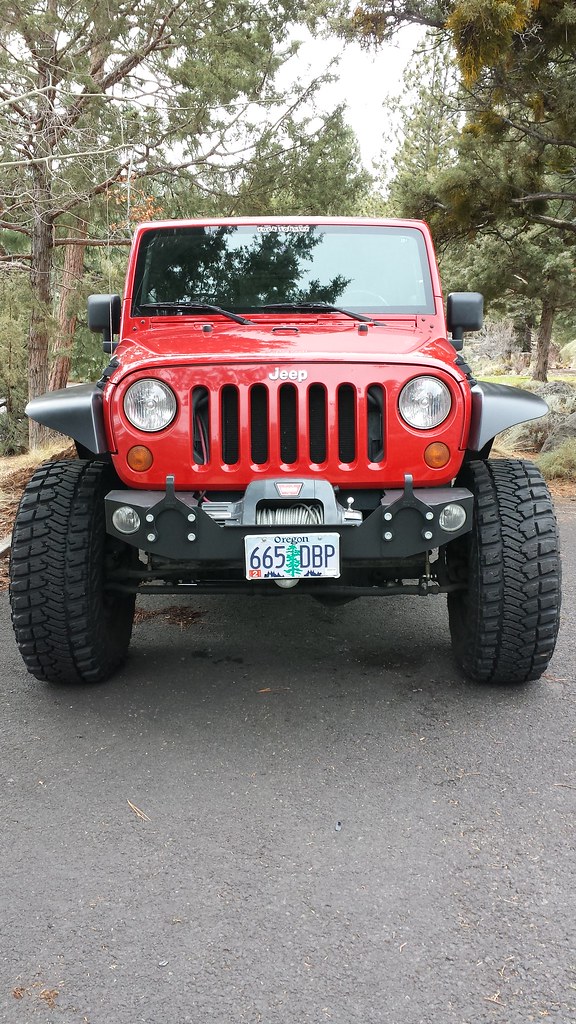
I just installed a RK 3.5 Flex kit (short arm) on my 07 Rubi. Added the extended brake lines too.
Did it over July 4th weekend so no one was around to help.
At some point I will write up the steps. (added on page 2)
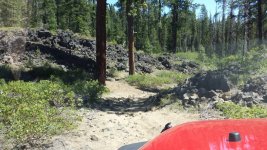
Very very happy with results. Rides over some big stuff with ease.

If you are considering this, it is pretty straight forward, but the instructions lack a few experience needed tips, like which coil to put in first on the front end so you don't have to fight or compress it. Install bump stops in coils loose and crank in later. Rotating the front drive shaft to meet the new control arm lengths, installing brake lines, and adjusting the steering wheel to keep the ESB from triggering braking over bumps. How is gearing affected, how to drill out your sway bar holes for the new linkage bolts.. What to do when you do something wrong..
Fortunately most of these things can be found here in the forums.

Send me a message if your considering doing this kit on your own and I would be happy to answer questions from my experience.
 
Last edited:

Chapco

New member
Show some pictures of it finished:thumb:

It's never finished... :)
I've still got bumpers / winch coming so that will eventually change the ride height.
Going up to a trail today for a test run. Will take some since driveway fotos are less appealing.
 

Serg5000

New member
I installed this lift on our 08 over Father's Day weekend. The instructions suck ass man. I called the shop I use for some help. They install lots of the RK lifts. After a few minutes on the horn it was installed and ready to test.
The road is awesome on and off the trail. Only issue I had was the pass rear bump stop. The bolt head was hitting on it. So I cut the bump stop at an angle and it was all taken care of. Other then that its great so far. Running some trails in Big Bear this weekend so that should be fun.
 

Chapco

New member
Good ride to test out the nuts and bolts were cranked down. The trackbar bolt came loose and felt the way folks describe death wobble. Easily corrected with my socket wrench. Cleared everything better than I expected and the jeep performed great up some loose lava flow uphill turns.
 

Attachments

  • 1373833422305.jpg
    1373833422305.jpg
    53.2 KB · Views: 401
  • 1373833436107.jpg
    1373833436107.jpg
    102.5 KB · Views: 392
  • 1373833449257.jpg
    1373833449257.jpg
    104.4 KB · Views: 389
  • 1373833468247.jpg
    1373833468247.jpg
    101.6 KB · Views: 388

Chapco

New member
I installed this lift on our 08 over Father's Day weekend. The instructions suck ass man. I called the shop I use for some help. They install lots of the RK lifts. After a few minutes on the horn it was installed and ready to test.
The road is awesome on and off the trail. Only issue I had was the pass rear bump stop. The bolt head was hitting on it. So I cut the bump stop at an angle and it was all taken care of. Other then that its great so far. Running some trails in Big Bear this weekend so that should be fun.

Agreed Serge5000.
I'm going to do a write up.
What bumpstop are you using?
I used a rough country 2" steel block that I had.


added from wayalife app for droid
 

Chapco

New member
Looks good. How did your trackbar bolt come loose? Was it not torqued down?

More than likely I didnt torque it down enough. I tinkered with it a few times after installing and even noticed the jam nut was not to torque. Adding a little more blue to the threads and see if that helps keep that from being an issue again.
I have a minor clicking noise on the rear end too. I think its the sway links or the braided cables clink something when they come back from extension.
 
Last edited:

Chapco

New member
So far I am pretty pleased. I did hit some sections of a trail that were kinda like a bike park set of whoopty-do and was getting some fun flexing and it didn't make even a squeak! I expect that to change based on other feedback on the forums on RK stuff.
The shocks seem to do well on and off road, I am not running it like a pre runner so not really putting it through those paces, but plan on taking it to some dune sometime this summer.
The height was exactly what I was looking for as I was hoping to get clearance over most rocks and blow down trees on the trails and it did great over both. I took it over a couple sets of good sized logs (bigger than the picture) and didnt hear any rubbing (as long as I kept it easy on the throttle letting the rear end down)

I plan on taking it out with some friends and their rig. Going solo is kind risky no matter the trail, so I didn't push it very far and difficult just yet. Next run we will bring a video camera.
 

Chapco

New member
Here are my tips for installing this kit. (if you are a rookie on a garage floor)

1. borrow, rent, steal a compressor and air wrench and sockets. (way easier) (16mm, 21mm)
2. start with the rear end. It's much easier. :thumb:
3. put your coils in earlier than the instructions state. just about the time you have it all disconnected. Its much easier to put them in before you bolt anything in. (you can even turn your drive shaft down a little bit to gain a little slack).
3.5. put your drivers side coil in first as the passenger side flexes further without unbolting the skid plate crossmember.​
4. put your blue locktight on before you start bolting things up.
5. be sure to have jacks that can crank up really high. I mean like 25 or 30 inches. Most floor jacks are 20-22" and you have to put a block on them to work.
6. Have a few sets of jack stands handy.
7. Various selections of socket extension. I used 2 mostly which were 2" and 10" and was able to reach everything pretty easy
8. If your control arms or track bars seem too long, they aren't. just read the tips on adjusting the castor/pinion angles of the drive shaft. Basically if everything is unbolted sitting on jack stands and you don't have a jack on the differential you can turn the whole axle with your hand... :rolleyes2:
9. The instructions advise reaming out the front sway bars to fit the bolts. I burned through 4 drill bits (expensive ones) and a reamer cobra bit. A few folks in forums just reuse the bolts or have the right grade replacements just slightly smaller.
10. Try not to touch your rotors. Oils on your hands make them perform less than stellar for a little bit.
11. The track bar seems impossible to reach like mine did. Good info in forums on this. Basically, bolt the upper end first and once you get the tires on and sitting on the ground, then turn your steering wheel until it lines up (really easy) :brows: (terraflex videos are corny but have good info:
12. You can pretty much set the lengths on the control arms and track bar and set the jam nuts. Much easier to get at the jam nut cranked down to torque than doing it on the ground on your back. The space to reach them requires a pretty thin wrench like a big crows foot and most don't fit with enough room to get a good bite.
13. Read up on changing out the brake lines for the braided ones. Do not turn on your key or motor to do this to avoid having the abs pump get air in. You will only lose the fluid in the lines you pull off. (have lots of wrags and cups to capture the mess if you cats and dogs.. dont get it but my wifes cats were very interested in the fluid that dripped)
14. To install your bump stops inside your coils, put them into your coils with tape loose and when you get the coil in bolt them in place. Easier than trying to squeeze them in after.

After the lift a few things you need to do.
1. Adjust the steering wheel by loosening the steering bolts and turning them backward or forward. I put tape on my steering wheel to get it straight without having to go back to the seat to see it. Crank those bolts back down. It may take a few adjustments. There are a few forums on how to do this and good videos on Youtube.
2. If your steering wheel is off aligned, your ESB is going to fire off and brakes may pulse. I have the flash update to disable mine by doing the right and left hold esb button trick. But the steering wheel correction solves it pretty much.
3. Take 3 Advil (unless your full of beer). :beer: If you don't do this much, your going to be sore.
 

NAUJK

New member
Good ride to test out the nuts and bolts were cranked down. The trackbar bolt came loose and felt the way folks describe death wobble. Easily corrected with my socket wrench. Cleared everything better than I expected and the jeep performed great up some loose lava flow uphill turns.

Its look great! Love the way it sits with the tires! :yup:

Its always fun when things come loose or fall off. I had a horrible clanking in my drivers side a few months ago out on the trail got it back to town and found out my caliper fell off easy fix put new bolts in.

Squeaks annoy the heck outa me I'm chasing squeaks in my suspension all the time. All most have them all fixed! :crazyeyes:
 

TooTall

New member
Any chance you know how much higher you sit than before? Looking for a measurement from ground to the rubi rails. Looks great!
 

Chapco

New member
Any chance you know how much higher you sit than before? Looking for a measurement from ground to the rubi rails. Looks great!

I will double check (at work now), but think when i measured it, after a few beers, it was about 4 3/4 inches. I have read that you should expect it to settle a little (like a half) and then if you have bumpers/winch etc it should sit somewhere near the 3 1/2" to 4" mark.
Didnt measure after wheels were put on. Will update later tonight.
 

Chapco

New member
Couple updates after a few good runs.
The RK kit seems to be pretty solid, done some more local difficult crawls without any real issues.
Great clearance over most stuff I see others with 2 or 3" lifts rubbing on.

Observations after a good set of difficult boulder routes.
-having a tough time keeping one of the control arms lock nuts tight. I have cranked the turd out of it with a cheater bar and it came loose today. Pretty sure I'm getting right torque specs. Might have to drop it and put in a secondary nut.
-RK recommends a 2" bumpstop for the kit. On some more extreme stuff i am rubbing. Seems like a half in shy. Going to flat fenders soon anyway.
-tore the expansion boot on my front driveline. Looks like it hit the auto case nuts during a pretty steep off off cambr section. I don't see that it's hitting the cross member as some have suggested. Going to Wood 1310 soon anyway.

As a side note the MT/R Kevlar tires are really impressive in the high desert volcanic tire eating environment.

Some more mellow shots at cline butte trail 16
ImageUploadedByWAYALIFE1375575771.939654.jpg
ImageUploadedByWAYALIFE1375575791.135407.jpg
ImageUploadedByWAYALIFE1375575813.597680.jpg
 

Serg5000

New member
Agreed Serge5000.
I'm going to do a write up.
What bumpstop are you using?
I used a rough country 2" steel block that I had.


added from wayalife app for droid

Sorry about the delayed response. I'm using 3" bump stops I the front. And I made some for the rear. I picked up some 3"x3"x4" long square tubing. 3/16" wall by the way. I cut them at a 20degree angle to allow the rear upper track bar bolt to clear the bump stop. RK sells them but mine cost $10 in material and 15 minutes to drill and paint. Worked great
 

Chapco

New member
Added a few more parts and did some chopping
13047710183_442e13f602_b.jpg


13203876463_97f1401e5b_b.jpg
 
Top Bottom