Rear Window Defroster Fix

MattAlpha

Caught the Bug
This is what I found when I was packing my Jeep for a trip up to VT.

ImageUploadedByWAYALIFE1419882034.017062.jpg
You can see the ground wire just hanging vice being attached to the defroster strip on the window.

So I grabbed my soldering iron, flux, a wire brush and solder and threw them in the Jeep.

This is what I did to fix it this morning.

I used a flat head screw driver to remove the button mount from the ground strap.
ImageUploadedByWAYALIFE1419882329.131741.jpg

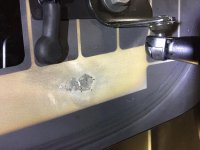
Here's where the mount fits onto the defroster's ground strip.
ImageUploadedByWAYALIFE1419882504.254097.jpg

I cleaned up the mounting surfaces with the wire brush.
ImageUploadedByWAYALIFE1419882416.544552.jpg

I then applied flux to both of the mounting surfaces and then heated them up and soldered them together all the way around. Here's the end result.
ImageUploadedByWAYALIFE1419882615.043313.jpg
ImageUploadedByWAYALIFE1419882659.556099.jpg

All reassembled.
ImageUploadedByWAYALIFE1419882695.320196.jpg

Works perfectly, which is what I needed this time of the year.

Overall it took me about 20 minutes from start to finish.

I hope this helps someone else in the future.
-Matt
 

Vilmars

New member
Used the permatex window defroster tab repair kit. All is working well and was easy to use. I'll update if the adhesive fails as have read that can happen.

Edit: I must have tempted fate, the tab broke off today. It lasted two weeks. Now to try the fix mentioned above.
 
Last edited:

MattAlpha

Caught the Bug
It's been several years since the defroster tab broke off on my passenger side and I fixed it by re-soldering it back on. 4 years later it's still working properly.

So I noticed a few weeks ago that my rear window defroster no longer worked. So this is what I found:


The tab has broken off my drivers side now. The passenger still is still solid.

Here's a pic of the tab still connected to the power wire:
IMG_7056.JPG

IMG_8279.JPG

Here are a few pictures of me preparing the tab and the mounting surface with a wire brush to help with the re-soldering it back on.
IMG_8280.JPG

IMG_8281.JPG

IMG_8282.JPG

IMG_8283.JPG


Flux applied:
IMG_8284.JPG

IMG_8285.JPG


I applied my simple 40 watt soldering iron to the base of the tab as I held it on until the solder melted and then let it cool. I then verified it was solidly affixed. Here is what it looks like soldered back on:
IMG_8286.JPG

Then I re-attached the wire. The defroster is now working properly again.


'07 JKUR ... mod'ing never stops...
 

RageKage

Member
I just gorilla glued mine back on [emoji23][emoji23][emoji23] took it to the dealer cuz I didn't think it was working and they used the infrared gun and determined it was working perfectly. Hasn't broke off yet!


Sent from my iPhone using WAYALIFE mobile app
 

scull20

New member
Nice work on the soldering! I used the permatex stuff on my old liberty a while back...it was garbage, only lasted a few days before it popped off again. After 3 weeks of regluing I just left it off.
 

MattAlpha

Caught the Bug
Thanks!

There are many ways to "fix" this particular failure. I prefer to just re-attach it the way it was attached originally. It's also a free-fix if you do your own wiring / soldering and have some flux laying around.
 

MattAlpha

Caught the Bug
Nice... my rear defroster button is flashing when I start my jeep... wonder if this is the issue.


Sent from my iPhone using WAYALIFE mobile app

It's easy to check. Raise your rear window and see if either wire that connects to the rear window defroster is hanging free instead of being attached to the rear window.


'07 JKUR ... mod'ing never stops...
 

dude

New member
So glad to find this thread. The dealer said new window, auto glass shops pushed the conductive epoxy route and the user reviews of those epoxy kits were mixed at best.

I was worried that the glass would shatter due to the heat from the soldering iron but it was fine. I just needed to be patient and let the iron do its work. The button tab seems solid but I still need to test it.

Thank you!
 

VeruGE*144

Caught the Bug
So glad to find this thread. The dealer said new window, auto glass shops pushed the conductive epoxy route and the user reviews of those epoxy kits were mixed at best.

I was worried that the glass would shatter due to the heat from the soldering iron but it was fine. I just needed to be patient and let the iron do its work. The button tab seems solid but I still need to test it.

Thank you!

Welcome to Wayalife, dude!


Sent from my iPhone using WAYALIFE mobile app
 

bigaaron84

New member
I tried the epoxy route first. it stuck for about a week and fell off. So i did it again and it fell off after a day. So then I tried the solder method but could not get the solder to stick for some reason. So I am taking it to the stealership tomorrow to see if its covered under my warranty.
 

dude

New member
So glad to find this thread. The dealer said new window, auto glass shops pushed the conductive epoxy route and the user reviews of those epoxy kits were mixed at best.

I was worried that the glass would shatter due to the heat from the soldering iron but it was fine. I just needed to be patient and let the iron do its work. The button tab seems solid but I still need to test it.

Thank you!

UPDATE:
Welp, it held until I went wheeling. The contact gave way again, probably due to the jarring. My solder job wasn't good enough. I will do a more thorough job of sanding down the old residue and making sure I lay down enough solder. Will update again.

UPDATE 2:
Sanded and cleaned surfaces, loaded up button tab with more solder. This time, the solder refused to hold onto the defroster. I also tried soldering onto the area just outside the original spot. I'm outta ideas and now considering the Frost Fighter epoxy product.

UPDATE 3:
OP's use of flux is key to making a solid solder connection. I picked up flux, applied it to the original spot on the defroster and a little on the button tab. Bam, the iron made quick work of melting the solder I had "tinned" onto the button. It's been a couple of days and it's still holding on.
 

Attachments

  • IMG_2365.jpg
    IMG_2365.jpg
    77.6 KB · Views: 54
Last edited:

TRLJNKY

New member
Mine is broken off also. Winter is here so I better get off my ass. Thanks for the tips

aka cavfighter
 
Top Bottom