Jeep JK Wrangler 730N/RHR Radio Installation Write-Up

WxNerd2015

New member
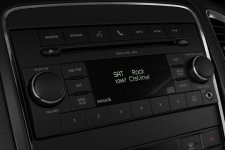
My next modification was an upgrade to the radio in the Jeep. The radio that originally came in the jeep was the 130S/RES, which was 1 step above the base model as it had the satellite radio has well as the functions for the UConnect but did not have the UConnect module.

attachment.php


I did some research to find what the UConnect module would cost to add in and what the parts I would need would be. This modification was definitely possible, but you needed the Uconnect module (which was $200+) as well as another harness to connect to the radio, and a microphone. Then you also have to mount the uconnect module inside the dash panel as well. Now this was not too expensive for keeping the OEM look and function, but adding in the additional function of having the bluetooth features, however, this radio didn't even have navigation and I could purchase a new aftermarket radio that had navigation as well as satellite and bluetooth all included for the same price and the same amount of work, and have better audio.

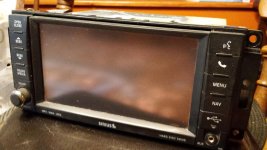
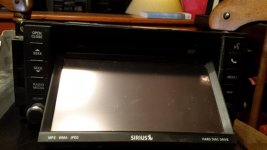
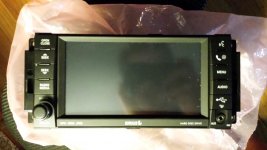
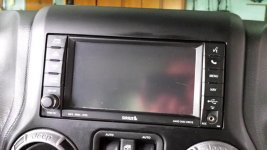
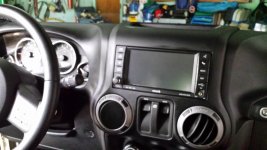
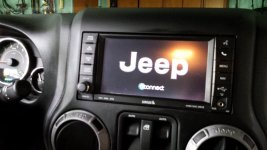
So I did some more research and decided that I did want to keep the OEM look and function, but I wanted to upgrade the radio. I looked into the 430 model radios, but those still required the addition of the same UConnect module so that just added to the price that I already knew. I ended up research the 730N/RHR model radio and searched eBay for a great deal. These radios brand new retail for anywhere between $1500-$3000, and eBay prices were not much better for used and refurbished radios that were in good shape. However, I got extremely lucky and was able to find one that was being sold on eBay as a pull off from a junkyard for only $500!!! Score!!! :rock: The only imperfection on the radio was a slight knick on the screen in the corner which you barely notice when the radio is off and can't see when it is on, so this was perfect!

attachment.php

attachment.php

attachment.php


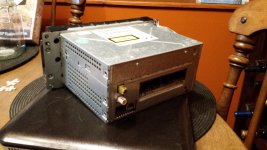
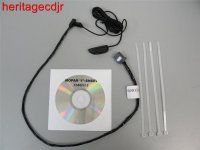
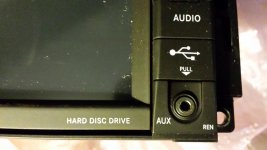
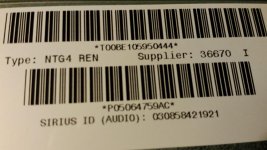
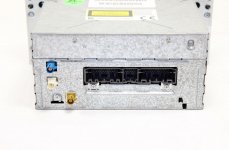
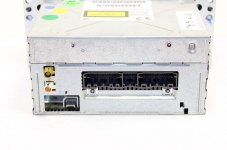
This radio was pulled out of a 2011 Dodge Ram 3500 and was barely used. The 730N/RHR radios have 2 connects on the back for the antennas, the white is the AM/FM antenna and the yellow is the Satellite/Navigation antenna. The 730N/RHR is also a major improvement on internal equipment as well, as the UConnect functions are built in to the radio which means this radio is much closer to plug and play with no extra module required for UConnect function. The only thing that is required to activate the UConnect in the radio itself is the addition of the microphone which is inserted in the small middle slot in the plugs on the back. The microphone looks like this:

attachment.php


And only costs about $35-$40 to get and is a simple install!

More write up to come on the radio installation, radio function, radio updates, and Chrysler radio compatibility discussion!
 

Attachments

  • system_lg_130_RES_RSC.jpg
    system_lg_130_RES_RSC.jpg
    26.9 KB · Views: 844
  • 20140731_190058.jpg
    20140731_190058.jpg
    74.7 KB · Views: 851
  • 20140731_190130.jpg
    20140731_190130.jpg
    44.5 KB · Views: 840
  • 20140731_190151.jpg
    20140731_190151.jpg
    75 KB · Views: 850
  • $T2eC16VHJIkE9qU3kIJrBRdwhqEM,!--60_57.jpg
    $T2eC16VHJIkE9qU3kIJrBRdwhqEM,!--60_57.jpg
    47.7 KB · Views: 846

WxNerd2015

New member
Chrysler Radio Compatibility Discussion

Now, my main issue and the big part of the research that I had to do was understanding the compatibility of the radio with my Jeep! When I started looking and had the idea, I had no clue on how many different radios that were actually made by Chrysler and that it was very specific as to which radio would work in my Jeep!

This first keep decision that I was making was which models of radios I wanted to look at (operating systems, features, fitment, etc.) and what were the key features to me. I decided that I wanted to go for the upgrade to an in-dash navigation radio as having the GPS up in the window was becoming an annoyance as windshield space on the Wranglers is very limited, and if I was going to spend the money to upgrade, I wanted to do it right!

I originally had access to a brand new REN model radio, pulled brand new from a 2009 Town and Country. This is the non-navigation model of the touchscreen Chrysler radios. This was not as ideal as I wanted to navigation radio, however this was almost all the way there, and it was free, which you can't beat!

attachment.php

attachment.php

attachment.php

attachment.php


I soon found out in researching the compatibility that there are 2 different kinds of CAN-BUS systems in all Chrysler/Dodge/Jeep/Ram vehciles, a high-speed CAN-BUS which covers all the JK models (07-current), and the low-speed CAN-BUS which applies to some other vehicles (see later in this forum, page 4, for links to the compatible part numbers for each Chrysler/Dodge/Jeep/Ram model). Radios meant for low speed CAN-BUS are not compatible which those using a high speed CAN-BUS. So the free option was out the window!

I then started the comparison between the 430N model navigation radios and the 730N/RER and the 730N/RHR radios. Now i liked the 430N models as they were a bit cheaper, the interface was nice, and Garmin navigation is the system that I had in my window for years, so I knew the system would be solid, However, a few of the key features that swayed me away from the 430N were the lack of a built in UConnect module (as stated earlier, you still had to purchase that separately), as well as the lack of being able to have the radio and navigation split screen as I feel that that is a really nice and useful feature. And as mentioned before, for some of the 430N's and the 730N/RER's, the high and low speed CAN-BUS compatibility needed to be checked as these were used in both systems, which was a pain in the butt to constantly have to check. I did however find a great site to help show what model numbers of what radios are compatible with all chrysler vehicles:

Jeep Grand Cherokee WK2 - 2011 Grand Cherokee Navigation radios

Which this page is meant for the Grand Cherokees, however parts numbers which are compatibly for 2011 Wrangler with the High Speed Can-Bus system are listed in there and that was a great help in the search, as well as making sure that I had everything that I needed to install and get 100% operation out of!

So, I decided, for what I was look for, the 730N would fit me best, so I researched both the RER and the RHR which both had high and low speed systems, both had built in hard drives, both had navigation by Navteq, both have built in HDD for music, pictures, etc. (however the hard drives vary in size depending on which radio you purchase and when it was made), etc. Basically they are the same unit, just the RHR is slightly updated in operating system, as well as a few additional features. The major difference between these two units came when I was looking at the plugs on the back of the unit. They both contained the main operation radio plug, a spot for a facttory backup camera, the UConnect mic plug, 2 USB connection plugs, and the AM/FM antenna plug. The difference however came when looking at the satellite and navigation antenna connections. On the RER, there were two separate antennas with two separate plugs for the satellite radio (yellow) and the navigation (blue):

attachment.php


As these were two separate antennas on the vehicle when these radios were being installed new from the factory, so, 2007-2010. On the RHR model, the separate satellite and gps anetnnas were combind into one plug on the back for the radio (yellow), so one less wire needed:

attachment.php


So, no having navigation from the factory, I assumed that I was going to need to install a gps antenna somewhere on the vehicle (which, it's a Jeep, not a lot of upward facing surfaces that are going to stay on the Jeep all the time, so I was trying to determine the location of the satellite antenna. Turns out, that location is on top of the sound bar on the passenger side, roughly above the speaker, as the interference from both the hard and soft tops are minimal, so this way the antenna is always on the vehicle. So having satellite and needing GPS, I assumed the RER was going to be easier so I didn't have to get an additional connector. I did just a bit more digging and talking with the parts department (who then had to call the Chrysler engineers) and found out that starting in 2011, any Chrysler/Dodge/Jeep vehicle that had satellite radio was already wired for navigation as the antennas had been combined into a single dual antenna, which meant no need to add a gps antenna and run a wire and all that! Woohoo!

This meant that the connector that I had for both of those matched to that which plugged in to the RHR model, not the RER model, so I then decided and searched for the 730N/RHR model radios.

Now, I know this has been long winded, but I searched a lot, and spent a long time putting all this information together in my head, so I just wanted to share it here to get a lot of this information together in one location to help anyone else out who is in the same situation that I am in, and deciding on the same modifications! So with that said, there was one last thing that needed to be considered...and thanks Chrysler for making it this complicated to change to another OEM radio which are compatible with some many different vehicles, but this much work is needed for all the different parts number that one have! Oh well, there is also a great satisfaction after a long and hard chase is complete and all is installed and functioning properly too, so I guess I can't complain too much! So the last consideration for me, was the fact that in some of the RHR model radios, Chrysler built in an anti-theft device, where-as you need to have a certain code to unlock the radio if it gets installed in a new vehicle, which many times, junkyard radios and eBay radios don't have with them, meaning that your new radio is bricked until you can get the code from the seller, figure out how to program around it, or pay for someone to generate a working code and send it back and enter, which all would be a big hassle. These anti-theft codes were introduced starting in the radios manufactured in 2012 to present, so if the radio you purchased was built in that time frame, make sure to check for the security/anti-theft code. I however got lucky and found one that was from 2011, so there was no security code to have to deal with and my radio was plug and play!

I hope this discussion can help those of you, who are in the same situation as I was searching to make sure that you get the best part possible and that all will work. I know, in the end, the aftermarket option may have been simpler, but I just really wanted the OEM fit, look, and function! Feel free to share and use when you would like!
 

Attachments

  • 20140722_201017.jpg
    20140722_201017.jpg
    53.1 KB · Views: 768
  • 20140722_201038.jpg
    20140722_201038.jpg
    48.3 KB · Views: 767
  • 20140722_201108.jpg
    20140722_201108.jpg
    67.4 KB · Views: 770
  • 20140722_201122.jpg
    20140722_201122.jpg
    78 KB · Views: 770
  • fSjmGFO_1024x1024.jpg
    fSjmGFO_1024x1024.jpg
    75.7 KB · Views: 779
  • cuEHmFZ_1024x1024.jpg
    cuEHmFZ_1024x1024.jpg
    75.9 KB · Views: 774
Last edited:

WxNerd2015

New member
730N/RHR Radio Install

Now, as promised, a write-up on the installation of the 730N/RHR In-Dash Navigation Radio!

The installation overall, since it is an OEM part, was pretty straight forward with no surprises! I also apologize as I don't really have any picture of the process of disassembling the dash, but there are plently of videos and forum post with pictures and video if you are more of a visual learner! I am one of those visual learners, so here is the video that I used which was a big help for me:


1. Pull the panel below the steering column down starting at the top, just below the steering wheel. Start pulling at the top and pull carefully as it is held on just by clips that snap in and out.

2. Once that panel is removed, there are two bolts located at the top right and top left areas, to the right and left of the steering column which the panel had covered up, which need to be removed.

3. Lift out the tray insert in the tray on top of the dash in the middle. Underneath that, there is one bolt that needs to be removed.

4. If you have power windows, this next step is a bit more tricky, and for me, it was a PITA! Remove the power window switch (Or without the power convenience package just remove the cup where those switches whould be) by grabbing the middle of the switch and pulling, and using something flat to slid in to pop the plastic off doesn't hurt either. Once the switch is loose, you will not have mouch play in the connector to that, but release the connector and remove the switch if you can do this as this gives you much more room to work with.

5. Once you have access to the power window switch location, the last bolt needed to remove in located just below where that switch was. If you look in at a downward angle, you will see the bolt, remove that, and make sure that all your hardware is in a good secured location so that you do not lose any them! I had one fall down under the carpet under the drivers seat, luckily, I had a long magnetized screw driver that I was able to find it and get it out after 20 minutes wasted cuz I wasn't paying attention.

6. The rest of the dash is not just held on by the same type of clips that were holding that lower panel on, just just give some good, strong, but careful pulls and the dash panel should release! The dash panel in the 2011+ goes all the way over to the driver side door and encompasses the instrument cluster as well as the center of the dash!

7. Now that the dash panel is removed and no longer interfering, you have access to remove your radio. There are 4 bolts (1 at each corner) holding the radio in place. Remove these 4 bolts and once again, put them in a safe place!

8. Pull the radio straight out towards the rear of the vehicle until you have access to the plugs in the back of the radio.

9. Disconnect all connections to the radio, and note the locations of which plugs go where, as this makes the install of the new radio much easier!

***As a side note, make sure that all CDs are ejected from the old radio before plugging in and installing the new radio as it is nearly impossible to get it back out unless plugged in to a factory harness!***

10. With the old radio removed and set aside, take this time to clean out inside the dash panel any dust and dirt yo may have in there! I know it is a Jeep and all, but it's good to clean up where all that electrical is running as well as the vents since they do get used sometimes, ya know, on rainy days when you have to have the top up! Just a suggestion from me!

11. With the dash empty and cleaned out, take the time and space to run the UConnect microphone and connector if you purchased one to activate the UConnect features on the radio! I routed mine right to the middle of the dashboard where the Sun Light sensor would be if I had automatic headlights! So it is in between the defrost vents directly below the review mirror!

***I tested a few locations, but for mounting convenience, this was the best location, and the sound quality for those on the other end is absolutely awesome! Even with the top off and windows down! And the UConnect works perfect!***

12. Once you have the mic installed in it's location and the wire run and tied up nicely where you would like it, time to get the new radio in the dash! Get the radio close to the dashboard, as you don't want to stretch the wire harness too much and cause an issue somewhere else, and plug the appropriate connectors into their locations, with the new mic plug going into the smaller location next to the harness that is running in to the CAN-BUS system.

13. Once all connections are made, line the radio up and slide it back into the dash location making sure no wire get pinched! It is a tight fit, so a little bit of force may be needed to get it all the way in.

14. Before anything is secured back down, take a moment to start the vehicle and allow the radio to turn on and "learn" your vehicle and make sure that all is functioning properly, as you would hate to discover this once everything is buttoned back up!

***My radio turned on instantly when powered on and came up with the RAM splash screen (As this radio was last in a 2011 Ram 3500) which showed for 3 second, and then the radio automatically switched over to show the Jeep splash screen as it "learn" what it was connected to. If you have a radio that needs a security code, this is around the time that the new security code would need to be entered to allow the radio to function in it's new vehicle. The radio then came up to the black screen which displayed the clock. I then pressed the volume knob to turn the radio on and the radio turned on with 100% function. I then checked the navigation and it searched for signal and my current location for less than 1 minute and then displayed my location. and function was 100%! Last to check was the UConnect mic, so I pressed the UConnect button and UConnect activated and gave me possible prompts and it tookthe voice commands and executed properly. I also checked and the radio had synced in it's information to show my vehicles VIN number as to what vehicle it belonged to.***

***Extra side note, if you have a Sirius subscription, you will have to call SiriusXM and switch your subscription to your new radio, as the radios have different SiriusIDs. It is not linked to your Jeep, but the radio itself.***

15. Once all is checked and you are satisfied that the radio is functioning properly, go head and reinstall the bolts to fasten the radio back to the dash.

16. Grab the dash panel to reinstall. Line up all of the clips and snap them back into place.

17. Reinstall the bolt that is through the power window switch hole.

18. plug the power window switch back in.

19. Once again, test to make sure that the power windows are functioning properly before going beyond this step.

20. Snap the power window switch back into place in the dash by pushing it back in from the front.

21. Reinstall the bolt in the upper dash panel tray. Careful not to over tighten as you could crack the plastic in the tray.

22. Reinstall the bolts on either side of the steering column.

23. Snap the panel below the steering column back in place starting with lining the bottom up and work your way to the top.

And there you have it! A brand new 730N/RHR Navigation radio to play around with! This for was 100% a plug and play modification, but depending on the features in your jeep, you may need an extra couple of parts. The radio the I took out was a 130S/RES which is one step about the base as it has satellite radio and is UConnect ready if you had the module. Therefore I already had a Satellite antenna which in 2011+ is also a GPS antenna, so I had no need to run any additional wires. If you do not have satellite radio already, or have a pre 2011 Jeep, then you will need to get additional antennas and run extra wires.

Here are a few pictures of the final product all installed and functioning:

attachment.php

attachment.php

attachment.php

attachment.php

attachment.php

attachment.php


Please reply or message with any questions as I have an answer for most stuff dealing with these radio installs. I spent hours doing my research and know almost all there is to know about it! Also, let me know if you have any questions on compatibility as I can help, and you can read my previous post that goes in depth on this matter!
 

Attachments

  • 20140802_173229.jpg
    20140802_173229.jpg
    61.4 KB · Views: 729
  • 20140802_173236.jpg
    20140802_173236.jpg
    63.6 KB · Views: 731
  • 20140802_173245.jpg
    20140802_173245.jpg
    58.8 KB · Views: 725
  • 20140802_173305.jpg
    20140802_173305.jpg
    45.6 KB · Views: 730
  • 20140802_173315.jpg
    20140802_173315.jpg
    49.9 KB · Views: 728
  • 20140802_173328.jpg
    20140802_173328.jpg
    45.1 KB · Views: 728

mds22

New member
Very nice write up. I had no idea the 730 had split screen nav/radio. I would love to have that feature.
 

WxNerd2015

New member
Very nice write up. I had no idea the 730 had split screen nav/radio. I would love to have that feature.

Yeah, it's really nice, cuz when I am not running an actual route, I like leaving the split screen so I can still have easy access to the radio control soft keys to change stations, catch when my favorites are on, etc. but I also have the Sirius XM Travel link and traffic so I can still keep tabs on the traffic at the same time too! I think this is a huge advantage over the 430N which you can only see one or the other! Not really clearly advertised anywhere as a difference, but I do think it is pretty important to note!
 

WxNerd2015

New member
730N RHR Tips, Tricks, and Functions

Just wanted to further my posts on the 730N RHR radio that I had installed to everyone more info on the radio itself, along with the functions and how it works! So if you are thinking you can get one, then you can be fully informed on the functions of the RHR! I will post a video of it working soon, but here are some pictures of the functions!

When the radio receives power once you turn the ignition on, you will first see the Jeep splash screen. Then, as long as the radio if off, it will load to the radio off screen, which usually will just display the time, like this:

20151019_192459.jpg
20151019_192502.jpg

If you then want to turn the radio on, you press the volume knob in, and (if you have no lock pick system installed on your radio) then you will see the warning/disclaimer about vehicle in motion inputs and all that. The screen will look like this:

20151019_192509_converted.jpg

Then the radio will then load into which ever radio or nav screen it was last on. For me, that is the split screen with audio on the left, and the navigation screen on the right:

20151019_192518.jpg

From there, you have the option to change the volume (but only when there is actually audio playing), you can seek through tracks, change radio station, change radio functions (You have AM/FM, Satellite, Hard Drive, USB, AUX, CD/DVD), click the nav screen to go into navigation, and use the UConnect functions on the radio! Here are some images of those functions in action:

20151019_192526_converted.jpg
20151019_192532_converted.jpg
20151019_192539_converted.jpg
20151019_192548_converted.jpg
20151019_192553_converted.jpg
20151019_192557_converted.jpg
20151019_192602_converted.jpg
20151019_192608_converted.jpg
20151019_192617_converted.jpg
 

WxNerd2015

New member
730N RHR Tips, Tricks, and Functions (continued)

The next feature it took me a long time to figure out! This would be the dimming/night function of the radio! For some reason, Chrysler made this extremely difficult to figure out, but the trick is to have the dash light dimmer turned to the right level! When dimmed, the radio will look like this:

20151019_192638.jpg

To get the radio to switch to the night colors functions which is seen above, you have to make sure that the dash light dimmer switch is at least one setting below the normal/locked dash dim setting (or at least one dimmer setting below the brightest):

20151019_192703.jpg
20151019_192716.jpg

You want to have the dimmer setting set to the first picture, not the second picture setting!

Next, if you press the UConnect button on different screens, you will get different options. When you press the UConnect button, there will be a short tone to prompt you to speak, and your options that you can say will appear on the screen, like this:

20151019_192740.jpg
20151019_192754.jpg

Next, if you press the open/close button, the screen will flip down to show the CD/DVD slot which you can then insert a CD or DVD:

20151019_192809.jpg
 

WxNerd2015

New member
730N RHR Tips, Tricks, and Functions (continued)

The next functions that I want to share are when you enter into the menu area of the radio. To do this, you press the menu button, and then this screen shows up:

20151019_192825.jpg

The first feature in here is if you subscribe to Sirius and have the Sirius Travel Link subscription, then you can hit the Travel Link soft key and enter the next menu:

20151019_192830.jpg

There are some great features in here like getting your weather forecast, fuel prices based on location with price and fuel type, sports scores and alerts, movie theaters with times, locations, etc. But for me, my favorite feature is what showed up after I did an update to the firmware on my radio, which is the weather map! This shows your location over laid over radar maps. It also will show front locations, different zooms, tropical weather updates, and a few other things! The radar maps look like this:

20151019_192835.jpg
20151019_192842.jpg

Another function, if you subscribe to it is the Sirius Traffic functions. This feature is very handy as it overlays the traffic patterns onto the regular GPS map so you can see where there may be traffic issues and go around it. Also, if you have Sirius Traffic, then when you have a route active on the GPS, it will update for serious traffic issues for you to get around without having to deal with backups! But from the menu page, if you click on traffic updates from there, it will take you to a more detailed screen on traffic updates and you can see details on specific issues and where they are relative to you!

20151019_192856.jpg

A few other functions that are accessible from that menu are the audio tuning controls where you have balance and fade, as well as bass, treble, mid-range, as well as managing your hard drive where you can have audio files, pictures, and some other stuff stored! Personally, I absolutely love the HDD for adding music so I don't even have to take the time to plug my phone or iPod in! Here's some picture of those screens below:

20151019_192904.jpg
20151019_192908.jpg
20151019_192919.jpg
20151019_192923.jpg
20151019_192927.jpg
20151019_192932.jpg
20151019_192945.jpg
 

WxNerd2015

New member
730N RHR Tips, Tricks, and Functions (continued)

Just a few remain tips left for me to tell about this radio. Once again, from the menu home screen, there are a few other possible things to edit/change with the radio, such as what shows up on the right half of the screen when in radio/audio mode. This can be selected on the right edge of the menu screen. From here you can select map view (which I have mine set to), Jeep Splash Screen, am uploaded picture, or you can have the screen go completely off!

20151019_193010.jpg

You can also access the menus such as checking the version of software/firmware/gracenote/etc. that the radio is currently operating on, as well as managing the hard drive, changing the time zone, voice recognition settings, pairing a bluetooth device, feedback settings, and a few other settings as well! The clock can also be adjusted if you click the clock directly on the screen, it will take you to the same screen as the menu time set does. Here are a few pics starting with the main and then sub screens:

20151019_193023.jpg
20151019_193027.jpg
20151019_193050.jpg

And lastly in all the major functions and to conclude all the tips and tricks I can think of at the moment, I will cover the navigation functions. When you go to the navigation screen, there are a few ways to get there. You can either press the NAV hard key on the right side of the radio, or click on the map on the right side of the touch screen. The NAV key will take you to the navigation menu, and clicking on the map will pull the map up full screen! Your view will look something like this:

20151019_193110.jpg
20151019_193116.jpg

There are a few map preference selections tat you can make on the map view screen such as your zoom, what shows up on the screen, always north or always behind, your option to go to the nav menu, and the ability to switch between the 2D and 3Dviews. I personally like the 3D view as you can see a bit further ahead, but to each their own! So the above pic is the 3D view, and below is the 2D map view!

20151019_193121.jpg

Then, from the navigation menu page, you can access all sorts of different info, such as where am I now (which displays lat. and long. of current location), guide me home (where you can store your home address for quick access to being guided home), you cane find points of interest, you can save favorites, you can create and save whole trips with multiple destinations, you can get emergency info, you can find your recently routed places, and of coarse, destination entry. The destination entry screen is shown below, followed by the where am I now function:

20151019_193129.jpg
20151019_193144.jpg

From the destination entry screen, you can see all the different options of how to route you and whatever inputs you would like or you may have to get to your destination! There is even a saved trails button, where your GPS can "drop breadcrumbs" for trails/paths/trips can save them so you can find your way back, as well as saving them for possible future trips! Once a destination is entered, the radio will screen back to the full map view screen with directions now showing and your route highlighted. (Just a couple quick tips and ideas. One, the volume of the voice on the nav can only be adjusted when it is speaking. And two, when the nav is giving a direction, the voice only comes out of the driver side front speaker, so it is focused on only the driver, and no one else. So, say there is music playing, the music will continue to play at the correct volume through all the speakers except the driver front speaker which will switch over to the nav voice to speak, and when it is done, it goes back to whatever it was doing before. I personally like this feature and think it is a pretty neat idea!) Here is what the screen looks like with an active route:

20151019_193234.jpg

You also have a few options from this screen as well during an active route as well as right before you hit go to start the route. You are able to select the kind of route you want, such as no toll roads, or fastest route, you can see alternate routes that are not as fast, and a few other things. Then, once the route is active, you have the option to add in a detour, find nearby points of interest (POIs), see the destination you input, save the destination, and view the turn list instead of just viewing the map! Some of those functions can be seen in the pictures below:

20151019_193248.jpg
20151019_193253.jpg
20151019_193314.jpg

So that is all the tips and tricks that I can think of with the RHR 730N Chrysler radio installed in a 2011 Jeep Wrangler! Let me know if you have any questions or if there is anything else I did not show that you may be wondering about! Thanks!
 

Suprchrgd_rubi

New member
Very cool I am wanting to do this upgrade as I have the same stock 130 radio with u connect installed, I will be adding a rear view camera to mine thought
 

WxNerd2015

New member
Very cool I am wanting to do this upgrade as I have the same stock 130 radio with u connect installed, I will be adding a rear view camera to mine thought

Yeah, it's a great upgrade with a lot of cool features if you are looking to keep the OEM look and function! I have been looking into adding a camera too soon, but trying to decide the right one that I want, like location, size, price, and how to get the stock radio connection harness (I know the AEV kit as well as another that go through the spoke in the rear tire have it, but I just want the harness itself so I can get the rest of the parts a heck of a lot cheaper! Good luck to ya! Let me know if you have any questions!
 

WxNerd2015

New member
Installation Help Tips

Just a few more things to help you out with your installation! If your radio was made after late '11 to '12, there may be a security code as a built in anti-theft device which you will need to make your radio function in it's new vehicle! Make sure that you either get the code from whoever sold it, or if you are unable to get it, you can go to this site to get the code to make it work:

http://www.radio-code.com/Dodge_chrysler-Pay-Page-radio-code.htm

Also, here is the link to the main Chrysler radio home page for these radios and the specific RHR model to learn about some of the features:

http://m.chrysler.com/en/owners/quality/
http://m.chrysler.com/en/owners/quality/rhr/

And lastly, you may want to update the firmware and grace note data that is on radio to the most current, as it is always good to keep your software up to date! It is actually pretty easy to do, and I have been able to do it myself! You can go to this site:

http://navrepair.com

And click the downloads with the free and arrow pointing at it, then find your correct radio model, download the firmware and grace note needed, and then install the updates! A few keys to a successful installation though
1. Make sure to first install the firmware, then the grace note updates.
2. You have to first download this disk burner express software (http://mygig-disk.com/download-rhr.php), as the Chrysler radios do not like when the built in Windows burner burns the disc and it will not recognize or run the update.
3. Make sure you leave a couple hours to get all figured out and to allow the updates to run as they do take a while

Here's a video to help with the software update, mine worked exactly like this!

Any questions on this stuff, let me know! I am happy to answer and assist you!
 

WxNerd2015

New member
Thank you I am still Looking into where to get in I know a web site oemcarparts looks expensive but I like the factory look

Yeah, I would check eBay as there are a lot of good deals on there! Though OEMautopartsco.com does have great radios that they program the OEM how u would like, along with a lockpick if you want too and all that which is really nice, just gets expensive fast!
 

WxNerd2015

New member
Looks like 2k with everything from them, checking eBay now

Yeah, I was able to get mine for $500! I know another guy I've talked to was able to get one for $300 from another forum member! Check that too! You can get a better deal than $2k and be more than happy with what you get most likely!
 
Top Bottom