Broken Body Bolt

JudgeJimmie

New member
Hey Everyone, looking for some advice / help!

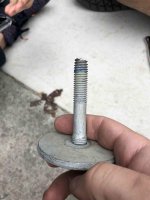
I was installing some rock sliders, and ended up breaking the front left Body Bolt [The one below the drivers side door, not the one within the engine compartment] when removing it from my jeep. It was the first one I attempted to remove, so there are still 5 left and I don't want to remove them until I figure this one out.

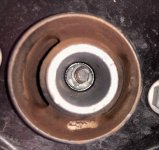
Here's a photo, I'm not sure how much of the bolt is left as I don't have a second to compare it to. Perhaps one of you have an idea?
Broken_Bolt.jpg

I have a few questions about this:
1). With the other bolts in the body / frame, am I ok to drive this for a few days while I figure out how to fix it? Obviously nothing crazy, just freeway to and from work.

2). Do I have any chance of fixing this myself. I wouldn't say I am super handy mechanically, but I do wrench a bit. I am inclined to take this to a professional which leads me to....

3). Does anyone here happen to be in the Bay Area around Mountain View, CA, and know any mechanics that could tackle this? I've put out a few calls to dealers to get some quotes as well, but I think I more specialized Jeep guy may be able to take care of this problem a bit cheaper.

And Finally,
4). Any tips on taking the rest of these bolts out in the end? I still do want to get my rock sliders on, but I am terrified of breaking any more. I was thinking I would have whoever can help fix my issue replace the other bolts with those grade 8 bolts everyone seems to talk about around the forums.

Thanks for any help here guys and gals!
 
Last edited:

JudgeJimmie

New member
Just as an updated if anyone else hits this issue and happens to google this thread:
1). With the other bolts in the body / frame, am I ok to drive this for a few days while I figure out how to fix it? Obviously nothing crazy, just freeway to and from work.
I drove my jeep about 20-30 miles on the freeway / city without this bolt and have had no issues, checking the hole periodically and it appears the frame is not moving at all. Not planning on doing any off-roading with my jeep in this state, but I think it is ok to drive!

2). Do I have any chance of fixing this myself. I wouldn't say I am super handy mechanically, but I do wrench a bit. I am inclined to take this to a professional which leads me to....
Doing some research here it looks like many people drill the bolt out with a left handed drill bit (like so). This seems like a pretty big task and can take quite a long time with many drill bits getting eaten up in the process.
I have found that the part number of the bolt is 06508326AA for replacement.

New Question, does anyone know if I follow the instructions for a body lift if I will have greater access to this bolt (Just behind the driver side wheel)? I've read a couple of places that following then body lift steps could give me access to the top of the bolt / make this easier?
For body lift instructions I plan on following these

4). Any tips on taking the rest of these bolts out in the end? I still do want to get my rock sliders on, but I am terrified of breaking any more. I was thinking I would have whoever can help fix my issue replace the other bolts with those grade 8 bolts everyone seems to talk about around the forums.
After looking online it seems there are a few tips and tricks to make getting these bolts out more safely. Again following the body lift guide here gives quite a few tips already.

I'd say:
- Do NOT use a breaker bar besides to get the bolts just started. I kept using the breaker bar when the bolt did not come easily with my normal socket
- Use an Impact Wrench! I plan on buying an air-powered impact wrench for this and future projects!
- Apply Downward pressure on the body bolt with a crowbar or something else while unscrewing. This seems to be a common theme in many of the guides and one I did not follow

If any of the forum members here have other good strategies please let me know!! Also still looking for a mechanic to help me fix this in the Bay Area if anyone has recommendations for a good one.
 
Last edited:
Yeah that sucks. There’s not an easy way to deal with those. Either drill and tap or weld a nut to it and back it off. You’ll be just fine doing some driving around missing only one bolt. What you didn’t mention was penetrating oils and also wiggling a bit- if it’s super damn tight don’t just cheater bar it harder- try tightening. Then loosening. Then tightening, loosening etc. get it to wiggle. Get some pb blast or kroil into it and keep working it until it moves easier. If you have a torch of some form it always helps to heat it then spray lubricant at it. Listen to the noises, if you feel like it’s moving but it’s not creaking squeaking or ratcheting on a dry seized-ish bolt you’re probably twisting the bolt and about to break it back off and try something else. Good luck getting it finished up.


Sent from my iPhone using WAYALIFE mobile app
 

JudgeJimmie

New member
Thanks for the advice Snboarder! I bought some PB Blast and will begin hitting the bolt with it starting tomorrow. After talking to a few folks, I think I may actually try and tackle this myself! I figure I can't really do any more damage and most shops are estimating from 1 to 8 hours (haha).

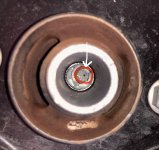
I went ahead and bought some left handed drill bits from harbor freight. Besides hitting this guy with PB Blast over the coming days, anyone have advice on extracting this bolt. Also, I am a little bit worried as the bolt appears to be a bit misaligned (Likely why it snapped in the first place). Is there a way I can get this more aligned before extracting / is this a sign of a bigger problem?

Here's the photo of the snapped bolt
IMG_0390.jpg

I'm a bit worried that even if I can get the left handed bit up there and straight it still won't be able to come out smoothly due to misalignment? Is this something I can / should fix before trying to get this out? Would the way to do this be to find all of the body bolts and take them out, and then lift the jeep with a jack (similar to wayalife's body lift instructions)
 

jeeeep

Hooked
harbor freight sells a transfer punch set for cheap.

I'd use the punch that fits the hole and tap a center hole to help align the reverse drill and keep it from walking on you.

the tapping may also free up the threads since you've used PB Blaster on it.

Good luck!
 

SDG

Caught the Bug
harbor freight sells a transfer punch set for cheap.

I'd use the punch that fits the hole and tap a center hole to help align the reverse drill and keep it from walking on you.

the tapping may also free up the threads since you've used PB Blaster on it.

Good luck!

Good advice. I would use the transfer punch with a couple hits and then switch to a real punch to get it deeper. Transfer punches are notoriously soft (and i am talking about good ones, not the ones from HF).
 

JudgeJimmie

New member
harbor freight sells a transfer punch set for cheap.

I'd use the punch that fits the hole and tap a center hole to help align the reverse drill and keep it from walking on you.

the tapping may also free up the threads since you've used PB Blaster on it.

Good luck!

Wouldn't a transfer punch misalign my drill with the center of the bolt though? The hole leading up to the sheared bolt is not perfectly aligned, so wouldn't I just want to center punch the actual bolt instead of using the transfer punch? I'm still learning about these tools, so just making sure I understand what you are saying!

IMG_0390.jpg

So in the above image the transfer punch would center land where the yellow dot is. The sheared bolt is outlined in red, wouldn't I want to put my punch for the drill to follow on the black dot? I was thinking center punch the black dot, then pilot hole, then use the 1/4" left handed bit and go to town.

Thanks for the advice on using the punches, I ordered a set from Harbor Freight. I've got an HR close to me too so can run and get more bits if any break....
Punches: https://www.harborfreight.com/12-piece-punch-and-chisel-set-66337.html
Left Handed Bits: https://www.harborfreight.com/left-hand-drill-bit-set-13-pc-61686.html
 

sipafz

Caught the Bug
Wouldn't a transfer punch misalign my drill with the center of the bolt though? The hole leading up to the sheared bolt is not perfectly aligned, so wouldn't I just want to center punch the actual bolt instead of using the transfer punch? I'm still learning about these tools, so just making sure I understand what you are saying!

View attachment 300617

So in the above image the transfer punch would center land where the yellow dot is. The sheared bolt is outlined in red, wouldn't I want to put my punch for the drill to follow on the black dot? I was thinking center punch the black dot, then pilot hole, then use the 1/4" left handed bit and go to town.

Thanks for the advice on using the punches, I ordered a set from Harbor Freight. I've got an HR close to me too so can run and get more bits if any break....
Punches: https://www.harborfreight.com/12-piece-punch-and-chisel-set-66337.html
Left Handed Bits: https://www.harborfreight.com/left-hand-drill-bit-set-13-pc-61686.html

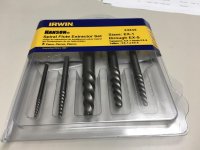
I would pick up a set of bolt extractors:

IMG_6952.jpg

They cost like $10 or so and a tap wrench. Then use a regular punch and make the mark in the center of the bolt, left hand drill through the bolt using a bit that is around 50 to 70% of the bolt diameter AND appropriately sized for one of the extractors. Good Luck!
 

jesse3638

Hooked
I would pick up a set of bolt extractors:

View attachment 300637

They cost like $10 or so and a tap wrench. Then use a regular punch and make the mark in the center of the bolt, left hand drill through the bolt using a bit that is around 50 to 70% of the bolt diameter AND appropriately sized for one of the extractors. Good Luck!
^^^ This ^^^ I've had good luck using this method on smaller more accessible bolts. I can't remember if the body mount bolts are hardened or not. If they are it's going to take some time. Be patient and wear safety glasses/goggles. Don't need to compound the problem with metal in the eye...😊.

Sent from my 2PYB2 using WAYALIFE mobile app
 

JudgeJimmie

New member
^^^ This ^^^ I've had good luck using this method on smaller more accessible bolts. I can't remember if the body mount bolts are hardened or not. If they are it's going to take some time. Be patient and wear safety glasses/goggles. Don't need to compound the problem with metal in the eye...😊.

Sent from my 2PYB2 using WAYALIFE mobile app

Thanks Jesse and Sipafz, I picked up some bolt extractors too... Terrified of snapping one of those off in the bolt as well though, as then I would have accomplished doing more harm than good haha. Safety glasses are an excellent idea though.

Also, from what I've read the bolts are definitely hardened. In a different thread on this topic someone mentioned it took them 5 hours and $70 in drill bits to get the thing out / drill into it. I'm gonna need all the luck wished in this thread!
 

jeffd

New member
I would pull the carpet and the plastic out and see if you can get it from the top. some of the body bolts apparently can readily seen others you need to cut a small chunk of the floor pan away. regardless I know when you break ez outs or left handed bits they are a bitch to get out. I would at least see if pulling the plastic trim piece by the door away and the carpet and see what it looks like. use a small map torch to heat the broken bolt up and melt the lock tite.
 

Strodinator

Caught the Bug
Remember that with proper use a drill bit should never break. If you feel like you are drilling too much start soaking the area in penetrating lubricant as that will keep the bit cool and safe.

Sent from my PH-1 using WAYALIFE mobile app
 

wjtstudios

Hooked
Remember that with proper use a drill bit should never break. If you feel like you are drilling too much start soaking the area in penetrating lubricant as that will keep the bit cool and safe.

Sent from my PH-1 using WAYALIFE mobile app

^^^this^^^ being upside down the lubricant won’t want to stay at the drill point so drill, stop, and apply. Go slow. Keeping adding. If you feel a lot of heat or see a smoke add more.


Sent from my iPhone using WAYALIFE mobile app
 

Strodinator

Caught the Bug
^^^this^^^ being upside down the lubricant won’t want to stay at the drill point so drill, stop, and apply. Go slow. Keeping adding. If you feel a lot of heat or see a smoke add more.


Sent from my iPhone using WAYALIFE mobile app
Realistically even with a hardened bolt, taps and punches are mostly made from carbide as with most bits. You could get the whole job done without breaking a single one as long as the area doesn't get dry

Sent from my PH-1 using WAYALIFE mobile app
 

sipafz

Caught the Bug
Realistically even with a hardened bolt, taps and punches are mostly made from carbide as with most bits. You could get the whole job done without breaking a single one as long as the area doesn't get dry

Sent from my PH-1 using WAYALIFE mobile app

Umm, taps and punches are RARELY made from carbide. Carbide while wear resistant is also brittle, not to mention, expensive. However, carbide tipped drills are becoming more common in the average DIY tool box these days. They work great on drill presses, mills and lathes, but not so great when used with a hand held drills and hole shooters. The human body lacks the ability to hold the tool firmly and steady enough to keep from chipping the brittle corners and cutting edges. Tools made from cobalt will work best.

I agree that the lubricant is key and gravity is an issue. Instead of oil or spray lubricant, one can use a bar of soap, shortening (Crisco) or chain saw bar oil to help keep lubricant at the business end.
 

jeeeep

Hooked
Wouldn't a transfer punch misalign my drill with the center of the bolt though? The hole leading up to the sheared bolt is not perfectly aligned, so wouldn't I just want to center punch the actual bolt instead of using the transfer punch? I'm still learning about these tools, so just making sure I understand what you are saying!

my bad, I didn't look at how much it was off to the side.

I would spray pb blaster from the top and bottom and lightly tap it from the top and bottom to kind of work the threads loose (allow the oil to work it's way into the threads better)

drill like you have shown on the black dot - it'll be misaligned as you back it out but go slow as others have recommended
 

JudgeJimmie

New member
I would pull the carpet and the plastic out and see if you can get it from the top. some of the body bolts apparently can readily seen others you need to cut a small chunk of the floor pan away. regardless I know when you break ez outs or left handed bits they are a bitch to get out. I would at least see if pulling the plastic trim piece by the door away and the carpet and see what it looks like. use a small map torch to heat the broken bolt up and melt the lock tite.

Thanks for the tip about pulling out the carpet. From what I've read I don't think I'd have access without cutting some of the body away... Not something I really want to have to resort to on my new Jeep :/. I'll definitely check when I get around to trying to get this out though.

I could also undo the other body bolts and lift the body off / remove the plastic bracket around the bolt to get access for heating. The more I think about it this may be a better course to take than just drilling right away. Has anyone removed the rubber / plastic around these body mount screws before? I had a friend look at it today and he suggested doing this and if possible perform the weld a nut method first before drilling.
 

JudgeJimmie

New member
Thanks for the advice everyone.

Victory!
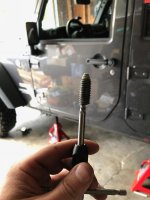
IMG_0400.jpg

I ended up taking off the rubber boot (Had to lift the body up quite a ways to get clearance to remove it), and drilling it out with left-handed bits and a bolt extractor!
Was a good learning experience and a good excuse to get some new shop toys (Propane torch!)

The hardest part of this for me was getting a center punch on the bolt since it sheared in a very non-smooth way.
 
Top Bottom