For those running the Evo bolt on coilover kit.

Okc_Jeepin

New member
I've lurked around on here for quite a while, as well as on other forums gathering as much info on the kit as possible. And have come to the conclusion that the only negative thing about the kit, are the installation instructions.

Have they updated their instructions at all? I like to think of myself as being somewhat mechanically inclined, but would hate to have to assume how the kit is to be installed once it is in my possession.

Thanks in advance and sorry if I'm beating a dead horse.
 
I’m tackling it this coming Friday. I’ve sort of pieced together from their various installation instructions (draglink, enforcer lift, rockstar skids, front/rear coilover) and user posts on here. Given myself 3 days for the job so fingers crossed.
The instructions do vary from ones I’ve found here so assuming they’re updated but not all the clearer.

Sent from my iPhone using WAYALIFE mobile app
 

aermotor

Member
I installed my kit about 14 months ago and had no issues with the instructions it came with. I also read a bunch online to supplement anything that might have been missing. No issues here.
 

13_gecko_rubi

Caught the Bug
The only really hard parts are doing the rear holes through frame due to clearance and making sure u line up the hopes you drill in front coil buckets. Just take your time and you'll be fine.

Sent from my SM-G960U using WAYALIFE mobile app
 
I've lurked around on here for quite a while, as well as on other forums gathering as much info on the kit as possible. And have come to the conclusion that the only negative thing about the kit, are the installation instructions.

Have they updated their instructions at all? I like to think of myself as being somewhat mechanically inclined, but would hate to have to assume how the kit is to be installed once it is in my possession.

Thanks in advance and sorry if I'm beating a dead horse.

So I’ve just wrapped up day one of my coilover install (+/-8 hours). I plan to do a more thorough write up but so far on the rear this is what I’ve come across compared to the EVO instructions.

1. Bending the exhaust bracket up 3/4” is not enough for getting the upper strengthening bracket in. We bent it up as much as possible without it coming into contact with body. I did not have to bend the driver side one.

2. With the help of a second person I used a big shale bar to separate the body and frame. I also put the previous bolts in from the top shock mount to make sure things lined up.

3. The body/frame mounts were 16mm not 15.

4. The gas line bracket is accessible from the wheel well and is very tight. I used a ratcheting box wrench and it fit, however when the bolt started protruding more and more the wrench became stuck and without and open end could not pull it off. Lifted the body with a crowbar to assist.

5. The rockstar skids take a bit of trimming beyond the 1.5”. This is the point we stopped at for the night. We’ve marked an angled cut we will have to make (towards front of vehicle on mount) because the rockstar slopes up at the bottom to sort of cradle the cut mount. We also used a clamp to squeeze the mount to get the rockstar on.

6. Also, the body mounts are a bit confusing if you start at the middle of the vehicle. There are two very close together so I thought those were the two the instructions were referring to. There are also a pair at the rear bumper. Once all three sets were loose it was much easier.

I’ll give another response tomorrow as well. We should get more of a full day in.


Sent from my iPhone using WAYALIFE mobile app
 

PEACEMAKER1

New member
I just installed the Coilovers and long arms this last weekend with a new set of XD60 axles. The instructions for the coilovers are not bad. I think the only part that you need to be careful of is drilling the bracket holes in the top of your bump stop plate. It is easy to mark them wrong, so double check before drilling. You also have to trim the plastic in the top of the wheel well that houses things like your battery and other stuff. My driver side trimming was super easy and quite minimal. The passenger side required much more trimming for me and was a little more tedious, but nothing too complicated if you take it slow. I would not be afraid of the install and highly recommend the coilovers. Feel free to check out my build thread in a few days and I will have a lot more pics of the installed suspension that hopefully can help you. Also, I found the pictures of Eddie's Rubicat to be helpful and this https://www.jk-forum.com/forums/jk-show-tell-33/evo-bolt-coilover-photos-248326/
 

PEACEMAKER1

New member
So I’ve just wrapped up day one of my coilover install (+/-8 hours). I plan to do a more thorough write up but so far on the rear this is what I’ve come across compared to the EVO instructions.

4. The gas line bracket is accessible from the wheel well and is very tight. I used a ratcheting box wrench and it fit, however when the bolt started protruding more and more the wrench became stuck and without and open end could not pull it off. Lifted the body with a crowbar to assist.

This bolt was interfering with my reinforcement plate after lowering the body back down, so I modified my plate with a hole that the head of the bolt could fit into when everything was installed and buckled down. So I ended up leaving the bolt in, lifted the body, installed the reinforcement plate, and then lowered the body back down and it all fit nicely.

Hmm I didn’t put this bolt back [emoji848]


Sent from my iPhone using WAYALIFE mobile app
 

PEACEMAKER1

New member
Hmm I didn’t put this bolt back [emoji848]


Sent from my iPhone using WAYALIFE mobile app
I don't think it is imperative to put the bolt back, but I was just worried about that small bracket that holds the gas filler hose rattling without the bolt. It was just a small thing to me. You could always throw some double sticky tape or something in that space to hold the bracket if it ever became a problem.
 
I don't think it is imperative to put the bolt back, but I was just worried about that small bracket that holds the gas filler hose rattling without the bolt. It was just a small thing to me. You could always throw some double sticky tape or something in that space to hold the bracket if it ever became a problem.

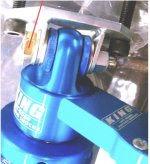
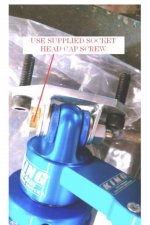
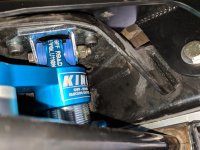
Could you possibly share a shot of the upper coil mounting in the rear? The directions showed washers being inserted but there was zero way to fit them in there without forcing the opening to be larger. When I checked the enforcer pro instructions to see if they’d clear it up, they showed an entirely different bolt being installed but we couldn’t see anyway it’d work to allow access for tightening the bracket to the shock mount. I stuck with the ‘gold’ bolt that was already assembled into the top of the coilover.


Sent from my iPhone using WAYALIFE mobile app
 

PEACEMAKER1

New member
Could you possibly share a shot of the upper coil mounting in the rear? The directions showed washers being inserted but there was zero way to fit them in there without forcing the opening to be larger. When I checked the enforcer pro instructions to see if they’d clear it up, they showed an entirely different bolt being installed but we couldn’t see anyway it’d work to allow access for tightening the bracket to the shock mount. I stuck with the ‘gold’ bolt that was already assembled into the top of the coilover.


Sent from my iPhone using WAYALIFE mobile app
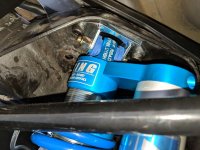
Sure thing! I will grab a picture tonight and post it up for you. Are you referring to the two bolts that attach the upper shock mount to the chassis?
 
Sure thing! I will grab a picture tonight and post it up for you. Are you referring to the two bolts that attach the upper shock mount to the chassis?

That area in general. I did some google image search investigation and most seemed to not show washers stuffed in there and seemed to match the 1109 instructions for which bolt was up there.

This is the image shown from the 1109 instructions:
IMG_1409.jpg

This is the image shown from the enforcer pro instructions (take note of the tag to swap bolts):
IMG_1410.jpg


Sent from my iPhone using WAYALIFE mobile app
 

Okc_Jeepin

New member
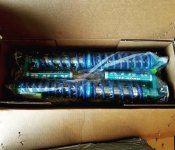
Well, I pulled the trigger about 3 weeks ago and got my coilover kit in. Just need to buy driveshafts and front bump stops and then i'll be diving in to the install. Super excited! :rock:

47680097_2196476253716166_9096432246901964800_o.jpg
 

Ajkaz

New member
If anyone has installed the rear kit recently, I would be incredibly grateful if you could post a pic of the hardware listing of the bolts/nuts/ect. Should be packed with your hardware, its a small piece of paper. I am installing my C/Os on a newer Jeep after having them stored for years and lost most of the hardware.
 

PEACEMAKER1

New member
Well, I pulled the trigger about 3 weeks ago and got my coilover kit in. Just need to buy driveshafts and front bump stops and then i'll be diving in to the install. Super excited! :rock:

View attachment 316290

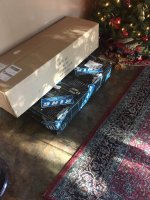
View attachment 316309 just got my bolt on coilover kit as well! Couldn't pass up the deal Mel was having on Black Friday.


Sent from my iPhone using WAYALIFE mobile app
Yeah, good luck on the install! You're going to love it.

Okc - don't forget that you have to install the coilovers and then measure lengths for the driveshafts so they fit properly.
 
Top Bottom