Evo double D bolt on Long arm kit JK 3.6 install

midnightmods

New member
Hello All,

I am installing a long arm kit from EVO, in a Right Hand Drive 3.6 auto.
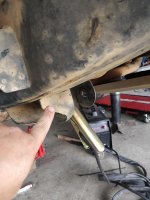
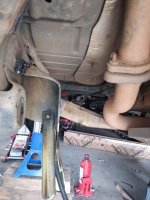
Does anyone have picture of how the exhaust is cut and reinstalled in the hoop ? (Drivers side for USA car)
The instructions don't really cover enough detail, I've spent hours on youtube and google looking for install pictures with out much luck.

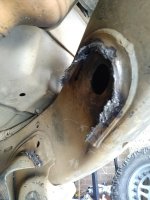
Requirements- #1 Pictures of how the 3.6 exhaust loop is cut and re-welded,
#2 pictures of the cut front control arm mounts, or the new mounted bolted on/welded on.

Thanks very much :)
 

KevinG

Caught the Bug
I just replied to your PM with my phone number. I am home for the rest of the day and can take any other pics from other angles if you would like. As for the loop, I ran a flex pipe in there for quite a while. I now have a solid pipe in there without the loop for the time being, but my ocd is really kicking in and I want to get it buttoned up with the loop. I am about ready to throw in the towel and pay a pro to do it. Here are a few pics to get you started. What other angles would help you out?

pass upper.jpeg

pass upper2.jpeg
 

TrainWreck618

Caught the Bug
I have a bunch of pics in my build thread how I installed the long arms, but here is a pic of where I cut the exhaust to figure out how I would ultimately weld it back in.
IMG_0692.jpg


Sent from my iPhone using WAYALIFE mobile app
 

KevinG

Caught the Bug
Just realized you are half a world away, so the phone number might not help. Here are pics of all of the mounting points for the front control arms. I took these of the passenger side since the exhaust is a little more out of the way.
First pic you can see the bolts that go through the crossmember.
front pass xmember.jpeg

Second pic is the bolts through the frame. The upper bolt comes out by the body mount you will see in the next pic. The lower bolt is through the factory lower control arm mount
frontpassto frame.jpeg

To the right of the body mount is the upper bolt from the evo mount.
outsideframefrontpass.jpeg

And last is the just a pic of the control arms to the front. I guess I should probably get some spray paint on the scratches. I think it's time for 40s...…
frontpasscontrolarms.jpeg

Have you tackled the back already?
 

RyanHanley

Member
Does anyone else’s upper front arms wobble like the rest of the arms are tight but the front upper arms I can just move around
 

RyanHanley

Member
I will try getting a video of what I’m talking about tonight and upload a short clip to YouTube and link it if that’s okay
 

KevinG

Caught the Bug
I will try getting a video of what I’m talking about tonight and upload a short clip to YouTube and link it if that’s okay

Sounds like the pinch bolt is loose. Get the misalignment joint "centered" and crank the bolts down to 50 ft. lbs.
 

RyanHanley

Member
Sounds like the pinch bolt is loose. Get the misalignment joint "centered" and crank the bolts down to 50 ft. lbs.

I got home and I check the pinch bolt and indeed that was my issue and they are torqued down to 50ft thanks again Kevin
 

midnightmods

New member
See attached,
Kevin can you confirm this is correct. the finger pointing picture is the section I keep and do not cut.
 

Attachments

  • 80383635_167982267918528_3080125071793061888_n.jpg
    80383635_167982267918528_3080125071793061888_n.jpg
    83.9 KB · Views: 76
  • 81462884_167982324585189_3426851347738132480_n.jpg
    81462884_167982324585189_3426851347738132480_n.jpg
    94.7 KB · Views: 76
  • 81038007_167982291251859_5219120352587677696_n.jpg
    81038007_167982291251859_5219120352587677696_n.jpg
    85.7 KB · Views: 76

KevinG

Caught the Bug
Trainwreck beat me to it. Here is pic of the driver's side before the long arm mount goes in. Clean everything up except the stock lower outer part of the control arm. As I said in the pm, pretty easy to get in there with a Sawzall blade to get the mount to where you can cut it pretty cleanly. After this pic, I went in there with a flap disc to get it all flat without any proud edges.

front before mount.jpg

I have a ton of other pics that I didn't post on here. Let me know if there's anywhere else that you are getting stuck.
P.S. Good on ya for tackling this!
 

TrainWreck618

Caught the Bug
If anyone has any more pictures of the 3.6 exhaust cutting location that would be great :)

I posted a picture of the exhaust cut and laying on the ground... literally all you do is make a parallel cut on the other side of the loop and flip it around. You will have to twist it around a bit to figure out the best position.


Sent from my iPhone using WAYALIFE mobile app
 
Top Bottom