Mattkuhn1986
New member
Jeep Factory Front Seat Big Boy Adaption
Tools needed:
Drill
1/4” & 1/2” drill bits
Hammer
Punch
Flat head screw driver
Needle nose pliers
3/8 ratchet wrench
T-socket (seat mounting size)
Trim puller
Procedure:
1. Unbolt 4 bolts holding seat to body.
2. Tilt seat back and unclip power wiring with trim puller to get slack. Undo the power clip and the yellow seat belt clip. These have the same style red retaining clips as the door do. The power clip will take a lot of pressure to get loose.
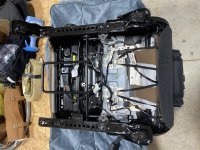
3. Remove seat from the vehicle. Lay down some soft material so you don’t damage the seat material. Put the seat on one side so you’re looking at one of the bottoms rails.
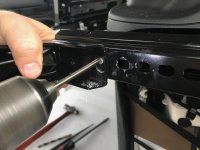
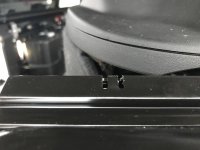
4. Slide the seat bracket all the way to the forward position. There is a metal retaining pin on the back of the seat rail that needs to be removed. By moving the seat you’ll be sure you have room to drill. Use punch to center punch and Drill out from the bottom. You may have to use punch to finish pushing it out.
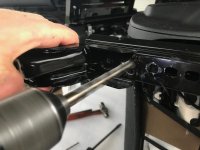
5. Once this pin is put enlarge this hole with 1/2” drill bit. After your bit clears, rock the drill left and right to oval the hole slightly.
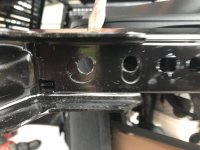
6. There is a hole approximately 1” back from the hole you just enlarged. Center punch this area and drill another 1/2” hole identical to the one you just drilled. Rock left and right as well.
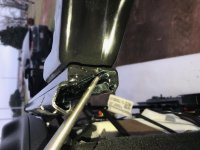
7. Slide the way back. There is a plastic retaining cover on the stationary part of the seat rail that needs to be removed. Take needle nose pliers and pull back. It will come free easily.
8. There are two tabs that need to be bent out of the way on the slide. One is on the outside top portion of the bottom rail. The other tab is accessed from the rear and it’s located on the bottom of the rail. Both tabs need to be bent outward so they aren’t in the way.
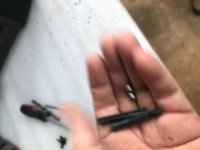
9. The putter glide has 4 plastic spacer bars separated by 5 ball bearings. To achieve maximum clearance you need to remove 2 ball bearings and 2 plastic spacers.
10. To do this you need to position the seat so that gravity will help in the process. Lift up on the front of the seat and move the seat forward and backwards till you slide the ball bearings and the spacer out of the rear of the slide. It will take a few fires of forward and backward motions but it will come out really easily.
11. Push the two tabs that were bent outward earlier back to their normal position. Reinstall the plastic cap on the rail.
12. Flip the seat over and follow the same procedure on the other rail.
13. Set both rails to the same position and reinstall in the Jeep.
14. Sit in the seat and push your seat back to its new rear position.
15. Follow same steps for passenger seat.
16. Enjoy.
Tools needed:
Drill
1/4” & 1/2” drill bits
Hammer
Punch
Flat head screw driver
Needle nose pliers
3/8 ratchet wrench
T-socket (seat mounting size)
Trim puller
Procedure:
1. Unbolt 4 bolts holding seat to body.
2. Tilt seat back and unclip power wiring with trim puller to get slack. Undo the power clip and the yellow seat belt clip. These have the same style red retaining clips as the door do. The power clip will take a lot of pressure to get loose.
3. Remove seat from the vehicle. Lay down some soft material so you don’t damage the seat material. Put the seat on one side so you’re looking at one of the bottoms rails.
4. Slide the seat bracket all the way to the forward position. There is a metal retaining pin on the back of the seat rail that needs to be removed. By moving the seat you’ll be sure you have room to drill. Use punch to center punch and Drill out from the bottom. You may have to use punch to finish pushing it out.
5. Once this pin is put enlarge this hole with 1/2” drill bit. After your bit clears, rock the drill left and right to oval the hole slightly.
6. There is a hole approximately 1” back from the hole you just enlarged. Center punch this area and drill another 1/2” hole identical to the one you just drilled. Rock left and right as well.
7. Slide the way back. There is a plastic retaining cover on the stationary part of the seat rail that needs to be removed. Take needle nose pliers and pull back. It will come free easily.
8. There are two tabs that need to be bent out of the way on the slide. One is on the outside top portion of the bottom rail. The other tab is accessed from the rear and it’s located on the bottom of the rail. Both tabs need to be bent outward so they aren’t in the way.
9. The putter glide has 4 plastic spacer bars separated by 5 ball bearings. To achieve maximum clearance you need to remove 2 ball bearings and 2 plastic spacers.
10. To do this you need to position the seat so that gravity will help in the process. Lift up on the front of the seat and move the seat forward and backwards till you slide the ball bearings and the spacer out of the rear of the slide. It will take a few fires of forward and backward motions but it will come out really easily.
11. Push the two tabs that were bent outward earlier back to their normal position. Reinstall the plastic cap on the rail.
12. Flip the seat over and follow the same procedure on the other rail.
13. Set both rails to the same position and reinstall in the Jeep.
14. Sit in the seat and push your seat back to its new rear position.
15. Follow same steps for passenger seat.
16. Enjoy.
Attachments
-
 74FB6506-0715-4BBF-B19A-D20464FB8E68.jpg145.7 KB · Views: 120
 -
 0D73869B-98AD-4105-A722-C9695253777E.jpg98.9 KB · Views: 120
 -
 B224AB30-C892-415B-A71E-62F97E181925.jpg98.5 KB · Views: 120
 -
 C272155B-D007-4987-9A1A-230995D91A12.jpg77.5 KB · Views: 121
 -
 D8463125-88DB-4000-8114-9617D8000E1A.jpg60.9 KB · Views: 121
 -
 A7404DB6-FA1F-44D4-A873-A91C4F186116.jpg103.2 KB · Views: 120
 -
 47220610-6B3B-4E90-9385-371904137D42.jpg37.3 KB · Views: 120