Jeep JK Wrangler Homemade Stubby Front Bumper Write-Up

wayoflife

Administrator
Staff member
main.php


A full width front bumper on a Jeep JK Wrangler is something that Chrysler is required to provide in order to meet federal safety standards and, while I'm sure they do their job, they're a complete nuisance out on the trail. They get in the way of rocks, they effectively reduce your approach angles, they make it difficult for you to disconnect your sway bar links and being that they're just plastic, they start to look pretty bad after just a few minor hits on the trail. And, it’s for these reasons that chopping up the front bumper and making it into a stubby is one of the most popular, useful and effective modifications that you can make on your Jeep JK Wrangler. Of course, in addition to all the benefits you will get from this mod, the best part about doing this is that it can be done for next to nothing and this write-up will show you how.

What you will need
• 9/16" Socket & Wrench
• 3/8×1" Bolt
• 3/8" Nut
• Ratchet
• Hand Drill
• 9/16" Metal Drill Bit
• Sawzall w/Metal Cutting Blade
• Grinder
• Ruler
• Masking Tape
• Pencil
• Rubbing Alcohol
• Flat Black Touch-Up Paint

Instructions
1. Using some rubbing alcohol, clean the plastic surface of your factory front bumper. This will help remove any oils that would otherwise make it difficult for masking tape to adhere to it.
main.php


2. Using a small ruler and a pencil, measure out from the bump pad and mark a point on top of your front bumper as shown in this pic. For my purposes, I made a mark about 5/8" from the edge of the bump pad.
main.php


3. Once again, use a small ruler and pencil to measure out from the bump pad and mark a point on the front face of your front bumper as shown in this pic. For my purposes, I made a mark about 2" from the edge of the bump pad.
main.php


4. Create a cutting guide by applying masking tape to your front bumper following the marks that you made.
main.php


5. Using a sawzall and a metal cutting blade, carefully cut through both the plastic shell and metal sub-structure of your front bumper as shown.
main.php


6. Using a grinder with a coarse sanding disc, clean up the edges of your cut.
main.php


7. Using a 9/16" metal drilling bit, drill a hole through the backside of your bumper metal sub-structure and plastic shell as shown in this pic.
main.php


8. Secure the metal sub-structure and plastic shell together using a 3/8×1" bolt and nut. A 9/16" socket and wrench will be needed for this job.
main.php


9. Apply some touch-up paint to the cut metal and then Repeat process on the opposite side of your Jeep. That’s all there is to it. You now have a JK with a factory stubby front bumper and for free. Please let me know if you have any questions.
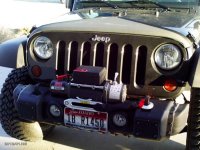
Installed Photos

main.php


main.php


main.php
 

JKU-Tom

Member
Didn't know you needed to bolt the plastic cover to the metal bumper. Perfect timing as I'm getting ready to do this. Thanks.
 

GCM 2

New member
.......Using a sawzall and a metal cutting blade, carefully cut through both the plastic shell and metal sub-structure of your front bumper as shown.
main.php


6. Using a grinder with a coarse sanding disc, clean up the edges of your cut.
main.php

absolutely my favorite two photos......possibly ever! Cutting and Grinding, this just wreaks of COMMITMENT, and that's my kind of jeep owner. Awesome write up Mr. Oh, you are a scholar and a gentlemen....keep it real yo!
 

wayoflife

Administrator
Staff member
absolutely my favorite two photos......possibly ever! Cutting and Grinding, this just wreaks of COMMITMENT, and that's my kind of jeep owner. Awesome write up Mr. Oh, you are a scholar and a gentlemen....keep it real yo!

LOL!! Commitment indeed. All it takes it that first cut and it's all good from there :D
 

JK1

New member
Love this mod i took it one step further and welded caps on the end... i just did a little more grinding on the metal part of the bumper to recess the plate in the plastic part on the outside....:beer: but be careful or you scrach the bumper like i did with the sawsall:doh: but i took plasti dip sprayed it on a rag and wiped over it and it looks good as new now:thumb:
finish1.jpg
 

Clark Collins

New member
Stubby

I used the DIY stubby write up and used the end pieces to finish the chopped ends. Since I had already put some dents in the crush can covers I used some of the other material I cut off to cover those dents. Now if I dent those covers I just take them off and straighten them and put them back on. I think the covers and ends make the bumper look better than the original with the ends just cut off. Someone makes end caps for the stubby chop, but I think mine look better than the aftermarket ends. I really appreciate the write ups on this forum and have used them to add the winch to my stubby and install Air-lift bags for my Jeep camping trips.
 

Attachments

  • winch4.jpg
    winch4.jpg
    96.4 KB · Views: 2,220
  • winch1.jpg
    winch1.jpg
    82.5 KB · Views: 2,198

groovebus

Member
I like your home made end caps better than the aftermarket ones I was thinking about buying. May have to tinker around with that project soon. My next will be the 2" teraflex leveling kit. Then chopping the bumper. Are the end caps just screwed to the plastic bumper? Did you use nuts and bolts to hold them on or some kind of self taping screws?
 

Red Knight15

Caught the Bug
I believe they are self tapping. I am going to do the same to mine first chance I get.


Sent from my iPhone using WAYALIFE mobile app
 

JKULIFE

New member
I just hacked the ends off and left them open. Used self tappers to hold the plastic bumper to the metal ImageUploadedByWAYALIFE1374301421.279560.jpg
 

JKUx

New member
I used the VDP stubby end caps and eventually swapped the push in style clips with stainless steel button head screws from the local ACE hardware store.
ImageUploadedByWAYALIFE1387240571.388533.jpg ImageUploadedByWAYALIFE1387240604.687865.jpg
 

Norm's JK

New member
Love this mod i took it one step further and welded caps on the end... i just did a little more grinding on the metal part of the bumper to recess the plate in the plastic part on the outside....:beer: but be careful or you scrach the bumper like i did with the sawsall:doh: but i took plasti dip sprayed it on a rag and wiped over it and it looks good as new now:thumb:
View attachment 36049

just to clarify, the metal end caps are welded so they sit flush behind the plastic outer shell ? I like the look of your bumper a lot nice and clean almost factory :thumb:
 

Tyler19

New member
Finally worked up the courage to do it.. Besides hitting one of the bolts and it throwing my cut off a little bit.. I like it! :thumb:
 

Jeep_Dawg08

New member
Well I finally got the nerve to cut on my Jeep for the first time.
It could use some finishing work, along with making some end plates to cover. But I think its a win for me.. lmao 1397357557743.jpg 1397357576601.jpg

●|||||||●
 

MikeO

New member
Love this mod. Probably the best one dollar for dollar.

Nothing left to do but smile, smile, smile!!!! 2012 JKU Sport
 

SarahLu

New member
I did this last weekend and used the stock ends. I still need to hit it with a coat of Bedliner but I'm definitely happy with it!
uqutu7us.jpg


Sent from my iPhone using Tapatalk
 

Jeep_Dawg08

New member
I'm going with flat end plates to cover. Like the look, just hope I can make it work.
Then it's onto the fenders, rear bumper removal, and mounting my MRBP bull bar( no mounting brackets). Another Fab project. Have a couple ideas of adding D-rings to the front bumper as well. Lol

●|||||||●
 
Top Bottom