Build of my JKU

wjtstudios

Hooked
My fusion 4x4 has taken a number of hard hits getting up and over ledges. It’s still perfectly straight.


2015 JKUR AEV JK350
1985 CJ8 Scrambler
 

MericaMade

Active Member
Synergy is a great product and have not bent mine yet and I have bent my share of tie rods.


Sent from my iPhone using WAYALIFE mobile app
That was my first option and im looking into Exdous as well.
My fusion 4x4 has taken a number of hard hits getting up and over ledges. It’s still perfectly straight.


2015 JKUR AEV JK350
1985 CJ8 Scrambler
I will go give them a look, thanks for putting them on my radar.

Even though I have the EVO drag link flip and it is fine should I just upgrade that as well?

Sent from my SM-G975U using WAYALIFE mobile app
 

MericaMade

Active Member
Added some Synergy components thanks to Exdous Jeeps. Bent the stock one on Pinyon Mountian a few weeks ago. Should I level the stabilizer more?

IMG_20191213_171409_344.jpg IMG_20191213_171409_341.jpg

Sent from my SM-G975U using WAYALIFE mobile app
 
Last edited:

MericaMade

Active Member
Added some JL hood latches, EVO inner fenders, and made a change to the rear shelf so I can lift it to access my gear. I used stock hood latches in the back to lock the shelf down. I still need to get a small lift support shock to hold it open but its working perfect now.
 

Attachments

  • 20200118_171045.jpg
    20200118_171045.jpg
    108.9 KB · Views: 136
  • 20200118_171036.jpg
    20200118_171036.jpg
    101.9 KB · Views: 136
  • 20200118_171032.jpg
    20200118_171032.jpg
    115.2 KB · Views: 138
  • 20200116_115843.jpg
    20200116_115843.jpg
    101.1 KB · Views: 137

MericaMade

Active Member
That shelf looks good. I’d be interested to see more of it.


Sent from my iPhone using WAYALIFE

I second this!

I will post up more close ups when I get home from work today. But here are the basic parts I got from Lowes.

6 - 8 inch L brackets - 6 bucks each
2 - 8 inch gate brackets - 4 bucks each
Scrap MDF wrapped in Auto zone carpet - wood was sitting around the house and Auto zone carpet was like 17 bucks.
5/16 and 1/4 hardware. I used 5/16 to bolt everything together from 1 inch to 1 1/2 inch and I believe 1/4 bolt to secure the L brackets in the existing hooks latches in the rear floor. About 10 bucks in hardware
Cut a old floor mat up for the top cover.
 
Last edited:

MericaMade

Active Member
That shelf looks good. I’d be interested to see more of it.


Sent from my iPhone using WAYALIFE

I second this!

Third.....

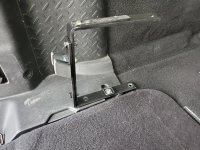
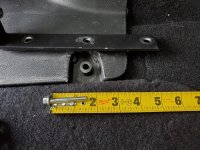
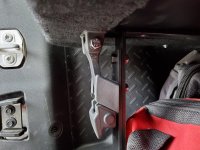
For the front brackets I just took two 8 inch L brackets and bolted them together for each leg and put a small strip on stick foam padding so it wasen't wood on metal. I used a small spacer to fill the small gap and a 1/4 x 1 1/2 long bolt to bolt the L bracket to the factory tie down points just up front. The rear did not need the spacer.

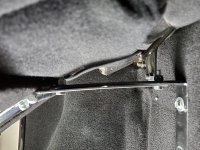
In the back I use 1 8 inch L bracket and 1 8 inch gate bracket for each leg. Again, a 1/4 bolt to bolt down the L bracket and 5/16 bolts holding everything else together.

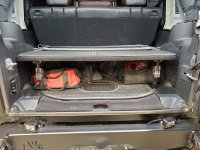
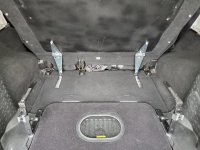
You cant see but I cut the back of the shelf in a slight angle across the back so it matches the same angle of the rear seats. This way when you open it, the rear edge is not rubbing the seats.

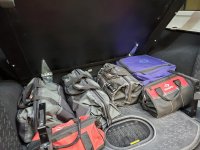
It 's really just 4 L brackets bolted down to and a piece of wood laying on top. This stops my bags from moving around and does not make any noise. I have been running the shelf without the hinges for a long time and works great. If you don't want the hinges then simply do L brackets up front and back instead of the gate hinge. I just wanted to make it a little easier to access stuff so I slapped on hinges and the front hood latches.

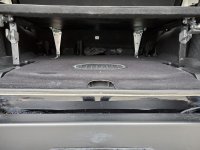
As for bolting the wood to the brackets I just used 1 inch bolts and washer and sunk them into the top of the wood a little so they sit flush and you cant tell with the mat on top. I even added tie downs to the wood as you can see in the first pictures.

You can use taller or shorter L brackets if you like for whatever high you prefer.

I cant figure out how to turn those two photos.
 

Attachments

  • 20200119_153858.jpg
    20200119_153858.jpg
    182.6 KB · Views: 115
  • 20200119_153937.jpg
    20200119_153937.jpg
    164.9 KB · Views: 114
  • 20200119_154007.jpg
    20200119_154007.jpg
    143.9 KB · Views: 113
  • 20200119_154017.jpg
    20200119_154017.jpg
    139 KB · Views: 114
  • 20200119_154059.jpg
    20200119_154059.jpg
    104.7 KB · Views: 115
  • 20200119_154117.jpg
    20200119_154117.jpg
    97.5 KB · Views: 114
  • 20200119_154431.jpg
    20200119_154431.jpg
    112.2 KB · Views: 115

MericaMade

Active Member
So for the ARB solenoid to run new front locker are you guys running the line any certain way? And do I need to purchased any special to connect the line to the new PR44?
 

OverlanderJK

Resident Smartass
So for the ARB solenoid to run new front locker are you guys running the line any certain way? And do I need to purchased any special to connect the line to the new PR44?

I would get the braided steel line. Mine runs up by the motor mount and under the brake lines to the compressor. Depends where your compressor mounts.


Sent from my iPhone using WAYALIFE
 
Top Bottom