Hello! ? About King 2.5" Bump stops

Sick JK

New member
What's it feel like when you bottom out? Or start to...I am strongly thinking of getting these with my coil setup.

It just softens the impact when you bottom out. They are designed more for higher speed applications. And properly adjusted they do not limit flex at all
 

Attachments

  • ImageUploadedByWAYALIFE1394984196.804806.jpg
    ImageUploadedByWAYALIFE1394984196.804806.jpg
    71.5 KB · Views: 298

ChaosNein

New member
Really. I thought they limited travel as well. To the tune of ~2" actually. In fact I had eliminated these as an option because of that.

as long as you cycle your suspension and adjust the bumps and/or bump extensions, you should not loose any travel.
 

Cole Trickle

New member
They look easy enough to install but try to do a little write up if you can?

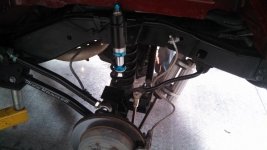
I installed both the king 2.5 bumps as well as some 2.0 bumps in the rear using the Evo Brackets...Thanks Drew for taking care of me.


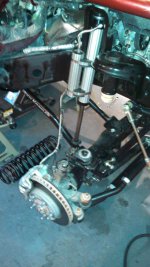
The front install is easy. The directions from king are horrible.

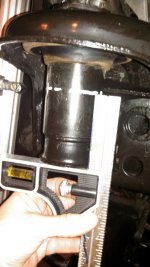
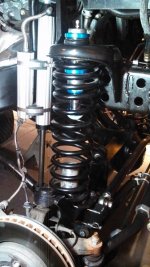
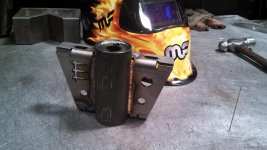
Basically remove the spring and measure 3" from the bottom of the stock bump mount after you remove the factory urethane bump.

use some blue tape as a guideline going around the round tube.

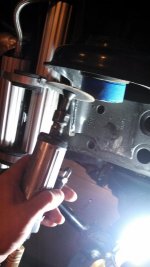
I did the passenger side first using a 4" cut off wheel and it was a pain to cut the rear portion. I have two sawzalls but I didn't have any straigh/good blades so I just made it work and it took some time.

I bought some blades the following night and was able to do the drivers side in probably less than 30 minutes from start to finish.
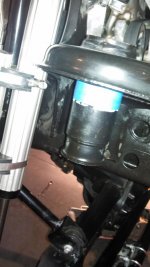
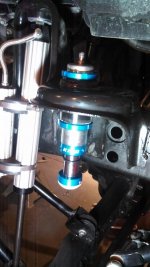
You will need to sand the inner part of the upper tube to get the blue ring to seat properly. Thread on blue billet deals and make sure you get two solid threads on the top.

I than used a screw driver and a dead blow to tighten the bottom collar and followed that up with blue locktight on the set screws.

reinstall the parts you removed and enjoy.

FYI only one of my bumps came charged ;):banghead:

I have access to a nitrogen station so it wasn't a big deal but it could be for some people. I found that I like them at about 110 psi both front and rear
 

Attachments

  • IMG_20140401_185545_609.jpg
    IMG_20140401_185545_609.jpg
    84.5 KB · Views: 228
  • IMG_20140401_190824_094.jpg
    IMG_20140401_190824_094.jpg
    63.9 KB · Views: 218
  • IMG_20140401_191030_827.jpg
    IMG_20140401_191030_827.jpg
    63.2 KB · Views: 221
  • IMG_20140401_193442_019.jpg
    IMG_20140401_193442_019.jpg
    57.2 KB · Views: 221

Cole Trickle

New member
more pics...

Another thing I just thought of. My RK front billet bump extensions called to be drilled and tapped when installed on the lower bump pad. I did mine this way and its a pain. I have since done two more installs for friends and just had them buy longer bolts with nuts and lock washers so you can through bolt them.

First day out at moab the stress from the kings caused my bolts to come loose. It was a easy fix after a trip to Ace for some longer bolts and a bag of washers and nuts.

basically save time and bolt on the lower bump extensions;):)
 

Attachments

  • IMG_20140401_195535_963.jpg
    IMG_20140401_195535_963.jpg
    68.7 KB · Views: 223
  • IMG_20140401_202927_647.jpg
    IMG_20140401_202927_647.jpg
    86.3 KB · Views: 225
  • IMG_20140402_195009_961.jpg
    IMG_20140402_195009_961.jpg
    72.7 KB · Views: 224

Cole Trickle

New member
You will need a little more skill for the rear...lol

I'm not afraid of cutting and I do all the work on my jeep but when it comes to welding I leave that to friends that are actually talented...lol

Over all I would say the bumps are pretty cool. They are deffinatley not a game changer as you are limited by the solid axles. I will say that it removes alot of the harsh teeth breaking hard hits when you come off a rock and it deffinatley stabalizes the jeep on off camber situations (this is cool). Doing the front and rear is not a cheap deal if you don't have friends and parts hook ups and I would say that most people won't take full advantage of the upgrade.

Figure most will end up paying $1000 for front and rear bumps plus $500+ for installation.....Thats a big chunk
 

Attachments

  • 2014 Moab EJS 373 - Copy.jpg
    2014 Moab EJS 373 - Copy.jpg
    120.6 KB · Views: 223
  • IMG_20140406_112339_288.jpg
    IMG_20140406_112339_288.jpg
    82.4 KB · Views: 220
  • IMG_20140406_124156_161.jpg
    IMG_20140406_124156_161.jpg
    61.1 KB · Views: 220
  • ResizedImage951397764221421.jpg
    ResizedImage951397764221421.jpg
    125.7 KB · Views: 221
Top Bottom