You are using an out of date browser. It may not display this or other websites correctly.
You should upgrade or use an alternative browser.
You should upgrade or use an alternative browser.
GraniteCrystal build thread
- Thread starter GraniteCrystal
- Start date
GraniteCrystal
New member
Anyone considered using sunglass cases to hold tie downs? The perfect size and you could clip them to a rope inside the Jeep like carabiners hanging off a climbing rope. I think I'm gonna order some more cases just for this purpose
Attachments
AllAmericanInfidel
Caught the Bug
Anyone considered using sunglass cases to hold tie downs? The perfect size and you could clip them to a rope inside the Jeep like carabiners hanging off a climbing rope. I think I'm gonna order some more cases just for this purpose
Never thought of that. I usually throw everything in a Bestop under seat organizer, but space gets taken up pretty quickly in those lol.
catahoula
Caught the Bug
Anyone considered using sunglass cases to hold tie downs? The perfect size and you could clip them to a rope inside the Jeep like carabiners hanging off a climbing rope. I think I'm gonna order some more cases just for this purpose
Sweet Idea! I just bought a case at Wally World. :thumb:
WJCO
Meme King
Anyone considered using sunglass cases to hold tie downs? The perfect size and you could clip them to a rope inside the Jeep like carabiners hanging off a climbing rope. I think I'm gonna order some more cases just for this purpose
Sweet Idea! I just bought a case at Wally World. :thumb:
How much were they and how many do you get?
EDIT: Disregard 'how many do you get?' I'm an idiot, lol. I was thinking of 'case' as in containing a few of them, rather than a single sunglass case. I'm going to need at least 4 of them.
Last edited:
GraniteCrystal
New member
How much were they and how many do you get?
EDIT: Disregard 'how many do you get?' I'm an idiot, lol. I was thinking of 'case' as in containing a few of them, rather than a single sunglass case. I'm going to need at least 4 of them.
Mine came with some sunglasses I ordered. I just emailed the company to see if I could get more.
GraniteCrystal
New member
How much were they and how many do you get?
EDIT: Disregard 'how many do you get?' I'm an idiot, lol. I was thinking of 'case' as in containing a few of them, rather than a single sunglass case. I'm going to need at least 4 of them.
I'm ordering some off Amazon right now. I'll let you know how they work out and put link here for you. Cost is $2.30 for each one.
WJCO
Meme King
I'm ordering some off Amazon right now. I'll let you know how they work out and put link here for you. Cost is $2.30 for each one.
Sweet. I got one of ebay for 4 bucks. If it works out with my straps, I'll order more or get some of the Amazon ones you're talking about. Great idea.
GraniteCrystal
New member
GraniteCrystal
New member


GraniteCrystal
New member
Rifle rack
I've been toying with the idea of how to carry my hunting rifle in the Jeep. There aren't a lot of options out there that fit the bill:
1) Rifle must be pointed upward when be transported. No horizontal mounting
2) Must cost less than $50
3) Must be able to be used with doors on. Hunting season is usually chilly. We're not running around the Rockies in the snow with the doors off shooting elk as we go.
4) Need not be inconspicuous. I don't keep my rifle in the Jeep at all times; only when hunting
5) Must be able to access it quickly from the drivers seat
With those in mind, I set to work. I went through a few different ideas before settling on this one. I'll write this in the form of a how-to should anyone else want to replicate it. Final product is at the bottom.
SUPPLIES:
A 3' piece of 1"x1/8" aluminum stock from Lowes/Home Depot ($5)
3 cans of black plasti-dip. Not the spray on kind; the kind where you actually submerse the part ($6 each)
1 Quart plastic pale with lid. Available in paint department of Lowes for about $2
A few washers
A tire you don't care about (Discount Tire hooked me up with one they were going to toss for free)
A few small pieces of rubber for washers/spacers or some actual rubber washers
Super glue
A vice and hammer/mallet
A drill and some drill bits
A dremel tool or similar
Razor blade
Patience
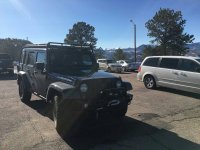
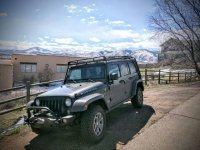
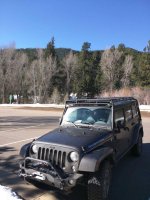
Here is a shot of the Jeep and rifle in question:

I decided on two anchor points, with the bottom anchor point being the sturdiest and taking most of the weight. It bolts right on using the existing bolts that keep the door from opening too wide.
First step is to cut about a 8" long piece (better too much than too little) of the aluminum stock and mark out the spots for the holes. Then drill each hole wide enough for the existing torx screws to fit through.
Next, spend some time working with your mallet, vice, and 8" piece until you get a shape that looks about like this:

Be sure to test fit frequently throughout this whole project.
Before bolting it back on and testing fit, you'll want to protect the finish on the inside of the door. I found some spare rubber around the shop and made two little washers/spacers, one for each hole. You can barely see them in this pic:

They're just super glued on the back to hold them in place. Re-drill holes with rubber spacers glued on.
Here is a pic of me lining up where the rifle will eventually rest:

Next up is the top piece. There's no really good place to bolt on up top. The two bolts you can see are entirely for looks and can't bear any weight. So I went with a snap in piece over the grip in the door. It'll use friction to snap on and the weight of the gun keeps it in place.
Here it is in-process:

Test fitting it:

Final shape. See pics farther down for full geometry of the hook.

Next up, time to take a knife to that old tire. Alternatively, you can skip this part and just plasti-dip stuff if you don't want to hassle with it, have confidence in the shock-absorbing materials of plasti-dip, or the two pieces that we've made so far don't contact sensitive parts on your rifle. Notably, the bottom piece could probably just be plasti-dipped with no rubber insert. My top piece touches my scope, so I wanted more cushion there.
Cut two 8" pieces of rubber, 1"+ wide.

Using super glue, attached them to each piece, and trim with razor blade. Be sure to clean both parts before gluing. Once glued down, you may want to go back and add some more glue in areas that are sticking up and get it all down firm. Doesn't have to be absolutely perfect; plasti-dip will help fill in. Here is what they look like after this step:


Next up, we're going to be adding an auxiliary supporting piece, just to make sure the rifle doesn't come unseated from the bottom piece. This one takes some patience as it requires some funny angles to get around the bottom, mesh, storage compartment on the door. Be sure to test fit a lot. Once you have it worked out, super glue it to the first piece and drill out the hole. Should look like this when finished:

With that new piece on, we'll need to add some washers so everything still bolts down flat. Super glue two together and then to the top hole:

Time for plasti-dip! A few notes on this. First, plasti-dip will eat through styrofoam it turns out. Second, these pieces are too big to fit in the plasti-dip can. That's where the 1 quart plastic pale comes in. Pour 2.5 cans of plasti-dip in that and be sure to keep the lid on when not in use.
Here is a shot of the bottom piece right after dunking the bottom half of it.

And here it is finished and dried. I had to do the bottom half, then top half, then bottom half, then top half because the part is still a little large for the 1 Quart pale. You could go big and get the 2.5 Quart pale and 6 cans of plasti-dip.

FINISHED SHOTS
As seen from outside. It's obviously visible, but like I said, I wasn't going for anything beyond a place to put it while hunting or out in the country.

With the door open. I really like the way it swings out of the Jeep with me. No more awkwardly climbing out while trying to hold my rifle. Just get out and it's right there in front of me.

This is a shot of me sitting in the drivers seat. Leg just rests up against it. I'm 6'3" and it doesn't hinder me at all.

As seen looking through the Jeep:

Hope this helps someone else! It took about 6-7 hours total to get the bends all correct, but it was fun and now I have a place to hold the rifle while out driving mountain roads looking for deer and elk.
I've been toying with the idea of how to carry my hunting rifle in the Jeep. There aren't a lot of options out there that fit the bill:
1) Rifle must be pointed upward when be transported. No horizontal mounting
2) Must cost less than $50
3) Must be able to be used with doors on. Hunting season is usually chilly. We're not running around the Rockies in the snow with the doors off shooting elk as we go.
4) Need not be inconspicuous. I don't keep my rifle in the Jeep at all times; only when hunting
5) Must be able to access it quickly from the drivers seat
With those in mind, I set to work. I went through a few different ideas before settling on this one. I'll write this in the form of a how-to should anyone else want to replicate it. Final product is at the bottom.
SUPPLIES:
A 3' piece of 1"x1/8" aluminum stock from Lowes/Home Depot ($5)
3 cans of black plasti-dip. Not the spray on kind; the kind where you actually submerse the part ($6 each)
1 Quart plastic pale with lid. Available in paint department of Lowes for about $2
A few washers
A tire you don't care about (Discount Tire hooked me up with one they were going to toss for free)
A few small pieces of rubber for washers/spacers or some actual rubber washers
Super glue
A vice and hammer/mallet
A drill and some drill bits
A dremel tool or similar
Razor blade
Patience
Here is a shot of the Jeep and rifle in question:
I decided on two anchor points, with the bottom anchor point being the sturdiest and taking most of the weight. It bolts right on using the existing bolts that keep the door from opening too wide.
First step is to cut about a 8" long piece (better too much than too little) of the aluminum stock and mark out the spots for the holes. Then drill each hole wide enough for the existing torx screws to fit through.
Next, spend some time working with your mallet, vice, and 8" piece until you get a shape that looks about like this:
Be sure to test fit frequently throughout this whole project.
Before bolting it back on and testing fit, you'll want to protect the finish on the inside of the door. I found some spare rubber around the shop and made two little washers/spacers, one for each hole. You can barely see them in this pic:
They're just super glued on the back to hold them in place. Re-drill holes with rubber spacers glued on.
Here is a pic of me lining up where the rifle will eventually rest:
Next up is the top piece. There's no really good place to bolt on up top. The two bolts you can see are entirely for looks and can't bear any weight. So I went with a snap in piece over the grip in the door. It'll use friction to snap on and the weight of the gun keeps it in place.
Here it is in-process:
Test fitting it:
Final shape. See pics farther down for full geometry of the hook.
Next up, time to take a knife to that old tire. Alternatively, you can skip this part and just plasti-dip stuff if you don't want to hassle with it, have confidence in the shock-absorbing materials of plasti-dip, or the two pieces that we've made so far don't contact sensitive parts on your rifle. Notably, the bottom piece could probably just be plasti-dipped with no rubber insert. My top piece touches my scope, so I wanted more cushion there.
Cut two 8" pieces of rubber, 1"+ wide.
Using super glue, attached them to each piece, and trim with razor blade. Be sure to clean both parts before gluing. Once glued down, you may want to go back and add some more glue in areas that are sticking up and get it all down firm. Doesn't have to be absolutely perfect; plasti-dip will help fill in. Here is what they look like after this step:
Next up, we're going to be adding an auxiliary supporting piece, just to make sure the rifle doesn't come unseated from the bottom piece. This one takes some patience as it requires some funny angles to get around the bottom, mesh, storage compartment on the door. Be sure to test fit a lot. Once you have it worked out, super glue it to the first piece and drill out the hole. Should look like this when finished:
With that new piece on, we'll need to add some washers so everything still bolts down flat. Super glue two together and then to the top hole:
Time for plasti-dip! A few notes on this. First, plasti-dip will eat through styrofoam it turns out. Second, these pieces are too big to fit in the plasti-dip can. That's where the 1 quart plastic pale comes in. Pour 2.5 cans of plasti-dip in that and be sure to keep the lid on when not in use.
Here is a shot of the bottom piece right after dunking the bottom half of it.
And here it is finished and dried. I had to do the bottom half, then top half, then bottom half, then top half because the part is still a little large for the 1 Quart pale. You could go big and get the 2.5 Quart pale and 6 cans of plasti-dip.
FINISHED SHOTS
As seen from outside. It's obviously visible, but like I said, I wasn't going for anything beyond a place to put it while hunting or out in the country.
With the door open. I really like the way it swings out of the Jeep with me. No more awkwardly climbing out while trying to hold my rifle. Just get out and it's right there in front of me.
This is a shot of me sitting in the drivers seat. Leg just rests up against it. I'm 6'3" and it doesn't hinder me at all.
As seen looking through the Jeep:
Hope this helps someone else! It took about 6-7 hours total to get the bends all correct, but it was fun and now I have a place to hold the rifle while out driving mountain roads looking for deer and elk.
WJCO
Meme King
I've been toying with the idea of how to carry my hunting rifle in the Jeep............ and now I have a place to hold the rifle while out driving mountain roads looking for deer and elk.
Very cool. I like the door idea. I may have to do something similar for my handgun. I like that it's out of the way of the console/pedals/etc. Is that scope mounted pretty solid? I was just thinking if it would get moved off of target while vibrating in that rest on a bumpy road.
Brute
Hooked
Very cool. I like the door idea. I may have to do something similar for my handgun. I like that it's out of the way of the console/pedals/etc. Is that scope mounted pretty solid? I was just thinking if it would get moved off of target while vibrating in that rest on a bumpy road.
It's a good idea...I was thinking the same thing about the scope. Using the plasti-dip was a great way to seal off the rubber from the tire...perhaps some old wetsuits (neoprene) which I have a lot of around the garage would work too...
Needless to say, it would dissuade car-jackers...
GraniteCrystal
New member
It's a good idea...I was thinking the same thing about the scope. Using the plasti-dip was a great way to seal off the rubber from the tire...perhaps some old wetsuits (neoprene) which I have a lot of around the garage would work too...
Needless to say, it would dissuade car-jackers...
Very cool. I like the door idea. I may have to do something similar for my handgun. I like that it's out of the way of the console/pedals/etc. Is that scope mounted pretty solid? I was just thinking if it would get moved off of target while vibrating in that rest on a bumpy road.
Wet suits would work great too.
Not too worried about the scope. It's a $1200 Leopold scope mounted on Talley rings, so it's very solid. Will add a strap if necessary though and I find it bouncing everywhere. Shouldn't be too difficult to thread some Velcro on there somewhere.
WJCO
Meme King
Wet suits would work great too.
Not too worried about the scope. It's a $1200 Leopold scope mounted on Talley rings, so it's very solid. Will add a strap if necessary though and I find it bouncing everywhere. Shouldn't be too difficult to thread some Velcro on there somewhere.
Cool. That scope on my AK is like that. For several years it was in my trunk (in a soft case) because I was a member of a range and would shoot after work. Scope was always right on, even after bouncing around for years.
GraniteCrystal
New member

GraniteCrystal
New member
Tie down mods
I recently purchased some tie-downs from Lowes. The work great, except that they're just a tiny bit too small to comfortably fit on the 1" tubing of my Gobi roof rack, the primary location they'll be used. I could squeeze them on, but it was rubbing off the coating on the tie down hook and crushing the powder coat on the rack.
First, I tried to simply hammer the hook wider open. No go. Definitely strong and made to not open up.
Next, I ground each one down for more clearance using a dremel tool:

Here you can see I've just flattened it out a bit. More clearance and spreads the load across a wider surface which should help with powder-coat crushing.

Next, I dipped them in plasti-dip. It comes pretty thick, so I used my naptha, xylene, toluene mix from Lowes for $6 to thin it out a bit. Worked much better after that. Just did one coat. I can always re-coat them when they start to look gnarly.

Here you can see I've gained the clearance I need to comfortably have them attach to the roof rack, no forcing required.

Next up: storage system. My sunglass cases arrived a week or two ago, everything fits great inside them. Headed to REI to buy some rope and velcro for a multi-functional hanging system.
I recently purchased some tie-downs from Lowes. The work great, except that they're just a tiny bit too small to comfortably fit on the 1" tubing of my Gobi roof rack, the primary location they'll be used. I could squeeze them on, but it was rubbing off the coating on the tie down hook and crushing the powder coat on the rack.
First, I tried to simply hammer the hook wider open. No go. Definitely strong and made to not open up.
Next, I ground each one down for more clearance using a dremel tool:
Here you can see I've just flattened it out a bit. More clearance and spreads the load across a wider surface which should help with powder-coat crushing.
Next, I dipped them in plasti-dip. It comes pretty thick, so I used my naptha, xylene, toluene mix from Lowes for $6 to thin it out a bit. Worked much better after that. Just did one coat. I can always re-coat them when they start to look gnarly.
Here you can see I've gained the clearance I need to comfortably have them attach to the roof rack, no forcing required.
Next up: storage system. My sunglass cases arrived a week or two ago, everything fits great inside them. Headed to REI to buy some rope and velcro for a multi-functional hanging system.
WJCO
Meme King
I recently purchased some tie-downs from Lowes. The work great, except that they're just a tiny bit too small to comfortably fit on the 1" tubing of my Gobi roof rack, the primary location they'll be used. I could squeeze them on, but it was rubbing off the coating on the tie down hook and crushing the powder coat on the rack.
First, I tried to simply hammer the hook wider open. No go. Definitely strong and made to not open up.
Next, I ground each one down for more clearance using a dremel tool:
View attachment 198963
Here you can see I've just flattened it out a bit. More clearance and spreads the load across a wider surface which should help with powder-coat crushing.
View attachment 198964
Next, I dipped them in plasti-dip. It comes pretty thick, so I used my naptha, xylene, toluene mix from Lowes for $6 to thin it out a bit. Worked much better after that. Just did one coat. I can always re-coat them when they start to look gnarly.
View attachment 198965
Here you can see I've gained the clearance I need to comfortably have them attach to the roof rack, no forcing required.
View attachment 198967
Next up: storage system. My sunglass cases arrived a week or two ago, everything fits great inside them. Headed to REI to buy some rope and velcro for a multi-functional hanging system.
Nice work.
GraniteCrystal
New member
Tie down storage
Finished tie down storage system.
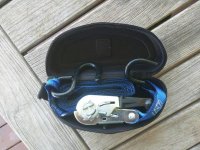
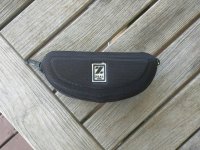
Here you can seem them all tucked into their sunglass cases nice and neat. The cases were only $2.50 off Amazon and I had already had one clip pop off, so I reinforced those with a little needle and thread:

Next, I bought a few feet of 1" webbing from REI for $0.35/ft and attached two clips on it for $1.50 each:

Next, I put some s-biners on it to attach things. At first I thought they were a bit smaller than I wanted, but I kind of like how they don't move around while driving:

And here is the finished shot, with tie downs, a water bottle, and a few other things attached:

Overall, I like it. The versatility of the strap, being able to attach it anywhere and adjust the position of the clips, makes it a nice system that I can move around to wherever is most convenient at the time. And I like the ability to hang other things (water bottles, bear spray, dog bowls, etc) off it as well.
Finished tie down storage system.
Here you can seem them all tucked into their sunglass cases nice and neat. The cases were only $2.50 off Amazon and I had already had one clip pop off, so I reinforced those with a little needle and thread:
Next, I bought a few feet of 1" webbing from REI for $0.35/ft and attached two clips on it for $1.50 each:
Next, I put some s-biners on it to attach things. At first I thought they were a bit smaller than I wanted, but I kind of like how they don't move around while driving:
And here is the finished shot, with tie downs, a water bottle, and a few other things attached:
Overall, I like it. The versatility of the strap, being able to attach it anywhere and adjust the position of the clips, makes it a nice system that I can move around to wherever is most convenient at the time. And I like the ability to hang other things (water bottles, bear spray, dog bowls, etc) off it as well.