Evo Mfg Gen 2 Rock Sliders??

OverlanderJK

Resident Smartass
you should have a 1/2 gap between the tubes coming out and the pinch welds or in EVO's measurements, a thumbs width. You would have to nail the shit out of something to get them to bend up.

I've done it on mine. Doesn't take that much of a hit for the tub to shake on a rubber body mount.
 

Evil

New member
I've done it on mine. Doesn't take that much of a hit for the tub to shake on a rubber body mount.

True, I can twist my Jeep up with a forklift and the body will twist and move and if I jarred the hell out of it I can get the pinch weld to touch the tube but I might have misunderstood the question. I have jacked mine up from the slider and it didn't move or come close to hitting, the other side might have rubbed but whos looking and thats what krylons for :D
 

Benito

Caught the Bug
Did it on Cadillac hill on the rubicon trail in my orange jk. Thumb width and it dented the shit out the the tub. You can see the indent from the slider perfect front and rear.

I have seen some pictures of the feet welded as low as possible to the frame, would this be the best way about it or will the skins prevent this kind of damage and just follow the rule of thumb?
 

Evil

New member
the skins dont cover/protect the pinch welds so they wouldnt help. I figured as much with the body flex and am waiting to dent it so I can notch it out above the legs.
 

JAGS

Hooked
I have seen some pictures of the feet welded as low as possible to the frame, would this be the best way about it or will the skins prevent this kind of damage and just follow the rule of thumb?

Skins won't protect the pinch seam. I used a 1/2 inch square steal tube running the length of the pinch seam. Welder did a few tack welds before removing the tube. The feet are basically as low as can go and still run a bead on the bottom edge.

I've still hit the pinch seam a few times. As others have said, the rubber body mounts still allow some flex if hit hard enough. But won't cause damage that needs to be fixed.
 

piginajeep

The Original Smartass
I have seen some pictures of the feet welded as low as possible to the frame, would this be the best way about it or will the skins prevent this kind of damage and just follow the rule of thumb?

Jags made a really good post. Measure don't use your dickskinner as that device. Go low and you'll be fine.

Mine were way to tight, you would think working at EVO MFG I would know better. I gave the welder the sliders and instructions. He didn't follow them
 

RedRum

New member
Yea well they are already welded on and I have just under a 1/2 inch of space so so be it not really all that worried about it ... We will see what happens
 

piginajeep

The Original Smartass
Yea well they are already welded on and I have just under a 1/2 inch of space so so be it not really all that worried about it ... We will see what happens

You really should be fine, every place I wheeled I didn't hit. But I hit crazy hard on the the rubicon. I was without a spotter going stupid fast up Cadillac and it was my first time on it.
 

professorkx

New member
I received my EVO rock sliders and skins last week, so prepped/painted and installed this weekend. I purchased the powder coated skins, so just had to paint the sliders.

To install the skins, I didn't want to purchase a $100 tool for the nutserts to use one time, but I have used the bolt/nut method in the past on 3/8" nutserts (the only other time I have used nutserts) and it sucks, so I needed a different solution. In my tool chest, I have a Harbor Freight Pop Rivet tool # 66422 that is built like the real nutsert tool, so went to work modifying the tool for nutserts. The rivet tool works great on 1/4" rivets, so I didn't want to destroy it if this could be avoided, but for $20, it was worth the risk.


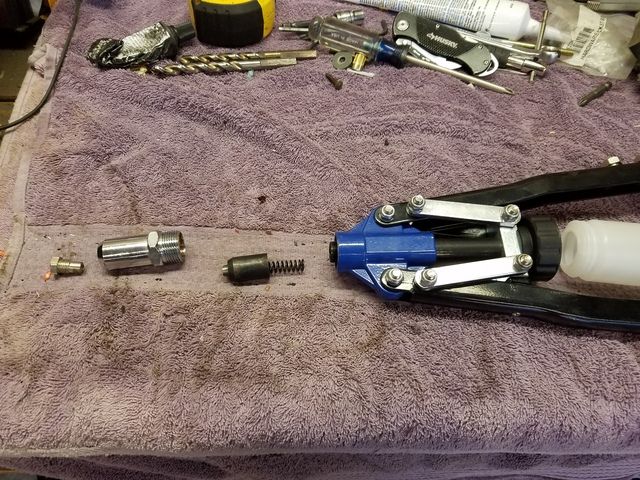
As you can see in this picture, the pop rivet tool (which is only $20 at Harbor Freight) can be disassembled to create a hallow barrel. I removed the interior crimping piece with the spring by unscrewing it from the barrel. I screwed the large nose piece back into place, but left off the tip that holds the rivet, and screwed the bottle off. In this configuration, I was able to slide a 12 inch long 1/4 x 20 all thread rode down the barrel. I tried to find a 1/4 x 20 bolt in grade 5, but needed 8 inches long, so no luck.


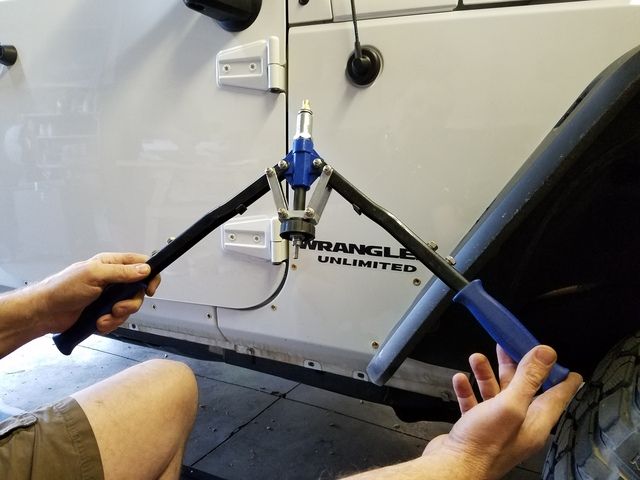
I added 2 washers and two nuts on the all thread rod on the bottle side, and drilled out 2 number 12 fender washers to 1/4 inch so the washers had a tight fit against the nutsert. After marking and drilling my first 4 holes, I put a nutsert on a 1/4 inch bolt, smeared on a little clear silicon to control rust on the inside, and tapped the nutsert into the hole. Finally, I screwed the bolt out of the nutsert and screwed the tip of my all thread rod into the nutsert that had been tapped into the hole. (the picture above is for illustration, as the nutsert was already in the hole when I screwed the all thread onto the nutsert) I tightened the nuts to spread the tools arms apart, and then pulled them together to crimp the nutsert into place. After the first nutsert, I tightened the two nuts together so my arms were at a consistent position for each nutsert.

I was surprised the all thread rod was strong enough to crimp the nutsert. The only issue I had was that I bent the tip of the all thread rod on two occasions, which meant the rod had a little wobble when screwing it out of the nutsert after crimping. No big deal, as I had plenty of extra rod, so I just cut the tip off, cleaned with a file so it would screw into the nutsert easily and moved to the next nutsert. I think a grade 5 bolt would keep this from happening if you can find one long enough, but it was more of a nuisance than anything else. Installation of the nutserts took about 1 hour per side, so the total job took about 3 hours with the silicon and final installation of the skins.


To prep the sliders, I setup 2 sawhorses and screwed the sliders to the top 2x4. I laid down 3 coats of self etching primer and 4 coats of black hammered paint...as well as 3 more coats of royal red on the end pieces to add my red accent color to each side. Not sure how long the red will last or how difficult it will be to keep the accents red, but it's a nice touch to start with. I wish I had painted the pinch seam black before installing the sliders, but I can still get to them, so that will be a project for another time.


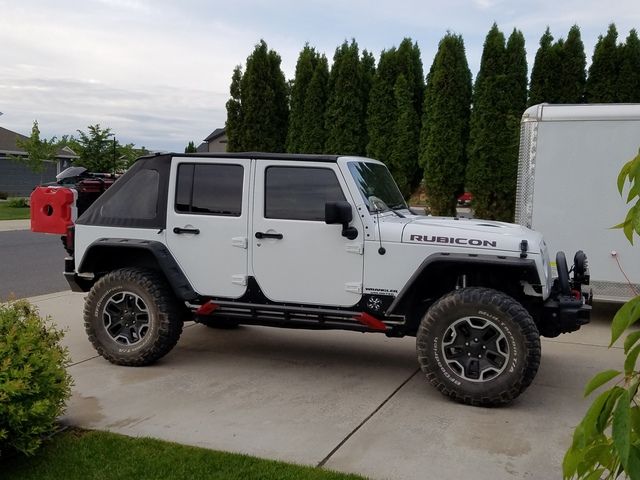
Time to go find some rocks for a good test...
 

zimm

Caught the Bug
Yesterday I got them wire brushed, primered and painted rustoleum texture black. It's been raining all day, so I don't know when I can weld them on. Either tomorrow or next weekend.


scull20

New member
Yesterday I got them wire brushed, primered and painted rustoleum texture black. It's been raining all day, so I don't know when I can weld them on. Either tomorrow or next weekend.


Hah...used the same saw horses to paint mine too.

They turned out great!
 

zimm

Caught the Bug
These don't have a left and right do they? I welded in the passenger side and they not exactly straight. I tried floor jacks and clamps and couldn't get it exactly flush up in the frame rails. See how the front sits out a bit? Hope I didn't weld the wrong one one......

 
Top Bottom