GraniteCrystal build thread

GraniteCrystal

New member
Driver's seat front facing storage rack

Super excited to show this off today. Never seen this on a Jeep before and I think it turned out great. There's lots of pics so this will be split up into multiple posts. Here is a final pic to show you what we're going for:
IMG_20160719_074502.jpg

Originally the flashlight was mounted on the side of the drivers seat, but I want to put the fire extinguisher there. Additionally, I'm hoping to get a Tuffy security drawer for under the seat, so I didn't want to interfere with that space. And, of course, the seat still needs to be adjustable in the forward/back direction. All these objectives are accomplished.

What you'll need:
6"x18" sheet of 16 gauge aluminum sheet metal. Lowes didn't have it; got mine from Ace Hardware for $11
1/4-20 x 1" cap screws, qty: 2
1/4-20 hex nuts, qty: 4
1/4-20 acorn nut, qty: 1
1/4-20 flat washer, qty: 4
1/4 x 1" fender washer, qty: 2
1/4-20 x 12" threaded rod, qty: 1
Door edge trimming, got mine from Pep Boys for $10
Took me 6-8 hours, designing as I went

Tools:
vice
mallet
dremel tool with cutoff wheels
ratchets/wrenches
drill and bits

Step 1: cut the sheet metal to a length of 13.5"
IMG_20160716_140630.jpg

IMG_20160716_140959.jpg

Step 2: mark out an area 4.75" x 1.625" in the center of the sheet metal. Cut out whatever remains on either side (shown in red):
IMG_20160716_141907.jpg

Here is it after cuts:
IMG_20160716_151219.jpg

Step 3: gently bend the sheet metal to fit the curvature of the seat.
IMG_20160716_142123.jpg

Step 4: bend the tab on the sheet metal over. It's going to act as a tight hinge, wrapping around the existing bar you use to slide the seat forward/back. Use a mallet as well to get the right shape. Check the fit on the bar to make sure you don't go too tight.
IMG_20160716_151543.jpg

Here it is after being bent:
IMG_20160716_153745.jpg

Step 5: use pliers to bend the top part of the tab backward. We do this to make it parallel to the main part of the sheet metal so that the two can bolt down correctly.
IMG_20160716_154158.jpg

IMG_20160716_154219.jpg


Step 6: drill clearance holes for the 1/4-20 cap screws. No particular placement needed, just eyeball it.
IMG_20160716_155234.jpg

IMG_20160716_155242.jpg

Here is me holding it up, test fitting it.
IMG_20160716_161645.jpg

And here you can see the bent tab wrapping around the existing bar used the move the seat forward/back:
IMG_20160716_161701.jpg

Next up, you can either drill some holes for whatever you want to attach, or you can move on to painting. We'll pick up with that in the next post!
IMG_20160716_162327.jpg
 
Last edited:

WJCO

Meme King
Looks great. You can still move the seat forward and back right?

Nice flip flops by the way.
 

GraniteCrystal

New member
Driver's seat front facing storage rack, part II

Picking up from where we left off...

Step 7: paint it. Here are the products I used:
IMG_20160716_162327.jpg

This is aluminum, so I began with a primer
IMG_20160717_065529.jpg

followed by 2-3 coats of black truck bed liner
IMG_20160717_110302.jpg

Step 8: I chose to add the door edge trimming at this point, but you could wait and do this and paint last. Note that the trimming does come with adhesive in it, so you only want to put it on once.
IMG_20160718_173228.jpg

IMG_20160718_173251.jpg

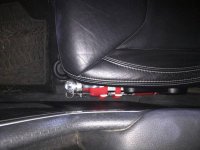
Step 9: Now we're going to make the second attachment method. At this point, it'd just act as a hinge and flop downward if pulled on. This rod will make sure it stays in place. Look under the seat and you'll find a 7/8" bar about 6" behind the bar you use to move the seat forward/back. We're going to wrap around that, then bolt to our aluminum. Begin by bending one end of the 12" threaded rod into a hook to fit the 7/8" bar under the seat.
IMG_20160718_174325.jpg

Here is a shot of it wrapped around that 7/8" bar:
IMG_20160718_202009.jpg

Step 10: mount the aluminum piece on the seat, and line up about where the threaded rod would pierce it. Keep in mind, you need to be able to raise/lower that bar to move the seat forward/back. If you mount the rod too high on the aluminum, your seat will be locked in place. Here is where I ended up drilling my clearance hole:
IMG_20160718_202214.jpg

And here it is sticking out
IMG_20160718_203054.jpg

Step 11: mount whatever you want to it. I put my flashlight and a portable charger.
IMG_20160718_210902.jpg

Step 12: Time to mount it up. For the two bolts on the tab, the order will be bolt, washer (forgot this but it should be in there), aluminum, washer, lock washer, nut. For the threaded rod, the order will be nut, lock washer, fender washer, aluminum, fender washer, lock washer, nut. You can see all of it loosely assembled here:
IMG_20160718_214914.jpg

And I chose to spray paint my outside pieces so it's all black:
IMG_20160718_214348.jpg

Step 13: Now, time to tighten it up. Begin with the two carriage bolts and snug those down. As you put force on them, they should bend that tab over even more, making a tight hinge on the bar. Don't overtighten. Nothing crazy needed here. Once those are good, tighten the two nuts on the threaded rod up, starting with the outside one. You want the aluminum piece pushing on the seat a little bit so there is a static load there, putting the threaded rod in tension. This way it won't move around as you drive. Tighten both nuts down to lock it in place.
IMG_20160718_215806.jpg

IMG_20160718_215823.jpg

Step 14: thread another 1/4-20 nut on the rod, then use your dremel and cutoff wheel to cut off the remainder of the threaded rod. Unscrew the nut you just put on there and replace it with the 1/4-20 acorn nut for a finished look.
IMG_20160719_074502.jpg

All done! Here are some more shots of it finished:
IMG_20160719_074520.jpg

IMG_20160719_074509.jpg

And here is one of me sitting, so you can see just how much space there is. Not worried about anything rubbing on my legs while I drive.
IMG_20160719_074319.jpg

Really happy with the way it turned out. Very solid, no vibrations, and I have room to mount more stuff on it. Hope that helps someone else!
 
Last edited:

bones37

Member
Nice work on the latest project! Thanks for sharing your Estes pictures. The wife and I got married there outdoors last year (beginning of August). I want to head back out there, but she's about 7 months pregnant and I doubt she wants to drive that far or fly at this point. I would love to take the Jeep out there, but it's about 9 1/2 hours. That's a long drive in a door with a 3.8 and 37's.
 

GraniteCrystal

New member
Nice work on the latest project! Thanks for sharing your Estes pictures. The wife and I got married there outdoors last year (beginning of August). I want to head back out there, but she's about 7 months pregnant and I doubt she wants to drive that far or fly at this point. I would love to take the Jeep out there, but it's about 9 1/2 hours. That's a long drive in a door with a 3.8 and 37's.

Yeah, that's a hike for sure. At 7 months I don't think you're supposed to even sit for that long. Maybe once the kiddo is a couple years old.

Glad you like the latest stuff. You got a good looking Jeep yourself. Someday I'll be on 37s...someday.
 

dchotrod

New member
You can do it! Really, I have a modest set of tools and it wasn't very difficult. If you go for it and have questions, throw them up here and I'll address them.

I appreciate the vote of confidence. I may try it at some point. I love doing things like is, I just have the uncanny ability to turn a 30 minute project into a full fledge ground up restoration (at least that's what it feels like).
 

dchotrod

New member
I did want to ask how your wind noise reducer is working? I just ordered a Gobi stealth today & thought that was another slick idea.
 

GraniteCrystal

New member
I appreciate the vote of confidence. I may try it at some point. I love doing things like is, I just have the uncanny ability to turn a 30 minute project into a full fledge ground up restoration (at least that's what it feels like).

I know what you mean.

I did want to ask how your wind noise reducer is working? I just ordered a Gobi stealth today & thought that was another slick idea.

Working great. It's holding up well, no fraying or anything and I think it's noticeably better. If you do it, let me know how it goes. And if you have trouble with Gobi install, let me know.
 
I really like the idea man! I like it maybe even for a Molle bag or something! With the flashlights you have won't they fall to the side when you are on the rocks? It didn't look like they clipped to me.
 

GraniteCrystal

New member
I really like the idea man! I like it maybe even for a Molle bag or something! With the flashlights you have won't they fall to the side when you are on the rocks? It didn't look like they clipped to me.

Yeah, I think I may add a Molle bag on the top part where I have more room. Not sure how to cut those slots though.

The flashlight and power supply are both press fits in on those rubber grips. You can hold them upside down and shake them and they don't come out.
 

GraniteCrystal

New member
Relocate fire extinguisher

With my flashlight and power supply relocated to the front of the drivers seat, I can now put my fire extinguisher well within reach on the side of the drivers seat.

Here is the one I got:
https://www.amazon.com/H3R-Performa...dp/B003TPOU2W?ie=UTF8&*Version*=1&*entries*=0

It comes with a handy little bracket which you can use with 3 worm clamps to mount just about anywhere on the roll cage. However, based on advice here, it seems prudent to have it on the drivers seat so it's within super easy reach. It's a super easy install and has been documented elsewhere, but I like doing how-tos so I'll spell it out.

What you'll need
1/4-20 x 3/4" or 1" cap screw, qty: 2
1/4 lock washers, qty: 2
1/4 regular washers, qty: 2

Tools
Drill and bits
7/16 ratchet, sockets, wrenches, etc

Step 1: use the lever on the side of the seat to raise it up
You can't have the seat lowered all the way or the fire extinguisher won't fit

Step 2: put in the first bolt
There are 3 holes currently in the seat mount. You'll be using the middle one. Secure the mount by feeding through one of the cap screw into the lowest center hole on the mount. Secure on the back side with a washer, lock washer, then nut. Don't tighten it down fully yet. The second arrow in this pic is about where we'll be drilling out second hole.
IMG_20160723_080544.jpg

Step 3: drill the second hole
Using the mount as your template to know where to drill, drill out a clearance hole for the second bolt. Mount it in the same order with no washers of any sort on the side facing out.
IMG_20160723_082207.jpg

You can use a wrench or anything flat to verify that the heads of the screw aren't sticking out farther than the pads on the mount.
IMG_20160723_083043.jpg

Step 4: tighten everything down
Here it is fully mounted and tightened:
IMG_20160723_083519.jpg

Step 5: put in the fire extinguisher and lower seat
Mount the fire extinguisher back in but don't tighten the clamps yet. Hold it in the mount and lower the seat until it starts pushing the fire extinguisher out. Raise it back up a bit to relieve pressure. Now you can tighten those clamps that wrap around the fire extinguisher.
IMG_20160723_083703.jpg

Here are some pics of it all finished. Not sticking out in front of the seat. Tucks in nicely. Very easily retrieved in a hurry.
IMG_20160723_083841.jpg

IMG_20160723_083923.jpg

IMG_20160723_091047.jpg

IMG_20160723_091807.jpg
 

TennJK

New member
Turned out great! I've been trying to come up with a good way to get mine under my front seat without worrying about stepping on it or hitting it. Really liking this idea
 

GraniteCrystal

New member
Turned out great! I've been trying to come up with a good way to get mine under my front seat without worrying about stepping on it or hitting it. Really liking this idea

Thanks! This one's not an original thought, but hope the write up helps if you decide to do it.
 

GraniteCrystal

New member
Update on fire extinguisher mount. Just mounted my full doors back on and the mount just clears them. Wouldn't want any larger of a fire extinguisher here I don't think.
 

Attachments

  • 1469366536215.jpg
    1469366536215.jpg
    87.6 KB · Views: 199
Top Bottom