oGKevin's Build

oGKevin

New member
Hey guys. New here. Figured I'd post what I have. I'd love some feedback and I'm here to learn more!

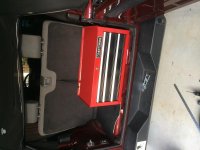
When I first bought her:

Phase 1 (Starting Build)


2007 Jeep JK Wrangler X 4-speed Automatic

Exterior:
  • Front Bumper: Rancho Rock Gear; Off-Road Bumper (w/ fog lights and D-shackles)
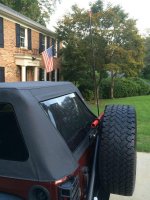
  • Rear Bumper: Poison Spider; JK RockBrawler w/ Tire Carrier
  • Fender Flairs: Poison Spider; JK Crusher Flares - Standard Width (Steel)
  • Inner Fenders for Flat Fender Flairs: Rugged Ridge; Inner Fender Liner Kit for Flat Fenders
  • Body Armor: Poison Spider; JK 2-Dr Body Armor (Steel)
  • Rocker Armor: Poison Spider; JK 2-Dr Rocker Knockers (w/ filler panels)
  • Soft Top: Bestop Trektop
  • Suspension Lift: 4.5"; TeraFlex
  • Tires: PRO COMP 35/12.50R17 LT
  • Wheels: Rugged Ridge Steel Wheels
  • Hood Latches: Drake Off Road Hood Latch Hold Down Assembly
  • Rear Break Light: Poison Spider; LED License Plate & 3rd Brake
  • Hood Scoop: Rugged Ridge; Hood Vent/Scoop
  • Cowl Armor: Rugged Ridge; Black Cowl Body Armor
  • Jeep Emblem: Mopar; Blackout, "Jeep" front emblem
  • Lug Nuts: Blackout


Interior:
  • Radio/CD: JVC KD-R540
  • Floor Mats: Rugged Ridge; All Terrain Floor Liners
  • Seat Cover: Smittybilt; [Molle] G.E.A.R Canvas Seat Cover with tool bags
  • Grab Handles on Role Bar: Rugged Ridge
  • Dashboard Addition: Daystar Upper Dash Panel
  • Rear Trunk Cover: Self

4FzCTi6.jpg
HcfPftX.jpg
TQtVXef.jpg
Y1hisH8.jpg
 

oGKevin

New member
Phase 2

2007 Jeep JK Wrangler X 4-speed Automatic

Exterior:
  • Headlights: Truck-Lite LED Headlights w/ anti-flicker harness
  • Grill: Duplicolor Bedlined Grill
  • Indicators: Blacked out (Rustoleum Lens Tint)
  • Winch: Smittybilt 97495 XRC Winch - 9500
  • Windshield Lights: Rigid Industries 20221 Dually Spotlight
  • Switchboard: Daystar KJ71044BK Black A-Pillar Switch Pod
  • Trim: Rugged Ridge 12419.25 Headlight Trim, Rugged Ridge 12419.26 Black Parking Light Bezel, and Rugged Ridge 11226.02 Black Rear Euro Tail Light Guard


Interior:
  • Radio/CD: JVC KD-R540
  • Floor Mats: Rugged Ridge; All Terrain Floor Liners
  • Seat Cover: Smittybilt; [Molle] G.E.A.R Canvas Seat Cover with tool bags
  • Grab Handles on Role Bar: Rugged Ridge
  • Dashboard Addition: Daystar Upper Dash Panel
  • Rear Trunk Cover: Self

YRc8QiT.jpg
ofUIBEY.jpg
jlfWCcl.jpg
JsvZfJz.jpg
 

oGKevin

New member
Phase 3

Exterior:
  • Taillights:IPCW LEDT-420CB Bermuda Black LED Tail Lamp
  • Toolbox: Craftsman Middle Chest
  • Bezel: Angry Eyes
  • Top: Spiderweb Shade
  • CB Radio: Cobra 75 WX ST
  • Hood: Poison Spyder Hood Louver
  • Snorkel: AEV Air Ram


5x5w4Cw.jpg
tfiznyE.jpg
sJT9pMe.jpg
E7lQhWG.jpg
CXiiymH.jpg
kYP1fMv.jpg
Tj3Xv8G.jpg
 

Attachments

  • IMG_2862.jpg
    IMG_2862.jpg
    75.9 KB · Views: 295
  • DEhLBY2.jpg
    DEhLBY2.jpg
    128.4 KB · Views: 298
Last edited:

oGKevin

New member
Did you get your Trektop used? Your rear bow is missing.

Yes - It came with the Jeep when I originally purchased it. Sorry about the jacked up sideways picture in the last post, I can't figure out how to get rid of it.

That's everything though, besides the dents from Rausch Creek and the AEV Snorkel.
I hope you guys enjoy! I have big plans for EVO Corners, TC, and Fascia. After that will be a new front axle, slabs, and Nitto 37 Trail Grapplers.

How she sits today:
kPtfHm4.jpg
 
Last edited:

oGKevin

New member
Teardown for the rebuild.

Lots of new EVO parts on the way. Beginning the tear down to rebuild it. :crazyeyes:

A little taste of whats to come:


EVO 1/4 Pounder with stinger
EVO 1/4 Pounder Lightbar Mount
EVO Fascia EVO Rear Shackle Mounts
EVO Rockskin Corners
EVO Tire Carrier
Rigid Industries Dually Floods (Backup Lights)
Rigid Industries 10" Bar for bumper
Rigid Industries 10" Lightbar Cover (Clear)
Mopar Fuel Door
Daystar Shackle Isolators
Poison Spyder Hawse Fairlead
Factor 55 Prolink
35" Nitto Trail Grapplers


5TfWAc5.jpg
413SVUl.jpg
HAeUZEY.jpg
S2wvJAW.jpg
YfHC8oL.jpg
 
Last edited:

oGKevin

New member
1/4 pounder is almost done. Rigid Industries 10" lightbar needs to be mounted and it'll all be on the Jeep tomorrow. Beginning work on the rear bumper for the fascia/d rings also. Worked all day, outside, in 19 degree weather :icon_crazy: bumperpix.jpg
 

CJW

New member
Almost there! Drilling holes for the stinger is a bitch, any advice?

Sharp bit, corded drill, push HARD.
Also, cut off the top outer corner of the frame horns/plates. Just a little. You don't want to cut the mounting points off but if left un trimmed, that corner will be in the way of mounting the most forward top bolts of the stinger. Ask me how I know. Hope those locations are clearly enough explained. If not, you'll see what I mean once all the stinger holes are drilled.
 

oGKevin

New member
Looks really good! Have you tried using a smaller bit and going bigger each time? I find that helps

I found the problem! I wasn't lubricating the hole. I switched to a new bit, used a lower speed and sprayed some WD40 in the hole every minute or so. Went right through it. 2 bolts left and then I have to wire up the winch and lightbar :icon_crazy:
 

oGKevin

New member
Almost there! Drilling holes for the stinger is a bitch, any advice?

Sharp bit, corded drill, push HARD.
Also, cut off the top outer corner of the frame horns/plates. Just a little. You don't want to cut the mounting points off but if left un trimmed, that corner will be in the way of mounting the most forward top bolts of the stinger. Ask me how I know. Hope those locations are clearly enough explained. If not, you'll see what I mean once all the stinger holes are drilled.

I just got done drilling the holes, so I know exactly what you mean now. Fuck. Well I'm not taking everything off again, I might just hit the front 2 outside bolts with loctite and bolt the back 4 in properly.
 

CJW

New member
I just got done drilling the holes, so I know exactly what you mean now. Fuck. Well I'm not taking everything off again, I might just hit the front 2 outside bolts with loctite and bolt the back 4 in properly.

Ya I said fuck it too. I got one in but not super tight and the other in but I drilled out the hole wider and it's still not cranked down well. If it's a problem later on I'll just get big ass self tapping bolts for it.
Looks really good though!!!!
 

oGKevin

New member
Looks good!

Thanks man! Appreciate the comments.

Ya I said fuck it too. I got one in but not super tight and the other in but I drilled out the hole wider and it's still not cranked down well. If it's a problem later on I'll just get big ass self tapping bolts for it.
Looks really good though!!!!

I stuck the bolts in, but there isn't enough room for the washers. I might chop it when I trim the back for bolt on d-rings.
 
Top Bottom