You are using an out of date browser. It may not display this or other websites correctly.
You should upgrade or use an alternative browser.
You should upgrade or use an alternative browser.
Oso Build Thread
- Thread starter dchew
- Start date
dchew
Active Member
Looking good! Ps are u in your garage ?
No, in my best friend's garage. It's pretty much everyone's dream garage :thumb:
Hightower
Member
No, in my best friend's garage. It's pretty much everyone's dream garage :thumb:
Does he want anymore friends lol. Good luck with the build
OverlanderJK
Resident Smartass
dchew
Active Member
Those welds look like garbage.....
:cheesy: Kidding! Nice welds!
Well, I wish I could take credit for those, but all the welds you see are on the bracket as it comes from EVO. :blush:
Haven't welded anything yet; those brackets are just in place for fit. It will be a while; we have to remove them, clean it all up for welding, then paint behind. I'm trying to figure out the best way to protect the frame underneath these brackets. Obviously we can't paint where we are going to weld, but I don't want a big bare section underneath the bracket either. So much salt is used where I live...
I think after cleaning it up we will paint it all, then regrind only the places right where the weld will be. Then after welding paint again. Anyone have a better plan?
PlenaBarba
New member
Awesome build. Subscribed! :clap2:
dchew
Active Member
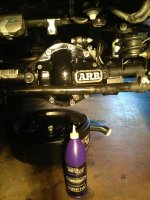
Thanks again for the great deal on the cover Dave!View attachment 13975
You bet! Looks great :thumb:
So did it take two quarts?
Prime8
New member
You bet! Looks great :thumb:
So did it take two quarts?
Well, the measuring technique specified in the ARB instructions is highly subjective and inaccurate. So I googled it. 1.3 quarts was the consensus with the locker. Put in about 1.3 quarts and it registers on the dipstick... So I hope it's adequate!
dchew
Active Member
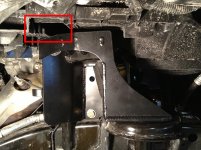
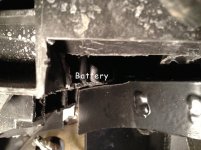
Well believe me I nobody wishes this was going faster than me! Frustrating evening last night between spilling a whole set of drill bits into the garage drain crock and breaking a few dozen dremel disks. The front coil over mounts are in, but the passenger side was a real bear. I don't know if Jeep changed things in 2013. I had to cut away so much plastic to the point of opening a hole into the battery compartment. Even then I still had to grind off the corner of the EVO tower (or else raise the battery). The rear top corner of the mount was hitting the front edge of the battery. There is a front plastic clip on the battery that helps hold it down. Not on mine any more. :grayno:
I will post picks later today once I clean up my cuts and touch up the tower. Not sure what to use to close up the hole. It is about 1.5" x 2.5". Maybe structural foam? I doubt plastic welding will stick to that material...
Dave
I will post picks later today once I clean up my cuts and touch up the tower. Not sure what to use to close up the hole. It is about 1.5" x 2.5". Maybe structural foam? I doubt plastic welding will stick to that material...
Dave
dchew
Active Member
Plastic wrap. Definitely plastic wrap.
Saran Wrap or Glad Clingwrap? Which works better??
:cheesy:
Prime8
New member
Saran Wrap or Glad Clingwrap? Which works better??
:cheesy:
Haha. Well if you are trimming out the softer plastic inside the wheel wells, I'd make a patch with that and use either gasket maker or that "plastic weld" stuff that actually partially melts and bonds the plastic. You can even try using a torch on a couple scrap pieces to see if it will melt together, instead of just burning...
piginajeep
The Original Smartass
this is normal to grind into the honeycombs (ribbings) on the battery tray. No reason to cut the part..I had to cut away so much plastic to the point of opening a hole into the battery compartment.Dave
Last edited:
dchew
Active Member
this is normal to grind into the honeycombs (ribbings) on the battery tray. No reason to cut the part..
I know the ribs are normal. But see the photos below. If I mounted this wrong I would love to know before I put it all together! :blush:
I ground the top rear of the mount. If I didn't it would have run into the battery. There used to be a battery mounting clip to the right of the battery that I also had to remove. I know I didn't have to trim quite as high as you see directly above the mount, but once I knew I had to breach the battery area I wanted to be sure I knew what I was cutting. So I cut it flush with the area to the right. That will also make it easier to cover it up.
I might have been able to avoid cutting into there if I ground a lot more off, but I was worried about maintaining the integrity of the coil over mount. Not sure if anyone has installed this yet on a 2013, but maybe they changed that area from 2012...? Or am I doing something seriously wrong?


dchew
Active Member
Checked with Andrew; everything looks correct. Either my JK is goofy or they changed something for 2013. Got everything on the passenger side cleaned up and repainted the C/O bracket after grinding. I'm leaning toward bending and painting some sheet metal to cover up the void.
Anyway, bumper off, vacuum pump relocated, removed the front control arms, started removing the necessary parts to tackle the PSC steering assist. I think it is best to do that now while the front end is apart. Looks like the reservoir will fit with the aFe CAI! if I can just figure out a way to mount it :yup:
Today we will cut off the front C/A brackets and try to fit the EVO high clearance fronts. That means dealing with "The Bugle" exhaust loop. I would have gone for the aFe down pipes to delete the bugle, but I understand it doesn't work with the Protek skids.


