Fitting adjustable control arms.

Gibbo

New member
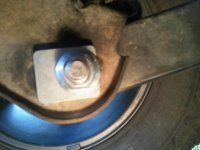
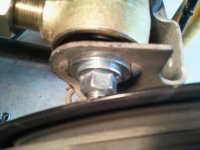
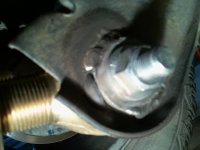
In preparation to fitting new JE Real drive shafts, I'm replacing the cam bolt set up that came with this lift, with some synergy cam bolt elimination washers. I'll put a couple of small welds on each one so they will never move.Then I have some Currie adjustable front lower, and rear upper control arms to replace the stock ones with. My question to you all that have done this before is, what's up with the rear control arms upper bolt that goes through the frame on each side. Does the nut stay fixed in position on the inside of the frame as the fuel tank is in the way on one side. My next question is if I do one side at a time, will the remaining arm hold everything in place while I adjust the new one to fit the open bolt holes. I'm going to do this in 2 days time.:eek:
 

StrizzyChris

New member
My question to you all that have done this before is, what's up with the rear control arms upper bolt that goes through the frame on each side. Does the nut stay fixed in position on the inside of the frame as the fuel tank is in the way on one side.

Nope, most everyone cuts that bolt off with a sawzall and replaces it with a new one. Youll want to put it in going the opposite direction.
 

bl17z90

New member
I would assume if you take 1 arm off the other 3 will hold it in place but this is just an mildly educated guess:thinking:
 

Skirmish

New member
If you are keeping the axle at the same angle and the control arms the same length then yes you can pull them one at a time and swap fairly easily. You may need to out a jack under the bracket or pumpkin to get the hole to line up perfectly but it isn't hard.

The upper arm nuts in the frame should have a tab that comes out of the bottom to keep it from spinning. They aren't welded to the frame and It can be a pain to line the nut up with the hole to thread on the bolt but a little patience and you will get it. If you go to the poly performance site and look at their bolt replacement kit you can see the "flagged" nuts.


image-525197635.jpg
 

wayoflife

Administrator
Staff member
My question to you all that have done this before is, what's up with the rear control arms upper bolt that goes through the frame on each side. Does the nut stay fixed in position on the inside of the frame as the fuel tank is in the way on one side.

As mentioned, the nuts are welded onto flags and they help to hold things in place. The flag inserts up into the bottom of the frame.

My next question is if I do one side at a time, will the remaining arm hold everything in place while I adjust the new one to fit the open bolt holes. I'm going to do this in 2 days time.:eek:

If you're asking if you can install one arm at a time, yes, you most certainly can and with your Jeep on the ground. :yup:
 

Gibbo

New member
StrizzyChris said:
Nope, most everyone cuts that bolt off with a sawzall and replac es it with a new one. Youll want to put it in going the opposite direction.

So I have to cut the bolt on the fuel tank side, or can I leave it and reuse it.
 

wayoflife

Administrator
Staff member
So I have to cut the bolt on the fuel tank side, or can I leave it and reuse it.

no, you don't have to cut any bolt on the rear end. you don't even really need to cut off the bolt mentioned, the passenger side front upper control arm mount bolt at the frame but, it does make things easier.
 

Gibbo

New member
no, you don't have to cut any bolt on the rear end. you don't even really need to cut off the bolt mentioned, the passenger side front upper control arm mount bolt at the frame but, it does make things easier.

That's why I couldn't find that bolt, I didn't look at the front uppers, I'm only replacing the lower arms up front after I take out the " offset washers ", ( OME's name for them ). I'll try and post a photo of them. Well it's time in the morning, can't wait. Nothing like good advice to build confidence. Thanks everyone.:thumb:
 

Attachments

  • 2012-10-14 15.30.43.jpg
    2012-10-14 15.30.43.jpg
    57.1 KB · Views: 102

wayoflife

Administrator
Staff member
That's why I couldn't find that bolt, I didn't look at the front uppers, I'm only replacing the lower arms up front after I take out the " offset washers ", ( OME's name for them ). I'll try and post a photo of them. Well it's time in the morning, can't wait. Nothing like good advice to build confidence. Thanks everyone.:thumb:

well if that's the case, this should help you out:

1. place a floor jack under the pinion of your front axle - raise it up so that it's just holding it up.
2. starting on the driver side, remove control arm nut at the axle using a 21mm socket and wrench.
3. if the bolt does not slide out by hand with ease, slowly raise your jack just a bit until the bind is released. if you go too far, you will need to lower it back down. when you have it just right, the bolt will come out easily.
4. remove the control arm nut and bolt at the frame end using a 21mm socket and wrench.
5. leaving your jack exactly where it is, repeat steps 1-4 on the passenger side. again, raise and or lower your jack as needed to pull the bolt out from your axle mount.
6. set both your new adjustable control arms to 23" eye to eye.
7. loosely install your new driver side control arm onto the frame mount using the factory hardware
8. lower your jack as needed until you can align the mounting hole with that of your new lower control arm. secure it in place with the factory hardware.
9. repeat steps 7-8
10. tighten all your nuts and bolts to 125-130 ft. lbs. of torque.

that's all you need to do.
 

Gibbo

New member
Well job done! Front and rear arms and cam bolt eliminator washers installed, (see photo). Front caster is smack on 4 degrees, measured with angle finder on bottom of "C's", is that ok. Everything went as everyone said it would, thanks again. Next weekend project drive shafts.:beer:
 

Attachments

  • 2012-12-01 12.41.41.jpg
    2012-12-01 12.41.41.jpg
    54.9 KB · Views: 83

wayoflife

Administrator
Staff member
Well job done! Front and rear arms and cam bolt eliminator washers installed, (see photo). Front caster is smack on 4 degrees, measured with angle finder on bottom of "C's", is that ok. Everything went as everyone said it would, thanks again. Next weekend project drive shafts.:beer:

Just a reminder but, those need to be welded in. Otherwise, they're no better than your old cam bolts. :yup:
 

Gibbo

New member
Just a reminder but, those need to be welded in. Otherwise, they're no better than your old cam bolts. :yup:

2 small welds top and bottom x8 washers. Paint black, good as new.
 

Attachments

  • 2012-12-02 14.43.21.jpg
    2012-12-02 14.43.21.jpg
    52.1 KB · Views: 57
Top Bottom