$10 Mini Switch Pod?

pvanweelden

New member
Thanks, hopefully later today I will get a chance to spend more time on it, and update with programming instructions.

Sent from my SM-N900V using WAYALIFE mobile app
 

13_gecko_rubi

Caught the Bug
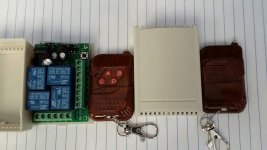
If I look at the link in the first post it bring up the auction and shows an absolutely hideous looking fake wood remote. Did you order that one and get the 4 button remote shown in your pictures?
 

pvanweelden

New member
Good news! I figured out the programming and in the latching mode all 4 channels can be turned on at once!
Will update first post soon.
1396022290041.jpg

Sent from my SM-N900V using WAYALIFE mobile app
 

pvanweelden

New member
:cheesy: ^ I used up my 9 volt battery the other day, so I brought in the Ryobi :D

updated the first post with programming info
 

pvanweelden

New member
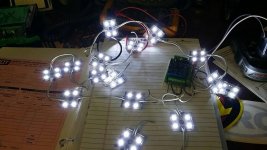
Using the remote to turn on 3 of my lights at once, thru the diy spod, but these lights could easily run off just the mini switch pod itself. 108 watts on channel A, 54 watts on channel B, and 36 watts on channel C.
1396063988645.jpg

Sent from my SM-N900V using WAYALIFE mobile app
 

pvanweelden

New member
Lol, I did that to easily test as I was constantly removing the leads. The connectors are small on the relay panel board, and only accept 16 gauge wires. I was connecting 2 16 gauge wires at once.

Sent from my SM-N900V using WAYALIFE mobile app
 

pvanweelden

New member
Since the connectors on this thing only accept 16 gauge wire, one thing you could do is order a 6 position terminal strip from waytekwire- part #47306 $1.98. Run very short wires from the relay panel to this strip, and then you could hook up heavier gauge wire to the strip. Use ring terminals on the strip and cover up the positives from accidental contact.
 
Last edited:

pvanweelden

New member
Think about what accessories you will have on your jeep. Oba compressor? Does it come with a relay and a switch?
50" led light bar? You will need a 30 amp relay for that. But, windshield lights, rear lights, rock lights, etc. As long as the wattage total is less than 120 watts per channel, you could use one of these to run your leds and then mount one switch for your compressor and or 50" led bar. No spod needed.

Sent from my SM-N900V using WAYALIFE mobile app
 

dahreno

Banned
If Overlander agreed with me on something, I better make sure my wife didn't spike my soda with something !LOL !
 

pvanweelden

New member
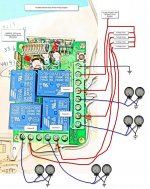
Those were my test wires in that pic- when you pigtail to the other connectors, use 18 gauge so you don't have to cut strands off to fit into the relay panel connectors. Thank you dahreno.

Sent from my SM-N900V using WAYALIFE mobile app
 

pvanweelden

New member
^ Funny Pastor :D
Well, after a day of having this wireless controller installed, all I can say is, it rocks! So awesome to have wireless control! I hooked up an Air Raid horn to the 4th button today. This thing kicks ass!

Sent from my SM-N900V using WAYALIFE mobile app
 

pvanweelden

New member
I received two of the ten dollar remotes today- I had thought all along that the pc boards would be identical, and the only differences would be with the remotes, but I was wrong. The 12 volts input and ground input are reversed on the cheaper pc boards. I will do some testing this afternoon or tomorrow to verify that all other connections and operations are the same as I have posted, otherwise, so far this writeup is only true for the 15 dollar remote.
I do admit, I like the fact that the cheaper 10 dollar remote has a sliding cover over the buttons to help prevent accidentally turning something on.
1396379339707.jpg

Sent from my SM-N900V using WAYALIFE mobile app
 

pvanweelden

New member
Ok- so here is where things get interesting- the boards are different- If you bought the $15 board, refer to page 1 for diagram.

If you bought the $10 pod- here is a diagram- I will do a better one later
pencil_sketch_1396385982473.jpg


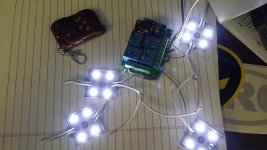
Here is one LED hooked up to each of the 4 channels with all channels on.
all-on10dollar.jpg

The main differences from the $10 to the $15 board is the input positive and negative are reversed, the Jumper Pin settings are also Reversed, and the Channel outputs are switched in the orientation on the board.
Good Luck and have fun!
 
Last edited:
Since I assume the board doesn't provide protection for the relays or other components, you really should fuse each channel's positive at no more than 10A and use at least 18ga stranded wire.

I normally wouldn't comment on this as I think your diagram(s) are for functional purposes only, but since you noted the incoming positive 30A fuse I wanted to point out that this is insufficient for an permanent installation.

I don't want anyone burning down their rig with a $10-$15 switch box!
 
Top Bottom