Sunnyside's Gladiator build begins...

sunnysideup

Active Member
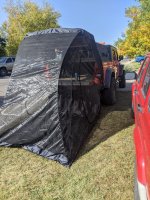
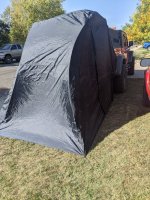
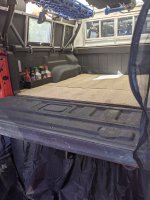
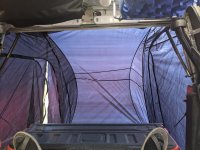
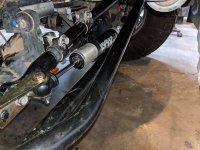
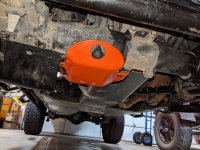
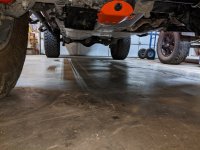
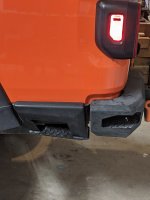
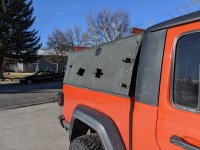
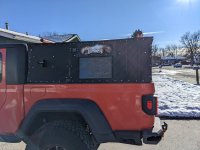
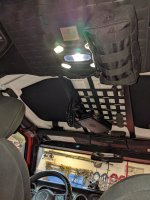
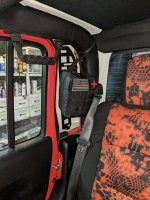
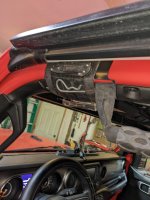
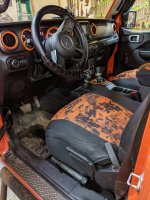
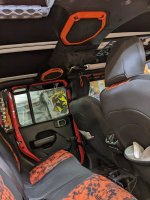
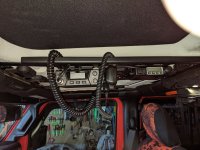
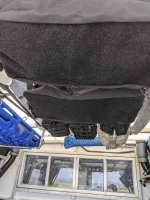
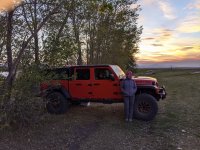
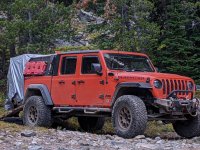
Been using the back for camping...just throwing a tarp over the back and sleeping on memory foam inside. It's worked! So much so that I'm working on a topper/truck tent option for the back... I also got all of the molle pouches in and have them secured to the rack my son made now, works great for keeping things secure. I also made a fishing pole place on the inside roof as it comes along on many trips.
 

Attachments

  • PXL_20210917_194043056.jpg
    PXL_20210917_194043056.jpg
    251 KB · Views: 36
  • PXL_20210918_013052794.jpg
    PXL_20210918_013052794.jpg
    312.3 KB · Views: 36
  • PXL_20210902_235739281.jpg
    PXL_20210902_235739281.jpg
    319.2 KB · Views: 36
Last edited:

sunnysideup

Active Member
Well I got another step done... When I bought my tires only 4 were available. Now those same tires are out of stock everywhere... so I needed a spare. I had an old rim I got cheap...but it had never been used... 5x5 and it should work for a spare. But I had to find a similar tire size wise that also will be able to mount in the stock location... After several people saying what fits and what doesn't in 37's... I found one that they said did. So I ordered it... but its tight! 20psi but very similar height and width to the Tires I have. So I now have a full size spare! On my last trip I was relying on someone else that had a similar sized spare. It's A copper discover sst 37x12.5x17, and it fits... I did not have to modify the heat shield or any thing. But the sway bar is close! I run Nitto Ridge Grapplers in that same size. PS the orange is a flashlight in the last pic...
 

Attachments

  • PXL_20210924_220115717.jpg
    PXL_20210924_220115717.jpg
    156.5 KB · Views: 17
  • PXL_20210924_220156927.jpg
    PXL_20210924_220156927.jpg
    196.8 KB · Views: 17
  • PXL_20210924_220131130.jpg
    PXL_20210924_220131130.jpg
    166.8 KB · Views: 17

sunnysideup

Active Member
Added a cheap tent... it has no poles so you are on your own to get this to fit anything... I had a 35 year old tent that was going to the dump, so I modified three poles to create support for the tent. But we had been using a tarp...so this fits nice and weighs about 8lbs altogether. It is screen and comes with a rainfly. It is about 120 dollars shipped... tag says it all, made in China. I think most cheap tents are now...

Has not been tested yet, except for it fits and gives you room to stand up and get dressed. and sleep on memory foam with the tailgate down.

It also leaves our rack open for a canoe or kayak ... which is of interest to us right now. And its about 3 grand cheaper than the current crop of RTT's lol. It will probably get used next summer. We don't camp in tents in the winter in Montana (I have but my wife won't).
 

Attachments

  • PXL_20210926_211659678.jpg
    PXL_20210926_211659678.jpg
    361.9 KB · Views: 16
  • PXL_20210926_211709249.jpg
    PXL_20210926_211709249.jpg
    340.1 KB · Views: 16
  • PXL_20210926_213329239.jpg
    PXL_20210926_213329239.jpg
    364.6 KB · Views: 17
  • PXL_20210926_213740979.jpg
    PXL_20210926_213740979.jpg
    214.2 KB · Views: 17
  • PXL_20210926_213655428.jpg
    PXL_20210926_213655428.jpg
    211.5 KB · Views: 17

sunnysideup

Active Member
Couple of other parts added... I reinforced the pinch seam with a 3/16 length of spring steel that runs down the whole pinch seam. Since my current steps mount to the body mounts underneath and the pinch seam... I went the whole length in one piece steel... this sandwhiches the pinch seam in steel. In hope to give it more strength in case of an impact with a large rock. It was primed, painted and rubberized on the back where it touches the paint.

I also used a Clayton steering stabilizer relocation bracket to move the fox2.0 up out of harms way It was the lowest point on the front.

I finally got the other axle shaft from RCV so the front axle is now complete! It was half RCV half stock while I waited for parts... its all set up, and it has the bronze bushing in the intermediate shaft now instead of the stock plastic.

I also mounted my artec FAD skid plate... it was steel instead of alum. So I painted it!

Now I really am out of parts to put on! Got another couple things on the topper...
 

Attachments

  • PXL_20211010_021926049.jpg
    PXL_20211010_021926049.jpg
    186.3 KB · Views: 24
  • PXL_20211010_021745826.jpg
    PXL_20211010_021745826.jpg
    196.9 KB · Views: 25
  • PXL_20211010_021807154.jpg
    PXL_20211010_021807154.jpg
    208 KB · Views: 25
  • PXL_20211010_021831065.jpg
    PXL_20211010_021831065.jpg
    189.2 KB · Views: 25
Last edited:

sunnysideup

Active Member
I love the coverage of the LOD bed sliders... but the look of them did not match my current bumper. I also wanted another step...I have one in the rear bumper... and now I have one in slider... I think the lines match my bumper better. I just continued the lines of the wedge thing they created and went to the base. about a 4 inch by 2 inch piece is missing now from the center... but the was slotted out in the design to let water come out from behind the metal...so little is lost. I gained a step on each side!
 

Attachments

  • PXL_20211023_034910471.jpg
    PXL_20211023_034910471.jpg
    108 KB · Views: 22
  • PXL_20211022_224444362.jpg
    PXL_20211022_224444362.jpg
    194.8 KB · Views: 22
  • PXL_20211022_224420449.jpg
    PXL_20211022_224420449.jpg
    323.5 KB · Views: 22
  • PXL_20210306_161823908.jpg
    PXL_20210306_161823908.jpg
    173.5 KB · Views: 22

sunnysideup

Active Member
Just an easy update... I was looking for the transfer case vent... I found it on the front side...about even with the rear driveshaft output. by reaching over from the back you will find about a 3 inch kinked hose and cap. this is the vent... so it is pretty low in the event you are in deeper water then you wish to be. I bought 4 feet of hose the same size... and a joint that fit into the stock hose. I opened the hood ran the hose down over the transmission. I zip tied the factory vent near the battery and ran the hose down to the transfer case... I was able from the passenger side -to reach up and place two more zip ties to keep the hose on top of the tranny. At the transfer case I was able to reach up from behind and run the hose over the factory nipple where the 3 inch was attached. No pics... but an easy way to get your vent up under the hood where everything else is vented!
 
Last edited:

sunnysideup

Active Member
Here is another part that I have waited to install... drilling 4 holes through the factory track bar mount at odd angles... made me decide to put it off. It takes about 15 min a hole with my tools, but the end result is that the rear track bar is level with the axle and the ground now. This mount is made by Rock Krawler... so is the rear track bar that I run, so that was a perfect fit. I have 3.5 inches lift or so... and every little correction can help maintain a stock like feel on the highway. This was a very stout part... I still have another part too... an ARTEC truss for the rear... but I've not been really ambitious about that job either. Probably will get it on this winter.
 

Attachments

  • PXL_20211126_040608820.jpg
    PXL_20211126_040608820.jpg
    198 KB · Views: 7

sunnysideup

Active Member
I decided to go all black on the side of the topper... and added some stainless screws to give it the rivited look. On the inside got a few more molle pouches... I'm using a magnetic mount for hanging the 10mm cheeseburger , and using another magnetic wrap to mount tools and such on the roll bar. I have not given the truck the snow test yet... I have not been off road much this fall/winter... but I'll get out there soon....
 

Attachments

  • PXL_20211212_202616614.jpg
    PXL_20211212_202616614.jpg
    240.5 KB · Views: 12
  • PXL_20211212_202705529.jpg
    PXL_20211212_202705529.jpg
    166.4 KB · Views: 13
  • PXL_20211211_234420333.jpg
    PXL_20211211_234420333.jpg
    198.9 KB · Views: 13
  • PXL_20211211_234440986.jpg
    PXL_20211211_234440986.jpg
    221.3 KB · Views: 12
  • PXL_20211211_234635364.jpg
    PXL_20211211_234635364.jpg
    153.3 KB · Views: 12

sunnysideup

Active Member
Christmas gifts from wife & kids (all adults now). These were not expected... but they are here and so I used them and moved things around to have them work with everything else. The fridge I had to make solid and easily removable. So.. I used a piece of treated teakwood to use 4 braces to the bottom of the case. This is then cut to fit exactly into the floor well on the passenger side. I use a ratchet strap around the bottom to the bed tie down location... this keeps it from sliding forward and back or bouncing out of location. The metal slot brace keeps the side from lifting at all and the ratchet strap locks in from each side. I figure the wood will keep it off the bed to prevent harsh vibrations. I have my own 12volt socket put together from amazon... with a circuit breaker on it - going to the battery direct. Have not tried it on a trip yet...its been 10 below zero...

PXL_20211228_022725510.jpg PXL_20211228_022733354.jpg PXL_20211228_025806822.jpg PXL_20211228_030156516.jpg
I can undo one strap... and lift this out and set it on the ground while it is still plugged in. I took it around on washboard roads and bumps for a few days and it never moved. I know nothing about the quality of the product...it was a gift! I see they are about 400 bucks. I hope it works for a long time. It has two compartments and can be set at different temps.
 
Last edited:

sunnysideup

Active Member
Then one of the artistic daughters bought trim pieces to dress up the inside. The gear shift one didn't stick well and is gone already... the others are holding on fine... I had painted the vents on my old JK... so this was just her way of giving the gladiator the same vibe.
 

Attachments

  • PXL_20211227_005525225.jpg
    PXL_20211227_005525225.jpg
    244.1 KB · Views: 15
  • PXL_20211227_005558774.jpg
    PXL_20211227_005558774.jpg
    192.8 KB · Views: 15

sunnysideup

Active Member
Last thing was a GMRS... I bought my license and a matching handheld unit. I had to change the location of the CB but they both fit fine and are out of the way... and my mag mount still easily has space for the pew pew... The family is switching to these radios...our club is still using CB's only...
 

Attachments

  • PXL_20220101_194247265.jpg
    PXL_20220101_194247265.jpg
    212.2 KB · Views: 11

sunnysideup

Active Member
So bought a scratch and dent front skid for 27 bucks... cut it up to work with my bumper. Then I finished a skid made out of 5/8 alum plate that keeps the tire from becoming a trap for stumps and rocks to get caught up in the center of it. Also helps it slide on snow! PXL_20220205_023740695.jpg PXL_20220205_023749485.jpg PXL_20220205_030418109.jpg PXL_20220104_041713595.jpg PXL_20220104_055852346_LI.jpg
 

Brute

Hooked
So bought a scratch and dent front skid for 27 bucks... cut it up to work with my bumper. Then I finished a skid made out of 5/8 alum plate that keeps the tire from becoming a trap for stumps and rocks to get caught up in the center of it. Also helps it slide on snow! View attachment 371893 View attachment 371894 View attachment 371895 View attachment 371896 View attachment 371898
Great idea on the spare...you know eventually the spare will grow and migrate into the bed...it's inevitable...
 
Top Bottom