You are using an out of date browser. It may not display this or other websites correctly.
You should upgrade or use an alternative browser.
You should upgrade or use an alternative browser.
The build/re-build of Gruff
- Thread starter Ddays
- Start date
WJCO
Meme King
Bought a Warn Zeon 10-S a few weeks ago and finally got the chance to put it in.
That's a sexy looking winch.
Pretty straightforward install.
Wait till you have to attach the rope, lol. I had a new vocabulary after putting the rope on.
Ddays
Hooked
Nice coming together pretty good
Thanks man!
Just read the whole thread. Sucks about the wreck but it looks like you do-over build is going great.
Appreciate it! Yeah, after the wreck I decided to just do the other stuff I was going to wait for and have it done before Winter....almost done!
The "DEFCON 2" reference made me laugh. Jeep build is Looking awesome man I absolutely love my warn Zeon. Glad you and the Jeep are ok after the accident!
Yeah, I figured DEFCON 1 would be reserved for not lining the skins up correctly!
That's a sexy looking winch.
Wait till you have to attach the rope, lol. I had a new vocabulary after putting the rope on.
Yeah, she's a purdy one!
I hear ya on the rope. I looked at the eye at the end that the key goes into and the hole that they are inserted in...HA!
I'm sure this will be fun!
Thank you all gentlemen! Happy Thanksgiving!
WJCO
Meme King
I did! :furious3:
Have to organize my photos and upload but what a pain in the ass!
Good deal. Glad you at least got it.
Ddays
Hooked
Adding Sliders
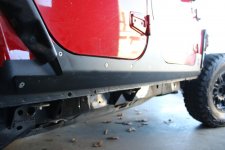
So I got the skins on and they weren't too bad. Now time for the slider pre-install. I'm not a welder so I had to farm this out. Figured I'd pre-mount them by tapping the frame in a couple spots and bolting them up so all he'd have to do was burn them on...
When you work alone you gotta use anything handy!


So after I got it bolted in place I really didn't like how the pinch seam stuck out like a sore thumb

So, off with the slider for a quick paint job. Looks much nicer blacked out. Off to the welder. I planned on some install pics of them being welded on but
every time I made to snap a couple the guy would give me a death glare. It was a cold morning and his welder was acting up. So the guy that knows nothing about a welder was making the adjustments to the feed rate and running for each grinder, hammer, wire brush request he made. Oh well, came out pretty good so I didn't mind playing gofer.
So I got the skins on and they weren't too bad. Now time for the slider pre-install. I'm not a welder so I had to farm this out. Figured I'd pre-mount them by tapping the frame in a couple spots and bolting them up so all he'd have to do was burn them on...
When you work alone you gotta use anything handy!
So after I got it bolted in place I really didn't like how the pinch seam stuck out like a sore thumb
So, off with the slider for a quick paint job. Looks much nicer blacked out. Off to the welder. I planned on some install pics of them being welded on but
every time I made to snap a couple the guy would give me a death glare. It was a cold morning and his welder was acting up. So the guy that knows nothing about a welder was making the adjustments to the feed rate and running for each grinder, hammer, wire brush request he made. Oh well, came out pretty good so I didn't mind playing gofer.
Attachments
Ddays
Hooked
Rear skins
Gotta admit, I really wasn't looking forward to this. I've looked over a lot of the build threads showing this install and it is a little intimidating. I'm a little out of sequence on posting photos this thread - I actually did the rear skins right after I did the rocker skins and before I did the sliders.


I painted all of the holes with primer. Since these are never coming off I didn't try to be neat here


I slopped a bunch of silicone over each of the stainless nutserts. Hopefully this at least delays any rust...


Dammit, missed hole. I drilled through the holes in the skins and one of the straps covered this hole up.


This was much more difficult than the rocker skins. You really have to crank the hell out of the straps in order to get the skins tight against the corners.
The cutting required is considerable, as you can see. Once you commit to these there is no going back. They did come out pretty good. The hardest part is next. mounting the tire carrier. I was going to wait until spring but I got impatient and went ahead and ordered the carrier. Had it powder coated in red to match the body color.
That came back and it looks fantastic. I'll get those posted up next...
Gotta admit, I really wasn't looking forward to this. I've looked over a lot of the build threads showing this install and it is a little intimidating. I'm a little out of sequence on posting photos this thread - I actually did the rear skins right after I did the rocker skins and before I did the sliders.
I painted all of the holes with primer. Since these are never coming off I didn't try to be neat here
I slopped a bunch of silicone over each of the stainless nutserts. Hopefully this at least delays any rust...
Dammit, missed hole. I drilled through the holes in the skins and one of the straps covered this hole up.
This was much more difficult than the rocker skins. You really have to crank the hell out of the straps in order to get the skins tight against the corners.
The cutting required is considerable, as you can see. Once you commit to these there is no going back. They did come out pretty good. The hardest part is next. mounting the tire carrier. I was going to wait until spring but I got impatient and went ahead and ordered the carrier. Had it powder coated in red to match the body color.
That came back and it looks fantastic. I'll get those posted up next...
Ddays
Hooked
Nice job man!
Looks awesome!!
Thanks! When you're halfway through this and cutting holes for the lights, you stop & question the sanity of what you are doing. Once you finish and step back and see it all together, man it's definitely worth it.
Ddays
Hooked
Evo carrier goes on
I have to say, this was pretty difficult. The instructions warn you and they are right. If you are thinking about installing one of these just be prepared. I tried to check out the other builds to find any tricks and have to say the best one I found was on MTG's build thread. He built a rig like this. I don't know how you'd do this without some kind of brace. Especially doing it solo. The jacks allow you to do the small vertical adjustments necessary to get the whole thing lined up. Strapping it to the body held it tight to the body so I had free hands & could adjust each one as needed.


I didn't take very many photos of the actual step by step process. Frankly, I was stressing and forgot to take any.
Once I got it hung came the adjustment phase. That takes lots of patience and I lost mine and had to quit & just walk away.
Started again in the morning and honestly it all came together pretty smoothly after that.


Here are the adjusted heights of the carrier I ended up with. This was arguably the hardest part of the install.
Without tire mounted

With tire. This thing closes like a dream. The weight of the tire on the carrier actually helps with closing the assembly.


Found these steel dice on the ETSY website a couple years ago. Had the coater weld them on like they were tumbling but if you look closely, the opposite sides of the dice add up to seven on five of the sides you can see. Not much of a gambler but I'll take all the luck I can get!

I have to say, this was pretty difficult. The instructions warn you and they are right. If you are thinking about installing one of these just be prepared. I tried to check out the other builds to find any tricks and have to say the best one I found was on MTG's build thread. He built a rig like this. I don't know how you'd do this without some kind of brace. Especially doing it solo. The jacks allow you to do the small vertical adjustments necessary to get the whole thing lined up. Strapping it to the body held it tight to the body so I had free hands & could adjust each one as needed.
I didn't take very many photos of the actual step by step process. Frankly, I was stressing and forgot to take any.
Once I got it hung came the adjustment phase. That takes lots of patience and I lost mine and had to quit & just walk away.
Started again in the morning and honestly it all came together pretty smoothly after that.
Here are the adjusted heights of the carrier I ended up with. This was arguably the hardest part of the install.
Without tire mounted
With tire. This thing closes like a dream. The weight of the tire on the carrier actually helps with closing the assembly.
Found these steel dice on the ETSY website a couple years ago. Had the coater weld them on like they were tumbling but if you look closely, the opposite sides of the dice add up to seven on five of the sides you can see. Not much of a gambler but I'll take all the luck I can get!
Ddays
Hooked
Came out really nice.
Thank you sir!
mudmobeeler
Caught the Bug
Lookin good. :thumb: