You are using an out of date browser. It may not display this or other websites correctly.
You should upgrade or use an alternative browser.
You should upgrade or use an alternative browser.
GraniteCrystal build thread
- Thread starter GraniteCrystal
- Start date
WJCO
Meme King
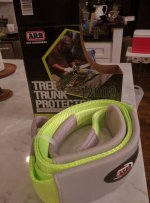
More birthday presents! Now that I have a tree trunk protector, I can finally stretch my winch line!
About time! That zeon is still a nice looking winch even if you never use it.
GraniteCrystal
New member
About time! That zeon is still a nice looking winch even if you never use it.
Ha, yeah, kind of expensive for not using it though so I better get stuck sometime
")
GraniteCrystal
New member
Mike_JK_Houston_711
New member
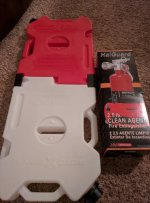
More birthday presents! Water and gasoline Rotopax and an H3R 2.5lb fire extinguisher.
Nice man! Get some mounts for those cans. Happy birthday!
WJCO
Meme King
More birthday presents! Water and gasoline Rotopax and an H3R 2.5lb fire extinguisher.
Geez you're getting hooked up this year. Let me know if you need any help building any custom mounts.
GraniteCrystal
New member
Nice man! Get some mounts for those cans. Happy birthday!
Geez you're getting hooked up this year. Let me know if you need any help building any custom mounts.
Thanks guys! Thinking of keeping it cheap for now and just using tie downs to the roof rack. Long term would like to have something more permanent on a tire carrier I think.
GraniteCrystal
New member
OK, thinking/planning more for the 4 day offroad trip planned this summer. Biggest area I think I'm lacking in is skid plates. We'll be flying solo for those 4 days and don't want to get stranded.
You guys think I'm going in the right direction to make skid plates the next purchase? Or screw skids and keep saving for 37s and then do skids?
Recommended skid plate setups for a 2014 Rubi, auto trans? Already looking at Evo Protek
You guys think I'm going in the right direction to make skid plates the next purchase? Or screw skids and keep saving for 37s and then do skids?
Recommended skid plate setups for a 2014 Rubi, auto trans? Already looking at Evo Protek
WJCO
Meme King
OK, thinking/planning more for the 4 day offroad trip planned this summer. Biggest area I think I'm lacking in is skid plates. We'll be flying solo for those 4 days and don't want to get stranded.
You guys think I'm going in the right direction to make skid plates the next purchase? Or screw skids and keep saving for 37s and then do skids?
Recommended skid plate setups for a 2014 Rubi, auto trans? Already looking at Evo Protek
What trails are you going to be running? That would be the determining factor that I would use. If there are a lot of rocks, then yes do skids, but if you're just going for off the pavement adventures, there's a lot around here that don't have a lot of rocks.
Sharkey
Word Ninja
If you are going to be in the rocks and sticks, skids like the protek would be a plus. I'd also get an extra serpentine belt and some zip ties or replacement clips for the T-case cable. Any of those things can turn a good day into a bad one pretty quickly.
All of that said though, if you drive carefully and pick good lines you can avoid a lot of problems.
All of that said though, if you drive carefully and pick good lines you can avoid a lot of problems.
GraniteCrystal
New member
If you are going to be in the rocks and sticks, skids like the protek would be a plus. I'd also get an extra serpentine belt and some zip ties or replacement clips for the T-case cable. Any of those things can turn a good day into a bad one pretty quickly.
All of that said though, if you drive carefully and pick good lines you can avoid a lot of problems.
What trails are you going to be running? That would be the determining factor that I would use. If there are a lot of rocks, then yes do skids, but if you're just going for off the pavement adventures, there's a lot around here that don't have a lot of rocks.
I'd like to do up to a 7 or so (once I have 37s) on the trail damage scale of 1-10, go to Moab and do a bunch of those trails, and I like river crossings.
EDIT: And I'll often be the only vehicle
GraniteCrystal
New member
I'd get the skids to protect that vulnerable trans cooler line on your transmission.
Yeah it's a question of when I think. Now so I'm covered going forward? Or later once I'm on 37s?
MR.Ty
Token East Coast Guy
Yeah it's a question of when I think. Now so I'm covered going forward? Or later once I'm on 37s?
Now. As far as I know that line is really easy to hit even when you are being extra careful. Better to protect it now rather than break it alone on some trail.
Brute
Hooked
I'd get the skids to protect that vulnerable trans cooler line on your transmission.
Roger that...even when I had 35's, I'd crawl under after a run and notice all the new marks on the skid plates...
scull20
New member
OK, thinking/planning more for the 4 day offroad trip planned this summer. Biggest area I think I'm lacking in is skid plates. We'll be flying solo for those 4 days and don't want to get stranded.
You guys think I'm going in the right direction to make skid plates the next purchase? Or screw skids and keep saving for 37s and then do skids?
Recommended skid plate setups for a 2014 Rubi, auto trans? Already looking at Evo Protek
I've got a 2014 JKUR as well. Before I got my tires and lift I got a ProTek system first...it saved my ass several times by keeping the exhaust from taking some pretty substantial hits. I'd get some skids now and tires later.
GraniteCrystal
New member
Thanks for all the thoughts guys! Based on what you guys said and my own piece of mind, I think the skids will be next.
GraniteCrystal
New member
Removable, big dog friendly, rear storage
Rear storage is a common topic of discussion amongst Jeep owners and there are some pretty sweet solutions out there. Many on Wayalife have duplicated Sharkey's setup and it works great. But, it doesn't work as well when you have a big dog that needs all the head room he can get in the back. Rather than stacking and eliminating vertical space, I needed something that would eliminate horizontal space. I also wanted to be able to remove it when I wanted so I would have the full capacity of the Jeep for hauling things when desired. With that in mind, here is what I came up with. Writing this up now, I wish I had taken more pics along the way, so please ask if you have questions. I've put things in the best order to do them looking back on the process.
Materials:
4'x8' piece of plywood. I went with 7/16" thickness.
Wood glue
Clamps, long ones
Metal corner guards (2 10' pieces and 1 8' piece) (Lowes item #11822)
1/2" cut nails, black (Lowes item #58215)
2 boxes of 3/4 wire brads (Lowes item #58175)
4 handles (Lowes item #308980)
2 hinges (Lowes item #308892)
2 butterfly connectors (Amazon search for RH-1688/0371)
Some 3/4" wood or sheet metal screws
a dog leash type connector (you can find these at Lowes as well...I just had one lying around)
4" of flat webbing (had some lying around. Got it originally from REI or Whole Earth Provision)
1 pipe strap (Lowes item #301382)
4 cans of Rustoleum black spray paint (Lowes item #303289)
1 can of Rustoleum white spray paint
1 pack of 2" stencils (Lowes item #106493)
A dremel tool with cut off bit
Table saw
Step 1: Decide what you want to put in the box
This is important for step 2
Step 2: draw a picture
A schematic of all your dimensions will save you a ton of time. Too easy to not account for the width of a piece of wood and now you're a half inch short and making another trip to Lowes.
Step 3: Make a box (two actually)
You can use whatever dimensions you like but Step 1 exists for a reason. My final dimensions were roughly 25"(L)x12"(W)x13"(H) but I only got there after realizing it was half inch too short to fit my Coleman grill. So, decide your max height and width first. For length, I went with 25". That allowed me enough space to put the boxes along the left hand side of the Jeep and still have room for a tailgate table and molle bags which I plan to add in the future.
Here are some pics along the way. Having a table saw helped greatly. Having a nice table saw would've been even better.
Using a small cardboard box and some extra wood to try and keep things as perpendicular as possible while drying. Use the 3/4" wire brads to tack things together


Putting the end pieces on. I reinforced each endpoint with an additional piece of plywood so that (a) the screws for the handles wouldn't stick out and (b) the handles would be strong enough to carry the weight.

You'll notice that the handle is actually screwed in the wood in that picture. I did that immediately after clamping so the screws would (a) add clamping force to the two pieces and (b) not crack the glue once it had dried.
Step 4: put a lid on it
The top box will have a lid on it. The bottom box is designed to not have a lid on it. In my pics, you'll see the lid sits inside the side pieces. This was largely because I didn't do a good job on step 2. I think, ideally, the lid would cover the entire width and length of the top box for water proofing reasons.
Here are both boxes, with the top box on the left. Lid open:

Lid closed:

Top box stacked on top of bottom box:

Be sure to use screws small enough to not poke through too far. Or, use a cut off tool on your dremel to grind them down afterward.
Step 5: add separate compartments (optional)
I love having a compartment for each thing so I added some dividers. This is an optional step. (Pretend nothing was spray painted in this photo):

They aren't taking any weight so I just went with a nice press fit and some glue
Step 6: spray paint
I used Rustoleum truck bed liner to do inside and out. Use painters tape to tape off all hinges and handles.

Step 7: label your boxes (optional)
I did this last but it'd be best to do it at this point. I separated my boxes into food/water items (gas cans, Coleman stove, water filter, etc) and shelter items (tarp, toilet paper, walkie-talkies, sleeping pads, etc). The labels just look cool and give it a finished look IMO. Use the stencils and some paper to make your words, then just put it on and spray paint white.
Here is the shelter box as an example:


Step 8: tack on the corner guards
Wood isn't the most durable in something that is removable, will be placed on the ground, etc. These lightweight corner guards add years of life to the boxes for just a few bucks more. Use your dremel tool and individually measure each side. Cut to length and tack it in using the small, black, cut nails. Be sure to go in the same order at all times (e.g. short side, long side, vertical side)
At this point, your boxes should look like this (with the possible addition of the labels in step 7):

Step 9: add the butterfly connectors
These allow you to carry both boxes simultaneously and keep things together while driving over huge rocks. Use the 3/4" wood or sheet metal screws to connect them. Vertical positioning is key here. Too close and you won't get a solid latch. Too far away and it won't lock all the way in place. Err on the side of too far away. I did mine too close. Get them to where it just touches when closed, then separate them by another 1/16" so there is a nice force pulling the boxes together.
With those added, you'll look like this:

Here is a close up of the butterfly:

Step 10: add the horizontal security strap
I added this so things wouldn't tip over and take out my dog. JK's come with a hanger attachment that wraps around the roll bar. I strapped one of those on the 45deg section of the roll bar. Then I flattened out the metal pipe strap to be a bit flatter and screwed it into the top box. Next, I threaded the flat webbing through the dog leash connect and the pipe strap and eyeballed it in the Jeep to get the right distance to the hanger attachment on the roll cage. Once I thought I had it, I cut the flat webbing, overlapped the ends by about 1/4" and glued them together. I also ran some thread through the seam for strength.
Here is the hanger attachment that comes with a JK:

Here is how the piece on the box looks when finished:

Here it is all finished up:

Inside the Jeep, plenty of room for our Golden Retriever on the right hand side:

Out camping two weekends ago:

There you go! Hope that helps out others. It was a fun project and one I hope to get years of use of. Now I can just grab the boxes, throw them in the Jeep, and I know I'm already 80% packed for a camping trip. Makes getting out into the woods a whole lot easier and it doesn't encroach on Fido's ability to come along too.
Rear storage is a common topic of discussion amongst Jeep owners and there are some pretty sweet solutions out there. Many on Wayalife have duplicated Sharkey's setup and it works great. But, it doesn't work as well when you have a big dog that needs all the head room he can get in the back. Rather than stacking and eliminating vertical space, I needed something that would eliminate horizontal space. I also wanted to be able to remove it when I wanted so I would have the full capacity of the Jeep for hauling things when desired. With that in mind, here is what I came up with. Writing this up now, I wish I had taken more pics along the way, so please ask if you have questions. I've put things in the best order to do them looking back on the process.
Materials:
4'x8' piece of plywood. I went with 7/16" thickness.
Wood glue
Clamps, long ones
Metal corner guards (2 10' pieces and 1 8' piece) (Lowes item #11822)
1/2" cut nails, black (Lowes item #58215)
2 boxes of 3/4 wire brads (Lowes item #58175)
4 handles (Lowes item #308980)
2 hinges (Lowes item #308892)
2 butterfly connectors (Amazon search for RH-1688/0371)
Some 3/4" wood or sheet metal screws
a dog leash type connector (you can find these at Lowes as well...I just had one lying around)
4" of flat webbing (had some lying around. Got it originally from REI or Whole Earth Provision)
1 pipe strap (Lowes item #301382)
4 cans of Rustoleum black spray paint (Lowes item #303289)
1 can of Rustoleum white spray paint
1 pack of 2" stencils (Lowes item #106493)
A dremel tool with cut off bit
Table saw
Step 1: Decide what you want to put in the box
This is important for step 2
Step 2: draw a picture
A schematic of all your dimensions will save you a ton of time. Too easy to not account for the width of a piece of wood and now you're a half inch short and making another trip to Lowes.
Step 3: Make a box (two actually)
You can use whatever dimensions you like but Step 1 exists for a reason. My final dimensions were roughly 25"(L)x12"(W)x13"(H) but I only got there after realizing it was half inch too short to fit my Coleman grill. So, decide your max height and width first. For length, I went with 25". That allowed me enough space to put the boxes along the left hand side of the Jeep and still have room for a tailgate table and molle bags which I plan to add in the future.
Here are some pics along the way. Having a table saw helped greatly. Having a nice table saw would've been even better.
Using a small cardboard box and some extra wood to try and keep things as perpendicular as possible while drying. Use the 3/4" wire brads to tack things together
Putting the end pieces on. I reinforced each endpoint with an additional piece of plywood so that (a) the screws for the handles wouldn't stick out and (b) the handles would be strong enough to carry the weight.
You'll notice that the handle is actually screwed in the wood in that picture. I did that immediately after clamping so the screws would (a) add clamping force to the two pieces and (b) not crack the glue once it had dried.
Step 4: put a lid on it
The top box will have a lid on it. The bottom box is designed to not have a lid on it. In my pics, you'll see the lid sits inside the side pieces. This was largely because I didn't do a good job on step 2. I think, ideally, the lid would cover the entire width and length of the top box for water proofing reasons.
Here are both boxes, with the top box on the left. Lid open:
Lid closed:
Top box stacked on top of bottom box:
Be sure to use screws small enough to not poke through too far. Or, use a cut off tool on your dremel to grind them down afterward.
Step 5: add separate compartments (optional)
I love having a compartment for each thing so I added some dividers. This is an optional step. (Pretend nothing was spray painted in this photo):
They aren't taking any weight so I just went with a nice press fit and some glue
Step 6: spray paint
I used Rustoleum truck bed liner to do inside and out. Use painters tape to tape off all hinges and handles.
Step 7: label your boxes (optional)
I did this last but it'd be best to do it at this point. I separated my boxes into food/water items (gas cans, Coleman stove, water filter, etc) and shelter items (tarp, toilet paper, walkie-talkies, sleeping pads, etc). The labels just look cool and give it a finished look IMO. Use the stencils and some paper to make your words, then just put it on and spray paint white.
Here is the shelter box as an example:
Step 8: tack on the corner guards
Wood isn't the most durable in something that is removable, will be placed on the ground, etc. These lightweight corner guards add years of life to the boxes for just a few bucks more. Use your dremel tool and individually measure each side. Cut to length and tack it in using the small, black, cut nails. Be sure to go in the same order at all times (e.g. short side, long side, vertical side)
At this point, your boxes should look like this (with the possible addition of the labels in step 7):
Step 9: add the butterfly connectors
These allow you to carry both boxes simultaneously and keep things together while driving over huge rocks. Use the 3/4" wood or sheet metal screws to connect them. Vertical positioning is key here. Too close and you won't get a solid latch. Too far away and it won't lock all the way in place. Err on the side of too far away. I did mine too close. Get them to where it just touches when closed, then separate them by another 1/16" so there is a nice force pulling the boxes together.
With those added, you'll look like this:
Here is a close up of the butterfly:
Step 10: add the horizontal security strap
I added this so things wouldn't tip over and take out my dog. JK's come with a hanger attachment that wraps around the roll bar. I strapped one of those on the 45deg section of the roll bar. Then I flattened out the metal pipe strap to be a bit flatter and screwed it into the top box. Next, I threaded the flat webbing through the dog leash connect and the pipe strap and eyeballed it in the Jeep to get the right distance to the hanger attachment on the roll cage. Once I thought I had it, I cut the flat webbing, overlapped the ends by about 1/4" and glued them together. I also ran some thread through the seam for strength.
Here is the hanger attachment that comes with a JK:
Here is how the piece on the box looks when finished:
Here it is all finished up:
Inside the Jeep, plenty of room for our Golden Retriever on the right hand side:
Out camping two weekends ago:
There you go! Hope that helps out others. It was a fun project and one I hope to get years of use of. Now I can just grab the boxes, throw them in the Jeep, and I know I'm already 80% packed for a camping trip. Makes getting out into the woods a whole lot easier and it doesn't encroach on Fido's ability to come along too.


GraniteCrystal
New member
View attachment 206327View attachment 206328
For about $80 I bought this set up. Has a ton of storage, lockable, ties down points, rolls, and can be carried as well. Fit all my camping stuff. A cool option for the non DIY set up.
Great build though!
Nice! Mine probably wasn't much cheaper than that so this would be a good option too. Thanks for sharing!