BIG BAD WOLF Build ~~~~

Big Bad Wolf

New member
I have dedicated this thread to my dream build.

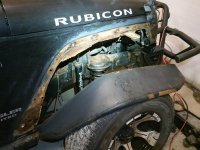
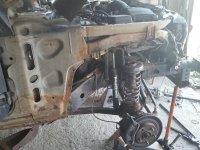
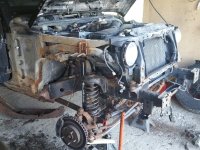
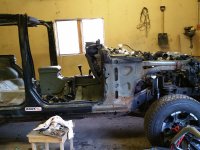
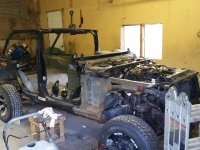
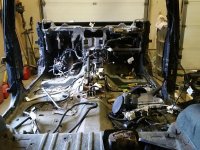
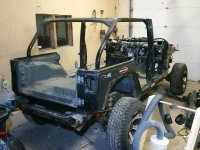
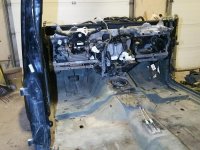
The project starts with my 2008, 4 door Jeep JK Rubicon.

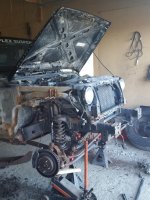
My passion for wheeling on a budget left me with plenty of broken parts, including a cracked engine block. In order to take my hobby to the next level I feel upgrading is key and doing it right the first time only makes sense.

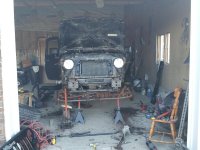
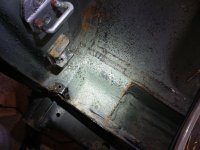
Due to uncontrollable circumstances my Jeep was left sitting for a couple years and our harsh climate introduced a lot of unwanted rust.

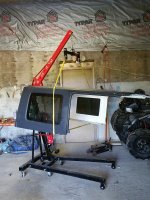
The goal is to start with the chassis and work my way up. I am not wealthy so a lot of sacrifice and patience is going into this build.

I have decided to name the Jeep "Big Bad Wolf". The goal is as follows:

- To make the chassis/frame and body inside and out resistant to harsh weather conditions along with being resistant to finish chips/cracks.
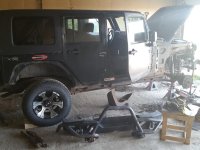
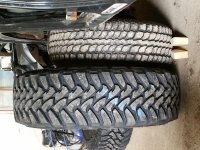
- To run 40" tires for rock crawling including true beadlock rims, which includes at least 60's front and rear ends.. Possible 80 rear.
- To include an engine swap, LS3 or Hemi including: swap kit/Tranny/Transfer case/Rad/Manifolds/exhaust etc.
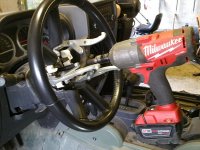
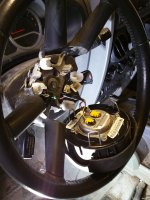
- To include hydraulic steering
- To include an appropriate lift kit, including most likely coil overs and possibly long arms although I don't plan to drive fast.
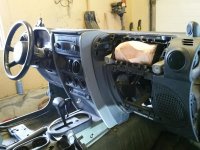
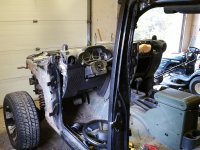
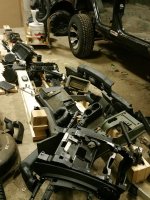
- To replace the entire dash, removing air bags/heater core and air conditioning.
- To put a custom cage in
- To possibly be able to run my spare inside vs outside

The list goes on.. Details later.
 

Big Bad Wolf

New member
Ripping apart JK & Building Lift

Part 1

RIPPING APART JK

To start this build I need to rip apart my entire JK. I need to lift the body off and to do so I want to get rid of as much weight as possible.

I do not have a lift but would rather use money towards parts. This is where some may toss the idea aside as a garage would charge thousands for such an undertaking. To save money I decided to make my own "lift". I drew up what I had in mind and did a few calculations to make sure the structure was safe.

Note: I am a certified mechanic but NOT a structural engineer. I am in no way telling anyone to do this vs buying a lift. You can find load ratings online for lumber, the rest is up to you. If anyone wants details I can share but note my structure has been custom made for my garage.

I will include cell phone photos for now until I decide to break out the DSLR.


Let's start with tools:

Although I have an air compressor I prefer Milwaukee Fuel and Dewalt cordless impacts.

You NEED an oxy acetylene torch for anything seized, DO NOT risk breaking bolts. I broke a few bolts because I ran out of oxygen and the store was closed.. Again. Don't do it! haha I have wasted hours extracting these broken bolts.

I put labels on the wiring harness etc, I want to avoid a headache. I also labeled zip lock bags with all the parts.

Note: My Poison Spyder fenders were seized, very bad. I will NEVER put SS counter flush bolts in anything on my Jeep again. The key slots corroded bad and the tools would strip even with a torch. I had to drill all of them out and the angles on a few were nuts. Hours wasted! Bolt heads for this guy next time.

I used my ATV trailer to remove parts to store away in a shed. Keeping the work place half tidy is key, well for me.

The dash is a pain to get off, and even worse is the plastic around the steering wheel.

The two rear body mount bolts were spinning inside the body and after reading others have had this issue I knew the inside nuts must have slipped/broken free. I drilled and cut two holes to get a socket in.. it was the only way to get it out, no huge deal.

Also note the tires in the photos are winter studded and were not used for wheeling but storage purposes.
 

Attachments

  • 20160513_012638.jpg
    20160513_012638.jpg
    97.9 KB · Views: 469
  • 20160518_182701.jpg
    20160518_182701.jpg
    99.6 KB · Views: 460
  • 20160518_182721.jpg
    20160518_182721.jpg
    124.1 KB · Views: 470
  • 20160518_182753.jpg
    20160518_182753.jpg
    88.8 KB · Views: 462
  • 20160518_182807.jpg
    20160518_182807.jpg
    119.5 KB · Views: 460
  • 20160518_182820.jpg
    20160518_182820.jpg
    151 KB · Views: 462
  • 20160626_172143.jpg
    20160626_172143.jpg
    180 KB · Views: 458
  • 20160626_190150.jpg
    20160626_190150.jpg
    129.7 KB · Views: 460
  • 20160626_200426.jpg
    20160626_200426.jpg
    100.4 KB · Views: 459
  • 20160626_205639.jpg
    20160626_205639.jpg
    108.5 KB · Views: 461
  • 20160626_203846.jpg
    20160626_203846.jpg
    101.3 KB · Views: 458
  • 20160626_205909.jpg
    20160626_205909.jpg
    119.8 KB · Views: 461
  • 20160626_205929.jpg
    20160626_205929.jpg
    104.2 KB · Views: 461
  • 20160626_205942.jpg
    20160626_205942.jpg
    113.1 KB · Views: 466
  • 20160701_195349.jpg
    20160701_195349.jpg
    139.1 KB · Views: 463
  • 20160701_232406.jpg
    20160701_232406.jpg
    105.5 KB · Views: 468
  • 20160701_232549.jpg
    20160701_232549.jpg
    112.4 KB · Views: 466
  • 20160701_232634.jpg
    20160701_232634.jpg
    126.9 KB · Views: 467
  • 20160714_174013.jpg
    20160714_174013.jpg
    105.3 KB · Views: 459
Last edited:

Big Bad Wolf

New member
Part 2

The structure or "lift".

This was insane to put up alone, not fun. Wear everything from steel toe's to a helmet.

I did not get photos of how I lifted it as it was tricky and my hands were "tied". I used two high Jacks and plenty of wooden blocks. I just went from corner to corner until it was high enough to get the beams through. I than lifted the beams with the high jacks until it was high enough. Besides using 1/2 bolts to hold the weight I put in extra center supports in the main beams. I also used 4 ratchet straps to connecting to the top to help support the body while lifting.

This part made me nervous but in all honesty it was solid with no issue. It works and I was quite excited about it. I laid in bed for weeks
thinking of the concept and to bring it to life was pretty awesome.

20160627_233417.jpg 20160708_235515.jpg 20160710_152846.jpg 20160711_204418.jpg 20160711_204427.jpg 20160712_021251.jpg 20160714_202932.jpg 20160714_202913.jpg 20160714_202923.jpg 20160714_202946.jpg
 
Part 2

The structure or "lift".

This was insane to put up alone, not fun. Wear everything from steel toe's to a helmet.

I did not get photos of how I lifted it as it was tricky and my hands were "tied". I used two high Jacks and plenty of wooden blocks. I just went from corner to corner until it was high enough to get the beams through. I than lifted the beams with the high jacks until it was high enough. Besides using 1/2 bolts to hold the weight I put in extra center supports in the main beams. I also used 4 ratchet straps to connecting to the top to help support the body while lifting.

This part made me nervous but in all honesty it was solid with no issue. It works and I was quite excited about it. I laid in bed for weeks
thinking of the concept and to bring it to life was pretty awesome.

View attachment 215755 View attachment 215756 View attachment 215757 View attachment 215758 View attachment 215760 View attachment 215761 View attachment 215762 View attachment 215763 View attachment 215764 View attachment 215765

This is fucking crazy
 

Big Bad Wolf

New member
Part 3

Pulling the Chassis away from body.

This was a challenge as I was on my own and outside of my garage is a slope downhill. The plan was to put the chassis in the next bay but getting it in was a PITA.

I used an SUV with a tire in between. Once down the hill I had to push the tires and sometimes lift the chassis up to get the whole thing to turn. The SUV had a hard time pushing it up the hill with it's V6 but I eventually managed.

20160716_150445.jpg 20160716_163521.jpg 20160716_163532.jpg 20160716_163541.jpg 20160716_163610.jpg 20160716_163617.jpg 20160716_163633.jpg 20160716_185416.jpg
 

Big Bad Wolf

New member
Part 3.5

I should have posted this beforehand before I removed the body.

You can see pictures where I did the interior previously but I want to top coat the bedliner and make it all black. Don't ask me why, I went with army green beforehand.

There was nasty dirt, grease etc which needed cleaning. I used POR 15 Marine wash along with my pressure washer and some good old scrubbing. At least now I have a clean surface to work with.

I used a respirator, face shield, rubber boots and chemical gloves etc. All the products I will be using are unfortunately very toxic. Some people laugh at how safe I am but when wheeling they don't laugh anymore :thumb: haha..

24324_10150113872935580_1573649_n.jpg 24324_10150113872925580_2378518_n.jpg 20160702_151519.jpg
 

Tree Frog

Member
There has got to be some kind of award for the wildest undertaking of a Jeep build. This is by far the most work I have seen anybody do in a home garage EVER!
I am saving a bunch of your photo's for future reference in case I need to take something apart and wonder what is behind it or whatever.
(will not repost without permission of course)

Words just can just not express how blown away by all this I am. :eek:
 
Top Bottom