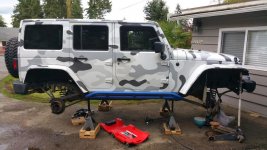
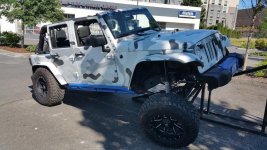
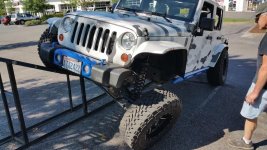
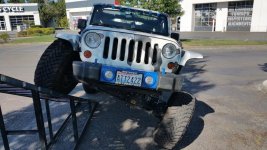
SEA-JKU Build Thread.

SEAJ

Member
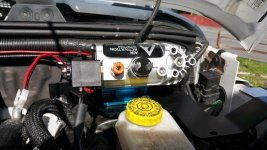
Yep Well get it done in time. Finishing touches on the front today. Ill get the electrical on the locker done and we will make some headway with the rear locker and gears.

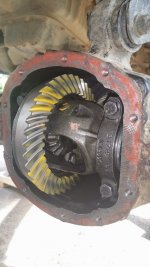
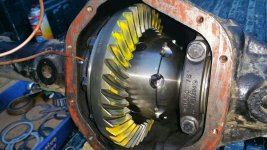
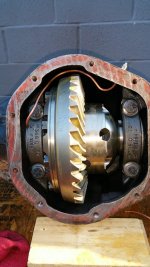
Yes we are doing the gears ourselves. There is a lot of quadruple measuring but its coming out.

That trick to heat the bearing in the oven to 230 degrees and throw the gears in a bucket of ice work very well. Who needs a press anyways.

20150403_175427.jpg

20150404_153622.jpg

20150405_103236.jpg
 
Last edited:

SEAJ

Member
The rear locker and gears are installed. Some final adjustments and everything can be put back in and lines connected.

20150405_193536.jpg

20150406_182310.jpg
 
Last edited:

SEAJ

Member
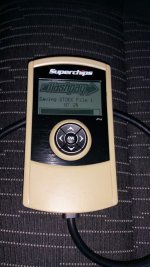
Locker and gears installed. So far everything is working great. To fix my shift points, speedometer, low tire pressure warning and to get some overall improvements to power, I ordered and ran the SuperChips Flashpaq 3872.


20150408_182030.jpg

Driving around for the first time It felt more responsive, got no gear\bearing noises at all and housing temperature stayed cool enough to hold my hand on.

Note. I did an unofficial GPS speedometer test with timer app. Its not super scientific but with new 4.88 gears and the 87 Octane Superships tune I comfortably knocked off 1.5 seconds on my 0-60. It was also much easier to maintains a slower steady crawl when wheeling up at Browns Camp.
 
Last edited:

SEAJ

Member
Finally figured out exactly what that noise was when I was at full flex on the passenger front.
The spring was making contact with the frame and catching a little sometimes. Cheap dealer lift FAIL.

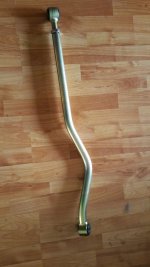
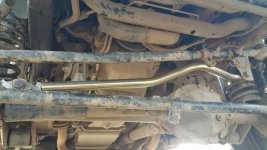
Easy enough to remedy. I did some research and decided on the MetalCloak JK Wrangler Long Travel Adjustable Front Track Bar.
Supposed to have awesome clearance, strength and was still a little less than most other options.

20150421_070010.jpg

20150422_191710.jpg

It feels better. Does not seem to track as much on the freeway when it becomes uneven. Less steering adjustment.
 

ClarksAdventures

New member
Finally figured out exactly what that noise was when I was at full flex on the passenger front.
The spring was making contact with the frame and catching a little sometimes. Cheap dealer lift FAIL.

Easy enough to remedy. I did some research and decided on the MetalCloak JK Wrangler Long Travel Adjustable Front Track Bar.
Supposed to have awesome clearance, strength and was still a little less than most other options.

View attachment 139056

View attachment 139057

It feels better. Does not seem to track as much on the freeway when it becomes uneven. Less steering adjustment.

That's the same one I have. I think you'll like it. Ps, that zinc coating is paint ready. Get out that blue rattle can!
 

SEAJ

Member
I am considering the blue. lol. I am also pulling the whole front axle in a couple weeks. I bought a craigslist ARB front locker and the pieces of the Artec truss that are in the mail. That will be an opportunity to do some custom painting. Some tactful painting anyway.

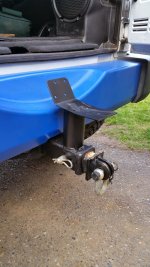
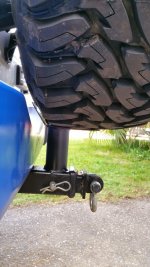
In the Spirit of Frugality and Innovation I came up with an idea to deal with my Jeep tire carrier issue for a while. It was cheap, effective and also adds some extra strength to an already sensitive spot I have hit on the trail twice now. When I bump into something and hit the tire again I have a little more push-back.

I introduce the $20.00 tire carrier.


20150424_174643.jpg

20150424_174624.jpg

Not trail rated yet though I did blast over a few curbs and did not hear a peep or see signs of any movement. The tire slides right on with a slight incline to the steel plate and sits nice and snug. 2 and 1/4 inch Pipe and Heavy Duty Tie down bracket from you local Home Depot.
 
Last edited:

SEAJ

Member
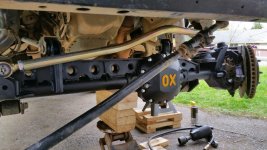
Axle Truss, HD Trackbar and ARB Front Locker.

With a Week to go before my next trail outing we spent this past weekend installing a front ARB locker I pickup up used off craigslist. It seemed in good shape despite it is an older model but for less than half the cost of a new one I will give it a go.

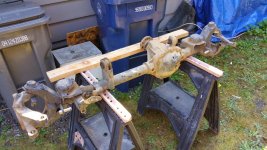
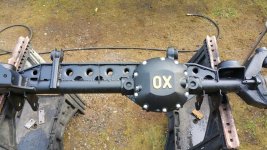
In addition to the locker, I got the Artec Heavy duty tracbar bracket and truss. It took a good solid 2 days to get the axle pulled, chained down, cleaned, cut, welded (A LOT) then cleaned again and finally painted.

Spent much of Sunday installing the ARB in the front only to find a leak when the wheels started rolling Sunday evening after everything was reinstalled. Identified a o-ring seal leak in the carrier and fixed it by Monday night.

I have an outing to Walker Valley this weekend to try both front and rear lockers.

To further minimize carrier\housing flex and to take solid impacts on the trail I threw on an OX cover.

20150508_144413.jpg
Before Truss and Locker

20150510_170326.jpg

20150510_180213.jpg

One unplanned change was how large the Tracbar bracket was after welding it on. It left no room for mounting the JKS Quicker Disconnects. To accommodate we cut and relocated a new mounting rod to the heavy duty Tracbar bracket. A little shortening of the adjustable disconnect and we're all lined up again.

The steering stabilizer mounts to the top of the HD TracBar bracket instead of the old bracket bottom and some adjustments needed to be made to verify clearance but it all seems to line up nicely.

Yeah... Its still a Dana 30 but I will fell a little less worried about how hard I smack it around now.

It feels a bit different on the freeway. A bit less feedback and correction needed. Not sure if it was the Truss, Adjusted Tracbar or relocated stabilizer but noticeably different.
 
Last edited:

SEAJ

Member
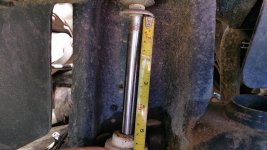
My next project I have already started planning and measuring for. I read some articles on doing a longer shock upgrade. Since the biggest limiting factor I have for the front of the JK is shock length I think this mod could give a lot of bang for the buck.

The plan:
Use Ford Shock Towers welded into the existing shock towers. This has been done many times on TJ's and I found a couple forum posts for a few JKs and the results were significant.
With only a few hundred dollars in mods to include the cost of new shocks you can get nearly 14 inches of travel.

Drop my lower brackets some also using heavy brackets to accommodate these longer shocks without the need for bumpstop extensions or major loss of up travel.

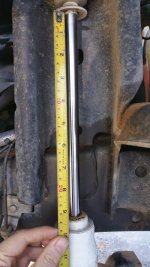
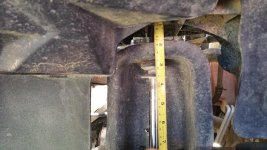
I did most of the measurements and found I could in theory get about 29 inches of total eye to eye shock length before my springs start to unseat. Around 31" the drive shaft makes contact with the exhaust. Goal. 13 inches travel with a 32ish inch shock.

I currently run about a 24 inch extended shock with a theoretical 10 inches of travel but in reality a little less than that.
My sitting compressible travel is a little over 5 inches and available extended travel is a little over 4.

With the relocation and longer shocks I should be able to retain good up travel and improve my down droop by a few inches before hitting my spring limits.

I will be gathering the requires pieces over the next few weeks and do some measurements to show the results.


20150508_124640.jpg
Current sitting shock height.

20150508_165358.jpg
Current full extension length

20150508_123844.jpg
Potential change in top shock mount measurement.
 
Last edited:

big dr

New member
You are getting a lot done in a short time!!:thumb: I'll be watching to see how the ford shock towers turn out. I think your documentation of the process might help a lot of guys on the forum who would like to get more travel for less bucks. Keep up the good work!:beer:
 

SEAJ

Member
Yeah I have been doing a lot of reading building where my budget and time allows.

I will further document the longer shock mod. My biggest hangup right now if how I want to do the lower mount. There is not a lot to pull from as I have not found much on relocating lower shock mounts for JK and older Jeeps are so different with the mounts its of little help.

I have a rough idea though. Leaning toward a custom fabricated route so I can rotate the lower shock mount also.

I did go for a romp in Walker Valley this past weekend. Both good and bad. The good... I was able to crawl over obstacles I was previously struggling on. I found another trail I had never seen before and had to back down and pull my TJ owning driving partner free a couple times. Up till now he was always leading the trail and had to pull me out. The tables have turned. I did push the envelope with lines I have never tried before and needed winched twice. It seems getting high centered is far to easy.


The Bad...
The bad. I tried a hill that is considered very hard and got hung up on the corner of this 2.5 foot boulder on my cross member and after 20 min of trying to get around, over it or unintentional dragging it around, I gave up. I think I gave up to much ground clearance dropping my tire pressure to 10psi. Ill try 15 psi next time and regain some of my dignity. If not. then some bigger tires or slightly taller lift are in my near future.

My trail partner broke the rear trackbar bracket at the welds on his rear axle. After watching his Jeep ass end shimmy and shake and trying to figure out what I was seeing, a quick stop at the gas station and a visual inspection confirmed the welds broke clean off. The driver side upper control arm bracket was also badly bent.
 
Last edited:

SEAJ

Member
I have most of the supplies in. I spent considerable time doing some calculations and retaking measurements trying to figure out the optimal shock length. I estimated I could get 2.5 inches higher with the ford shock tower and drop the bottom mount by about 2" and rotate it as well.

The top mounts will be the ford shock towers. I picked up from a local Ford dealer for about $21.00 each.
Model: E5TZ18183A4
Its tall and heafty and will outboard my shock placement which will be needed for more down travel.

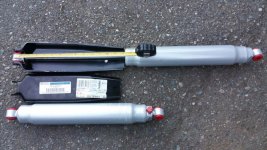
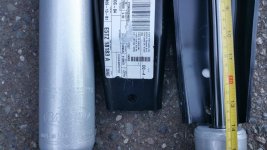
The shocks I decided to go with are the Rancho 9000XL
Model: RS999012
19 Inch compressed 32 Inch extended for about 13 inches travel. I figured the adjustable tuning will provide me the flexability I may need when it comes to the ride with such a large shock

20150604_195541.jpg

20150604_195601.jpg

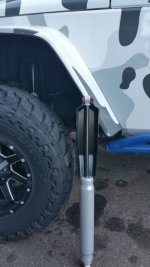
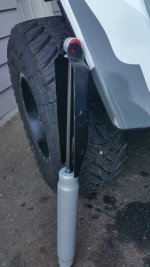
The shocks themselves are large, heavy and long. Beefy comes to mind. You can get an idea on how big the shock is extended compared to a 35 inch tire.

20150604_195907.jpg

20150604_195944.jpg

I plan on installing the shock, upper mount and lower custom bracket this weekend. I also have some homemade spring retainers and may need to invest in limiting straps if I get as much droop as it would appear. My springs will become my limiter by unseating followed by drive shaft rubbing Y-pipe and finally binding in the control arms and trackbar.

Once everything is installed, I will post my calculations up and how they actually fared in reality.
Initial numbers suggest a considerable improvement to down travel with only about 2.5 inches loss of up travel. I currently have about 6-7.2 inches up and (Shock Limited) and 4.5 inches down (Shock Limited) from sitting height.

After the replaced shocks I should have a much better flipped ratio of down travel greater than up travel.
 
Last edited:

SEAJ

Member
Ford Shock Tower w Long Travel Shocks

Towers and Rancho shocks are installed. It took 3x as long as expected to get it setup right and there was a lot of trial and error but the results speak for themselves. Ill provide some details the next couple days on how it was done and what issues we found and had to adjust for.

20150613_162907.jpg

20150613_164106.jpg

20150613_164341.jpg
 
Last edited:

joshuaj21

New member
Your build is looking fantastic brother. Been looking to chop fenders and bumper(s). Love the look of your front chop. How did you end up holding the lexan in place while the epoxy cured? Trying to figure that out before I get started but other than that I think I've got about everything else. Any suggestions of lessons learned on your end you would do differently?
 

SEAJ

Member
Advice on the trimming. Triple check and mark all the angles. Take your time cutting. On the second side I got a little rushed and cut a little to much off the bottom. Had to glue some metal in to get the backing I needed. I used a 2 x 4 jammed up against a few bolted together blocks to maintain pressure while epoxy cured. Also used a strap attached to front tow hook to keep pressure on flat. One of the pictures shows the blocks and straps on the ground below the bumper.

Fill in any gaps that form with the epoxy. Trim, sand, refill gaps. Repeat. Cutting clean and straight is key. Curves while cool looking complicated cuts a lot. I used some brown cardboard box to draw the shape of the first side cut it out and then mark the shape of the second side on the fender so they matched closely.
 
Last edited:

joshuaj21

New member
Awesome, Thanks for the breakdown. Much appreciated... not sure if I'll get overzealous with curvature on the fenders. Had thought about that before and making an exact symmetry for both sides with curves seems very tricky. I do like the small lip though. Gives the appearance of the fenders having some depth as opposed to just a flat piece of plastic. What tool did you use to cut the lexan? I have my dremel and my buddy has his Sawzall and disc grinder to make the initial bumper cuts. Figured the dremel would be fine to cut the lexan...
 

SEAJ

Member
Actually yeah the Lexan seemed to handle the heat of a dremel pretty good. You have to use a grinder anyways once everything is glued on to smooth things out.
 

joshuaj21

New member
Shweet. Will have the grinder to smooth everything out but figured the dremel would be good for the fine cuts. Thanks man!
 

SEAJ

Member
Evans Creek

I went out to Evans Creek this past weekend.

http://www.nwjeepn.com/EvansCreek.htm

Its a fun trail system. Fairly large. Spent all day and still had a couple trails I had not hit yet.

The bad. Its tight. I am 83.5 Side wall to Sidewall. Claimed to be limited to 80 inch. Rims are 79.5 so I had to really squeeze to get past the entrance poles and rocks to get into the trail system.

I took a little more trail damage this time than usual. The side effect of longer travel shocks showed.

I tore the boot off my front drive shaft because it rubbed the exhaust pipe. Needed to replace the drive shaft anyways.
My trimmed front bumper took a good smack in the Driver edge. Lexan outer cap held up though it dented with the rest of the bumper. Ill fix this eventually
My Passenger tire rubbed the front fender a little at full compression. Not an issue at this point. It happens rarely.
I did not quite fit a couple times so I scuffed up the wrap pretty good on the passenger front and rear fender. Fortunately the fenders flex pretty well and do not break easy.
I knocked the alignment off twice in one trail run. This happens regularly on the trail but never quite understood how. We think its the drag link maybe bending and straightening. Has a bow in it now. Ill have to get a chromoly to replace it.
I cracked the inner rim cap on my passenger front. A Little epoxy fixed that.

The good news is that I rarely had a tire off the ground and the JK runs stable even over some pretty large rocks and obstacles. The only time I cannot climb over or crawl up something is strictly limited to my clearance. If I do not get high centered or hung up I can do it. Got plenty of traction.
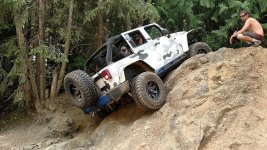
IMG_20150627_140937742.jpg

A few short videos. Ignore the camera mans falling or sarcastic comments.

[video]https://plus.google.com/u/0/photos/109354649471132497488/albums/6165959413463965697/6165959409858436242?pid=6165959409858436242&oid=109354649471132497488[/video]

[video]https://plus.google.com/u/0/photos/109354649471132497488/albums/6165959413463965697/6165959413123022498?pid=6165959413123022498&oid=109354649471132497488[/video]

[video]https://plus.google.com/u/0/photos/109354649471132497488/albums/6165959413463965697/6165959410708038898?pid=6165959410708038898&oid=109354649471132497488[/video]

[video]https://plus.google.com/u/0/100028948546952664921/posts/iW4CPYgktVT?pid=6165828287979595842&oid=100028948546952664921[/video]

Going out to Walker valley to try the harder trails there tomorrow.
 
Top Bottom