SEA-JKU Build Thread.

SEAJ

Member
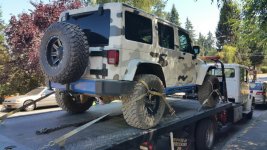
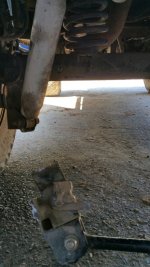
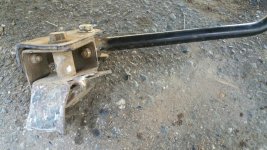
Took the walk of shame home today. The rear Tracbar ripped off today just as soon as we got to the trails in Walker Valley. Ended up tearing the boot on my rear drive shaft also due to shaft rubbing on the charcoal canister and gas tank skid when the rear end would shift after the tracbar broke. I opted to pay some for the tow home than risk more damage.

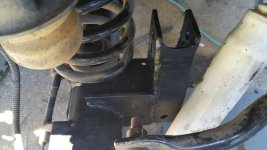
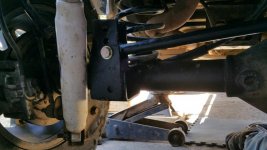
I have an old .25 inch block that was used as a rear bump-stop that is about the same measurements. With a little grinding, drilling and welding I should have a newly much stronger attached bracket by mid day tomorrow.
20150703_145009.jpg

20150703_160815.jpg

20150703_161002.jpg
 

JKbrick

Active Member
That sucks to lose a trail day, make sure if you are making the new bracket to tie it to the axle really well. If not its just a cantilever and will do it again
 

SEAJ

Member
I tried to find a bracket locally but none were available in town so fabricated a bracket and welded it on. Also expanded on it a little adding a couple more mounting holes as I likely will go another inch or so taller over the next year. The tracbar had a slight bend at the end that also had to be straightened. Drove on it the last two days. All seems to function perfectly.

The new bracket is made from a .25 inch bump stop welded to the expansion bracket the lift came with. Its all now .25 inch thick with nearly 18+ inches of welded area to the axle. Compared to the old that was likely half the thickness and maybe 10 inches welded area to axle.

20150704_152417.jpg

20150704_155601.jpg
 

SEAJ

Member
I got back out on the trail and the new rear trackbar bracket did not make a peep. Welds and new bracket holding like a champ. Now I have to address the remaining glaring issues that will soon cause me problems If I do not resolve.

1. I need to replace the front drive shaft. At this time by exhaust pipe is the limiter for the driverside front droop. As a result my front shaft boot is tore and melted in two pieces.
When I ran the RTI ramp it did not touch but when I am out on the trail I verified it clearly rests on the exhaust heat shield as in these pics I took Saturday.

20150718_123941.jpg

20150718_124210.jpg

2. I have to do a trail alignment every time I wheel. Seems my front Drag Link is bowing and straightening and now also my Tie Rod is bowing. Time for some much beefier replacements. Ill start researching options unless someone has some recommendations. You might be able to see the bow of the tie rod a little in the picture.
 

SEAJ

Member
Upgraded the Steering

I did my research and saved up the funds. I finished today installing the new Drag-link, Tie-rod and Stabilizer mounts.

I went for the:
Carolina Metal Masters Steering Package.

Specs:
Constructed from 1.5" OD Solid 7075 T6511 Aluminum
Clear anodized for corrosion resistance
Greasable 1 ton tie rod ends
No re-tapering required in standard / under knuckle location
Straight tie rod allows easy adjustment

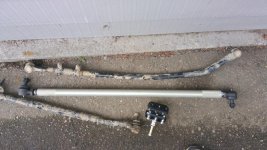
You can see the differences in the draglinks. My old bent stock one I had to adjust after every trail run and the new aluminum one.

20151025_094212.jpg


It did require some fabrication to relocate my axle side stabilizer mount. It was not going to clear in the old location at full turn lock.
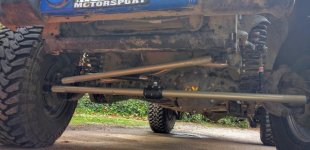
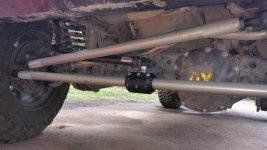
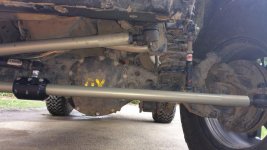
It drives much tigher now with no noticable play. It looks good too. Nice in shiny, beefy and straight.

20151025_144049.jpg
20151025_144059.jpg
20151025_144105.jpg
 
Last edited:

Tree Frog

Member
So how did you get out?

How long did it take?

Too bad there is not a prize for stuck of the week. I think you got it.
 
I did my research and saved up the funds. I finished today installing the new Drag-link, Tie-rod and Stabilizer mounts.

I went for the:
Carolina Metal Masters Steering Package.

Specs:
Constructed from 1.5" OD Solid 7075 T6511 Aluminum
Clear anodized for corrosion resistance
Greasable 1 ton tie rod ends
No re-tapering required in standard / under knuckle location
Straight tie rod allows easy adjustment

You can see the differences in the draglinks. My old bent stock one I had to adjust after every trail run and the new aluminum one.

View attachment 170940


It did require some fabrication to relocate my axle side stabilizer mount. It was not going to clear in the old location at full turn lock.
It drives much tigher now with no noticable play. It looks good too. Nice in shiny, beefy and straight.

View attachment 170941
View attachment 170942
View attachment 170943

Hey man! I like the build its coming along great! I notice you have a axle truss on a d30 right? I heard that can warp the axle, have you noticed anything like that with yours? I'm Interested for my own build
 

SEAJ

Member
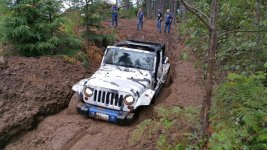
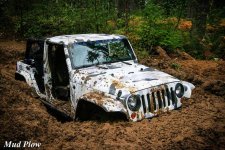
The group gave up on trying to pull me forward. They attached the winch to the rear and after a couple round of pulling I got free. Seems the amount of mud behind me was do-able. It took about an hour of three different vehicles Winching to get me out.


So how did you get out?

How long did it take?

Too bad there is not a prize for stuck of the week. I think you got it.
 

SEAJ

Member
Hey man! I like the build its coming along great! I notice you have a axle truss on a d30 right? I heard that can warp the axle, have you noticed anything like that with yours? I'm Interested for my own build

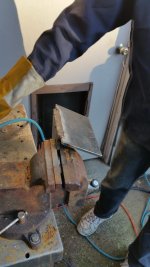
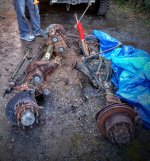
We had that concern as well and some reading suggested that we strap the axle down and just take your time moving from one side to the other making sure not to get the axle to hot in any one point.

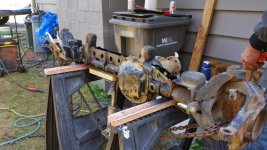
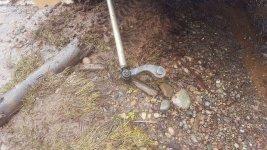
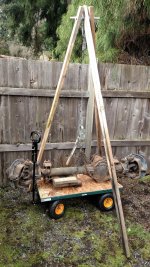
We used a bottle jack with some wood and chains. You could probably pull something like this off with some jack stands also. See picture for how we chained the axle to hold it straight while we welded to it for the Artec Truss.

20150509_155321.jpg
 
We had that concern as well and some reading suggested that we strap the axle down and just take your time moving from one side to the other making sure not to get the axle to hot in any one point.

We used a bottle jack with some wood and chains. You could probably pull something like this off with some jack stands also. See picture for how we chained the axle to hold it straight while we welded to it for the Artec Truss.

View attachment 170970

Okay thanks! That gives me a good idea! I've been curious for awhile! I read most welding shops wouldn't do something like this normally because it bends
 

SEAJ

Member
The Wrap has been holding up pretty good. Actually its nice because the paint takes no damage at all to this point.

I have de-Virginized the wrap however.

I have been out of commission for about a month. My last wheeling trip I had one of those many things go wrong at once days.

1. Pin holding Rear passenger shock broke loose and shock dragged ground loosing bushing.
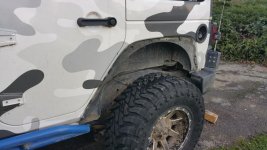
2. Tore the rear Driver Fender completely off and broke it in three pieces. Oops there was a root sticking out on that line.
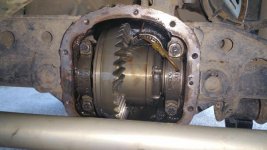
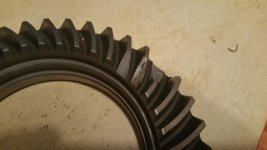
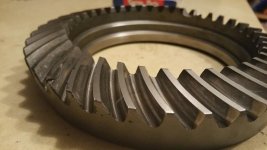
3. A clicking noise on the drive home. Confirmed to be three broken and 1 cracked tooth on the front ring gear.

Hmmm. Stock axles, front drive shaft fine. Why the ring gear?

Bought a new ring and pinion set from Yukon (Yes the Yukon gears broke) and had it sent for cryo treatment this time to see if that will improve its strength. I found a local wheeler who sold me a set of stock fender flares for $75.00 Its all been installed and I am back on the trails.

20151115_154613.jpg
20151231_202010.jpg
20151231_202020.jpg
20151115_155229.jpg
 
Last edited:

SEAJ

Member
A few more changes.

I have been toying around with the idea to install a CO2 tank for a few months now. I decided to go for when I read about this nice beefy bracket from wheelersoffroad.com
http://wheelersoffroad.com/product/off-road-air-systems/heavy-duty-tank-mounting-brackets/

After we got it I spent a day brain storming where to put it using a #20 CO2 tank. We picked up a #20 CO2 tank from a local Garden Supply coop that will do $15 tank swaps.
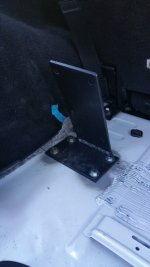
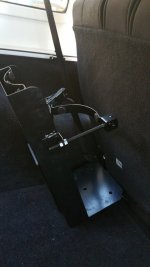
It was a bit bigger than I even imagined. Being stable in the worst possible situation was paramount so we opted to bolt it to the jeep using a custom 3\4 inch steel bracket to the floor. The following pictured show the results. The bracket was placed at the same angle the rear seat angles to minimize the space it would take.

20160109_150654.jpg

We drilled 4 holes in the bottom drivers side cargo area and bolted the custom bracket to it. The bracket was adapted to bolt to the CO2 bracket from wheelersoffroad.

20160110_102141.jpg
20160110_104837.jpg

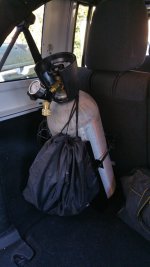
The results turned out well. It does not take a ton of space, tank can be easily repaced in a matter of seconds by laying down the passenger seat and it has not made a peep of noise on the last two wheeling runs.

20160110_114357.jpg

Results. Enough Air to air up my 35 inch tires 40+ times and run air tools on the trail if I or someone in my group breaks. Tanks can be easily bought and replaced for about $15.
I can air up a tire with stock valves stems from 19PSI to 38 PSI in about 30 seconds. I can adjust my air pressure low or as high as 250PSI. I over inflated to 40+ PSI the first couple attempts.
 

SEAJ

Member
Its been an eventful 8 weeks.

The front replaced Cryo treated ring gear... So Far so good.

Been out on the trail a few times since its replacement.

I however have identified another rather expensive failure point.
Sector Shaft!

FB_IMG_1453083557179.jpg

Yep they apparently break on JK. My reading suggests they are a bit longer than earlier jeep models and even though I still run the stock pitman arm and only run 35 inch tires. It can still break with enough impact force to a tire while wheeling.
In this case it broke when the passenger front tire hit a rather tall outcropping of roots. The tire did climb over it but with an unfamiliar poping sound and complete loss of steering.

The only think that could be done was replacing the entire gear box. Made a few calls and 2 hours of driving later returned with a $1100 steering box from a dealership. We replaced it right there on the trail. Drove home under my own power. Over the next week we had the traction light on steady throwing codes about the steering wheel being off and cruise control was unavailable. Ultimately we had to pull the clockspring get it rewound to center by hand, reinstalled it and the traction light turned off and everything's good again.

That is a lousy one to have break on the trail. So I spent the last couple weeks reading whatever I can to determine a way to minimize\prevent it from happening again. Initially I thought Sector shaft brace but the more I read it became apparent that even with the brace much of the load is still transmitted through the shaft even with a brace. Jeeps are reporting they are still breaking with the braces.

Whats the solution? I had not planned on doing this any time soon but it seems Ram Assist is the only real solution. So my research has begun. Its seems If I do all the parts and work my self I can do a reliable setup at about 1\3 the cost of a kit. When it all comes together Ill do a basic write-up.

On a good note. I have been impressed with the Carolina Metal Masters Tie rod and drag link. Not only has it proven to shrug off the hardest impact and snap right back to normal shape after taking on much of the weight of the jeep. Its also setup to take that Ram Assist on the way.

IMG_20160123_131130368_HDR.jpg

IMG_20160123_132031979_HDR.jpg
 
Last edited:

SEAJ

Member
We have had a lot of snow and mud up here in the PNW this year. Its been fun getting some snow wheeling in but I am ready for summer.

[video]https://plus.google.com/109354649471132497488/posts/29PeBTV1vuo[/video]

IMG_20160213_141955706_HDR.jpg

After a lot of back and forth mentally about where I wanted to take the JK I finally invested in a decision. Ultimately the decision is a costly one in terms of funds, time and sweat but I am optimistic about it. All other upgrades are on hold as this one will take me about 6 months and more funds than I care to think about but I am off to a good start. Well actually its more a collection of upgrades centered around suspension and drive-train.

1 Ton Axles build started.

20160312_175211.jpg
IMG_20160314_122621645.jpg

I picked this pair of 2006 Super duty axles from a guy just north of the Canadian border. He posted them on craigslist for 750 Canadian. With conversion Rates, renting a trailer and a half a tank of gas this cost me about $600.00 for the pair. I got a set of 17 steel rims thrown in to use temporarily that will fit the axles for about 150 American more. The front is a Dana Super 60 and the rear a Sterling 10.5. They are massive and heavy compared to the Dana 44.

So far they are looking good. I will have to replace the Ujoints but everything else looks to be a go. The Plan is to build the axles and prepare the JK for them over the next 6 months.

This month I will tear down the axles grinding off excess and removing brackets
I will buy the Artec 1 Ton Conversion Kit for both Axles along with the Wheel Speed sensor adapters and Tone Rings next month.
In May, I will buy 5.38 gears and overhaul kits and install. Maybe the U joints.
ARBs the following couple months.
A lot more will follow to include changes to control arms, steering, Beadlock Wheels, Coilovers and 40 Inch Tires.

The plan is to chronicle this major undertaking as I proceed. I expect there may be delays as my off road trips will not be stopping and stuff breaks...but well get there.
 
Not sure how I've missed this build thread but going to follow going forward! Looks good and can't wait to see it on 40's. Did you ever get your ram assist?
 

Napalm

New member
Been watching this build from the start and it looks like it's making some awesome changes. Looking forward to the Axles!
 

Tree Frog

Member
Right on Sea J. This will be bad ass. Would love to see the build up of these axle's and how you get them to work under the JK. :hmm:
 

SEAJ

Member
Not sure how I've missed this build thread but going to follow going forward! Looks good and can't wait to see it on 40's. Did you ever get your ram assist?

This was kind of why I suggested I had some mental back and forth. The longer I own the JK the more in Axles, Steering and suspension I seem to have to keep dumping funds into. I ultimately decided on RAM assist but then I still do not know if my front Dana 30 with Cryo gears will hold up to 35s. I also feel a 4 Door should be on a minimum of 37s to run any of the moderate hard stuff. Will that Ram assist and aftermarket Tie rods transfer over to going 1 tons?

I was also looking at that rear EVO lever system and had the same questions about the Dana 44 being replaced and its durability. I just feel like I am hitting a point of diminishing returns and building on what is essentially a limited foundation.

I had to make a choice. I spent time looking at aftermarket axles and could not quite swallow that much upfront cost. Maybe I should just buy a rock crawler buggy and leave the JK as is.

I decided to invest more into the JK by building up a better foundation. Is it the financially responsible route... No. Will it be the most practical choice for wheeling... Nope. I must be a masochist. I just cannot shake that mental image of my Jeep running 1 tons, 40s and coilovers.

I decided to go the build it route. Besides, I learn a lot more and gain more appreciation if I build it up myself.

Maybe after that I will finally get around to buying the bumpers and winch.
 
Last edited:
Top Bottom