Evo Levelling installation challenges

atrollip

New member
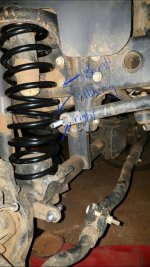
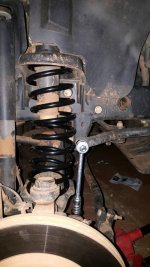
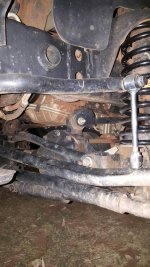
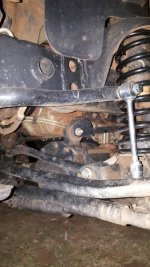
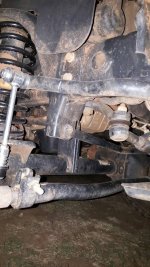
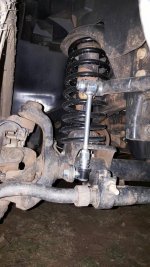
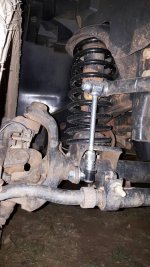
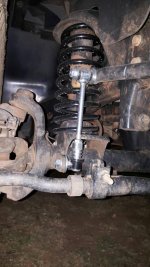
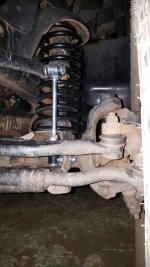
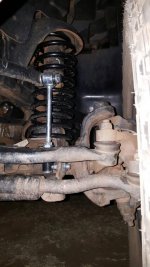
After installing the Evo coils in front i noticed that the right hand side(our driver side) the coil was rubbing against new swaybar link. The swaybar links seem to be within 5° of horizon. They are BDS quick disconnects for 2-4" lift and they were set to shortest length(8.6") which measured exactly the same length as OEM back sway bar links which is what is normally recommended for the levelling kit in front. After installation the coil also seems to be slightly angled. Last night I took of tyre just to check whether swaybar link really was rubbing coil as it was driven to work and back yesterday. It definitely was rubbing.
Something else i noticed was that swaybar link was not installing at a near vertical position but was quite slanted toward the inside of the Jeep.

Any advice on how to resolve this or what to look at will be appreciated.
 

Attachments

  • 1462390815199.jpg
    1462390815199.jpg
    90.1 KB · Views: 346
  • 1462390915572.jpg
    1462390915572.jpg
    85.5 KB · Views: 352

TonyViv

Member
My drivers side coil looks the same(bowed to the front and much closer to the swaybar link) passenger side is perfectly straight, and I cant figure out why either. Ive checked everything I can think of. The coil is seated properly, adj control arms are the same length(stock control arms were the same way) never been in an accident, crush cans are good. I have a 4 inch pro comp lift with all front adj control arms.
Ill be watching here
Thanks all

Tony
 
Last edited:

atrollip

New member
Hi all another update when driving over 65mph and the Jeep hits a bouncy area of the road the front wheels start to bounce and even after surface has evened out they continue to bounce and you nearly have to stop the Jeep to get the tyres to stop bouncing.
The coils were seated in there the OEM grooves properly. I haven't checked anything else as I'm not really certain what to check. My spring is angled slightly backwards not forwards. It also nearly seems like the sway bar itself shifted over towards the left hand side of the Jeep (our passenger side) due to the slanted angle of coupling swaybar links
 

atrollip

New member
We did put on spidertrax spacers in preparation for new wheels and mags today that will be fitted. I'm not certain if maybe the spacer with the smaller wheel and mag just created the bouncing.
Sorry for all the information overload but just trying to put everything here so somebody might be able to help me.
 

Sharkey

Word Ninja
Did you loosen the rest of the suspension, let the jeep settle under its own weight, then tighten everything up to spec after swapping the springs?
 

atrollip

New member
Hi Sharkey thank you for your reply. No the only thing we loosed was bottom shock mount and swaybar links as per Evo installation guide. What must I loosen further should I loosen trackbar, upper and bottom control arm, then retorque or is there more I must loosen?
Il give it a bash this evening?
 

Sharkey

Word Ninja
I'd loosen the control arms, trackbar, etc. and then shake the jeep back and forth and let it settle, then torque to spec. You don't want any of the bushings to be bound up from the change in height. Not saying this going to fix your issues, but it can't hurt and maybe it allows your axle to shift back over a bit.
 

Eezybreezy08

New member
Just to let you know atrollip, mine does the same. Mine does it on the passenger side. It dosent look as bad as yours but I do have a bend. I haven't messed with it and it hasn't messed up my ride from what I can tell and feel
 

atrollip

New member
Hi Sharkey I unfortunately was stuck till late last night at work and today it will be the same but I'm off tomorrow and will loosen everything up and give feedback.
 

atrollip

New member
Feedback: Yesterday I loosened up everything and retorqued it after giving it a good shake and then letting it settle. Today I took it for a drive and pushed it past 65mph on a bumpy road and nothing happened so It worked. Thank you Sharkey. I also noticed yesterday that my right lower control arm took a nasty hit after last offroad trip and it seems to be slightly bent. I'm not sure if this is what's messing up my alignment of the quick discos. It's so slightly bent that I can't imagine it making the quick discos miss align. Just again a big thank you for the advice it's really appreciated.
 

Sharkey

Word Ninja
Can you post pics with the tire on the vehicle on the ground? I'd like to see the angle of your swaybar relative to the frame at ride height. I'd also like to see if it looks like your swaybar has shifted to one side or the other.

No worries, I'm glad fixing the bump issue was just a matter of freeing up the bushings and then torquing. :clap2:
 

atrollip

New member
Il take some photos tomorrow morning for it did look to me like the sway bar shifted to the passenger side, i tried giving it a tug back it wouldn't budge but I'm really new to all this and wasn't sure if it could be shifted back or if it arose from some other damage?
 

Sharkey

Word Ninja
Il take some photos tomorrow morning for it did look to me like the sway bar shifted to the passenger side, i tried giving it a tug back it wouldn't budge but I'm really new to all this and wasn't sure if it could be shifted back or if it arose from some other damage?

It can definitely shift, but it usually doesn't shift much with such a small lift. I'm also curious to see if your links are set too short. At resting height, your swaybar shouldn't be less than parallel to the frame (pointed downward toward the ground). If anything, it should be about five degrees or so above parallel.
 

Sharkey

Word Ninja
Also, if you think it has shifted, check the other side to see if your swaybar is making contact with the crossbar coming through the frame. I've circled the spot on the pic below.

1462390915572.jpg
 

atrollip

New member
My sway bar is slightly above parallel, I adjusted the quick discos (2-4" lift) to their shortest length (8.6") as it's same length as OEM rear links which are recommended for the install. It's not making contact with cross bar. Here is some photos.
 

atrollip

New member
The right hand side you will see we put washers in just to get it to connect.
 

Attachments

  • 1462816821563.jpg
    1462816821563.jpg
    106.6 KB · Views: 122
  • 1462816877648.jpg
    1462816877648.jpg
    83.4 KB · Views: 122
  • 1462816895483.jpg
    1462816895483.jpg
    107 KB · Views: 120
  • 1462816914483.jpg
    1462816914483.jpg
    98.5 KB · Views: 121
  • 1462816934253.jpg
    1462816934253.jpg
    97.2 KB · Views: 119

atrollip

New member
We busy camping and it's night time let me know if u need better photos.
 

Attachments

  • 1462816965796.jpg
    1462816965796.jpg
    82.2 KB · Views: 127
  • 1462816988543.jpg
    1462816988543.jpg
    81.6 KB · Views: 126
  • 1462817005023.jpg
    1462817005023.jpg
    80.5 KB · Views: 125
  • 1462817024143.jpg
    1462817024143.jpg
    74.2 KB · Views: 122

catahoula

Caught the Bug
Follow one of Eddie's write ups on a lift. I used the TF BB for reference for TF Leveling kit and had no issues.
 
Top Bottom