You are using an out of date browser. It may not display this or other websites correctly.
You should upgrade or use an alternative browser.
You should upgrade or use an alternative browser.
2012-Up Jeep JK PSC Steering Pump Bracket Update
- Thread starter wayoflife
- Start date
Majik
Member
WOW, that came out real nice. Good job. :thumb: I wonder if that could be done with the factory air box or something like it.
Thanks! I thought so, too
") I believe the stock airbox would work, too. I have mine laying around somewhere.... hmm. In at least one dimensional aspect, it probably would have been easier with the stocker... that Airraid box is a beast!
I believe the stock airbox would work, too. I have mine laying around somewhere.... hmm. In at least one dimensional aspect, it probably would have been easier with the stocker... that Airraid box is a beast!jeffj
Caught the Bug
This story will not end. After I got the knew bracket installed I thought all was good. I then noticed a oil leak that was leaking from the main crank seal. When I shredded the belt it got rapped around the crank and damaged the seal. My dealer was nice enough to warranty that work. On my way home from dealer I shredded another belt. Again broke down along the road. Dealer sent a truck and brought me a loner car. The hydraulic tensioner bushing went bad. They ran it threw as warranty work and covered the tow. They really went beyond to help me. Check the tensioner if anyone has this issue with the psc bracket.
This story will not end. After I got the knew bracket installed I thought all was good. I then noticed a oil leak that was leaking from the main crank seal. When I shredded the belt it got rapped around the crank and damaged the seal. My dealer was nice enough to warranty that work. On my way home from dealer I shredded another belt. Again broke down along the road. Dealer sent a truck and brought me a loner car. The hydraulic tensioner bushing went bad. They ran it threw as warranty work and covered the tow. They really went beyond to help me. Check the tensioner if anyone has this issue with the psc bracket.
Man that sucks but glad to hear you have such an awesome dealer that's been helping you out. Shredding a belt is bad news to every other pulley on your motor. After shredding ours, I carefully removed every bit that I could find and replaced the 2 idler pulleys just to be safe as they seemed to be damaged a bit. I am still hearing a squeak but, I'm not sure if it's the crappy water pump again or something else. Hoping we don't see anymore trouble but, not really holding my breath.
CrazyLarry
Member
Just wanted to check in and see if anyone is running the psc resevoir in the stock location next to the stock airbox. thinking about getting the pump and resevoir kit but im running a stock airbox on my 2012 and didnt want to run into any fitment issues
SaddleTramp
Member
Just wanted to check in and see if anyone is running the psc resevoir in the stock location next to the stock airbox. thinking about getting the pump and resevoir kit but im running a stock airbox on my 2012 and didnt want to run into any fitment issues
I haven't seen anyone running the PSC res with the stock air box, I just don't think there is enough room or enough ability to trim the stock box housing. There are a few that I've seen and at least one here, who has made the PSC res work with an after market air box by putting the PSC res in the stock res location but that still took some custom brackets and moving a few other parts around. Of course it will work with most aftermarket CAI's. I have also recently seen a few folks on the interwebs putting the PSC res near the battery (just next to the grill side of the battery location) too.
I'd love to make the PSC res work in the stock location to be able to use the higher volume and also keep the stock air box. I may work with my installation folks to try to get the PSC res to work near the battery as a next option.
I'm currently running a PSC RAM kit with the stock res but so far it isn't working well. Turns left pretty well but at lower RPM's or after full left turn, it won't turn right at all until the revs come up considerably or I wait 10 seconds or so. I'm not a good enough Holiday Inn Express hydraulics engineer to know if running the higher volume PSC res will help improve the function or if the stock res use is unrelated and I have other issues that need massaging?
CrazyLarry
Member
I haven't seen anyone running the PSC res with the stock air box, I just don't think there is enough room or enough ability to trim the stock box housing. There are a few that I've seen and at least one here, who has made the PSC res work with an after market air box by putting the PSC res in the stock res location but that still took some custom brackets and moving a few other parts around. Of course it will work with most aftermarket CAI's. I have also recently seen a few folks on the interwebs putting the PSC res near the battery (just next to the grill side of the battery location) too.
I'd love to make the PSC res work in the stock location to be able to use the higher volume and also keep the stock air box. I may work with my installation folks to try to get the PSC res to work near the battery as a next option.
I'm currently running a PSC RAM kit with the stock res but so far it isn't working well. Turns left pretty well but at lower RPM's or after full left turn, it won't turn right at all until the revs come up considerably or I wait 10 seconds or so. I'm not a good enough Holiday Inn Express hydraulics engineer to know if running the higher volume PSC res will help improve the function or if the stock res use is unrelated and I have other issues that need massaging?
Yeah I thought about mounting it next to the battery as well but was concerned about the angle of the house not being steep enough giving the pump the volume it needs to do its job right

JeepRealtor
New member
Glad I found this post in this thread. I just received my Hydroassist kit today from Lance at PSC. I have a 2012 JKUR w/ an Airaid intake and AEV Snorkel and was hoping not to have to change my intake and lose my snorkel. Is the reservoir in the kit meant to be a replacement to the OEM Reservoir, or is it supposed to be used in addition to the OEM Reservoir? Does it really make a difference? Do you make additional pics of how exactly you mounted it? Thanks in advance.
How about a pic to answer that??!
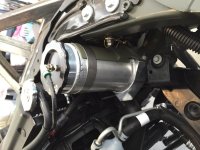
I ended up fitting it gorgeously in the factory reservoir spot. Had to slightly reroute a wiring harness and move the airbag sensor a few inches. Looks like it was meant to be there. And no, my hose routing is direct and without kinks or obstruction.
That is an airraid intake and an aev snorkel btw, and no cutting was needed.
View attachment 56641
View attachment 56642
2013rubirick
Hooked
Glad I found this post in this thread. I just received my Hydroassist kit today from Lance at PSC. I have a 2012 JKUR w/ an Airaid intake and AEV Snorkel and was hoping not to have to change my intake and lose my snorkel. Is the reservoir in the kit meant to be a replacement to the OEM Reservoir, or is it supposed to be used in addition to the OEM Reservoir? Does it really make a difference? Do you make additional pics of how exactly you mounted it? Thanks in advance.
I removed my factory res and install the psc in the stock location. There is no way the stock air box was gonna fit so I bought a ripp mod cold air intake which was the smallest one I could find.
Sent from my SAMSUNG-SGH-I537 using WAYALIFE mobile app
JeepRealtor
New member
I removed my factory res and install the psc in the stock location. There is no way the stock air box was gonna fit so I bought a ripp mod cold air intake which was the smallest one I could find.
Sent from my SAMSUNG-SGH-I537 using WAYALIFE mobile app
I haven't started the install yet, so this may be obvious, but... Do you have any pics of how the PSC res was actually mounted in the stock location?
I recently was researching whether a PSC resevoir would work in the stock resevoir location (2015 JKUR), while still using a stock airbox. I saw this thread and it appeared as if it could be done with aftermarkey air boxes, but not with the stock airbox. I decided it was worth a try, as I am running a Genesis dual battery kit, so mounting it near the firewall was not an option. I also have an sPod Source mounted and didn't want to mount it near the brake booster (too far away).
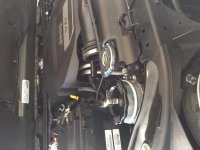
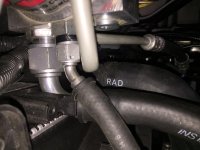
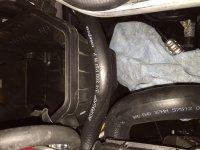
I fabricated a bracket and welded it the the small cross-member behind the passenger side headlight. Clearances were all checked and evertyhing fits....but it is a VERY tight fit. The resevoir bolts to the bracket and is removable. There is a vertical support bar (made from 3.5" tubing to contour the shape of the resevoir), and a large hose clamp was used to make the top portion stable. The large gravity feed line on the resevoir exits the resevoir with a 90* fitting, which just clear the radiator. This hose then goes around the edge of the stock airbox and enters the pump with another 90* fitting. There are no kinks in the hose or humps to prevent the flow.
For some reason the pics I add from my IPad are rotated and I cannot seem to change them. Also, I could not find a pic showing the stock airbox, but will update the thread a soon as I can. At least the re is a couple pics showing how the resevoir was mounted. Hope this helps someone else to know it can be done. (I had 6-8 hours in it). Thanks!
Attachments
Fir-na-tine
Caught the Bug
I recently was researching whether a PSC resevoir would work in the stock resevoir location (2015 JKUR), while still using a stock airbox. I saw this thread and it appeared as if it could be done with aftermarkey air boxes, but not with the stock airbox. I decided it was worth a try, as I am running a Genesis dual battery kit, so mounting it near the firewall was not an option. I also have an sPod Source mounted and didn't want to mount it near the brake booster (too far away).
I fabricated a bracket and welded it the the small cross-member behind the passenger side headlight. Clearances were all checked and evertyhing fits....but it is a VERY tight fit. The resevoir bolts to the bracket and is removable. There is a vertical support bar (made from 3.5" tubing to contour the shape of the resevoir), and a large hose clamp was used to make the top portion stable. The large gravity feed line on the resevoir exits the resevoir with a 90* fitting, which just clear the radiator. This hose then goes around the edge of the stock airbox and enters the pump with another 90* fitting. There are no kinks in the hose or humps to prevent the flow.
For some reason the pics I add from my IPad are rotated and I cannot seem to change them. Also, I could not find a pic showing the stock airbox, but will update the thread a soon as I can. At least the re is a couple pics showing how the resevoir was mounted. Hope this helps someone else to know it can be done. (I had 6-8 hours in it). Thanks!


Fixed it for you :thumb:
Curious to see how the box fits and how you modified it to make it work
~Woodrow~
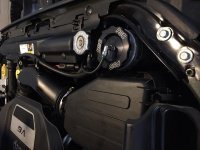
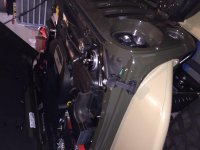
So, here are a few more pics with the factory airbox in and some with it removed, so you can see the lines/fittings. I hope they don't come out sideways again...any suggestions on how to rotate them would be appreciated. Using an IPad and it's all I have?
Attachments
Fir-na-tine
Caught the Bug
Thank you for sharing this info.........as for the pictures......not sure which device you are using but i copied your original pictures onto my IPad and then pulled them up in my pictures file......went to edit....rotated.....then resaved them back into the file
To edit your post and remove your attached pictures use the "manage attachments" in the Additional Options area below your edit screen......after removing the attachments from your post and deleting the original pictures repost using the rotated pictures from your picture file and then hit "save changes" and you should be good........I hope that this helps you out and that this wasn't too confusing LOL
~Woodrow~
Last edited: