You are using an out of date browser. It may not display this or other websites correctly.
You should upgrade or use an alternative browser.
You should upgrade or use an alternative browser.
Anyone have the LOD Destroyer Rear Bumper w/ Tire Carrier?
- Thread starter eazy
- Start date
EXCELLENT thread everyone!! I've been looking for a rear bumper/tire carrier for my JKU and the LoD fit all my requirements and more. I've just ordered it a couple of days ago, so I've likely got a bit of a wait, but I do have a question.
I didn't order a bezel for the rear lights. Can I install them after the bumper is installed or will the bumper have to be removed to install the lights? I would rather do it one time if you know what I mean.
Thanks!!
Clay
I didn't order a bezel for the rear lights. Can I install them after the bumper is installed or will the bumper have to be removed to install the lights? I would rather do it one time if you know what I mean.
Thanks!!
Clay
I finished (finally!) my LOD Destroyer rear w/ linked gate yesterday. Went pretty smoothly for me, thanks to reading the directions carefully and reading this thread a few times.
My learnings:
Happy LOD customer here, with LOD all around. :beer: :thumb:
My learnings:
- pay attention to the top / bottom bearing - despite my best efforts i got turned upside down, and pressed the top in the bottom spot, put in the grease seal, and then realized my screw up. I used the 1.5" socket i bought at the autoparts store (just $10) and another socket, with a drill bit to align, to tap the pair out gently with a section of 2x4 and a small dead blow hammer. Seems fine. but don't repeat my mistake!
- for 35" tire, used the middle height and middle fore/aft bolt holes. some metal showing on either side of the tire, but fine for now. may move later. room to go lower even but will show more of the metal rack.
- used blue / medium locktite on all tire carrier fasteners
- zerk fitting - i scratched the black paint, touched up, but should have been more careful
- other than that it seems good. will drive more and continue to listen for rattles if stuff moves / adjusts
- i might shave the quick release flange where it is next to the tail gate... SUPER close to the gate, requiring care not to scratch upon engage / disengage. will likely dremel and clear coat it. *** Have others done anything on this??? :rolleyes2:
- i do have a lot of extra fasteners...
Happy LOD customer here, with LOD all around. :beer: :thumb:
EXCELLENT thread everyone!! I've been looking for a rear bumper/tire carrier for my JKU and the LoD fit all my requirements and more. I've just ordered it a couple of days ago, so I've likely got a bit of a wait, but I do have a question.
I didn't order a bezel for the rear lights. Can I install them after the bumper is installed or will the bumper have to be removed to install the lights? I would rather do it one time if you know what I mean.
Thanks!!
Clay
You'll need to remove the bumper, as best as i can see. not sure how you'd get your hands in there. unless you're more creative or smaller handed than me. It came with a flat plate / no light bezel, FYI.
dshipp2
New member
Drilling the vertical holes
Does anyone know why LoD didn't include an instructional on the drilling portion of the install? I feel like that part is the most brushed over, even in the video. I am trying to make sure I drill the vertical holes in the right spot. There are two circle indentations, but there is a curved metal just inside the indents. Is this where I am supposed to drill the vertical holes? and does drilling through those circle indents in the top automatically allign with the 2 holes on the bottom?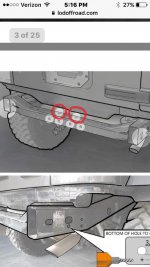
Does anyone know why LoD didn't include an instructional on the drilling portion of the install? I feel like that part is the most brushed over, even in the video. I am trying to make sure I drill the vertical holes in the right spot. There are two circle indentations, but there is a curved metal just inside the indents. Is this where I am supposed to drill the vertical holes? and does drilling through those circle indents in the top automatically allign with the 2 holes on the bottom?

Jsouder53
Hooked
Does anyone know why LoD didn't include an instructional on the drilling portion of the install? I feel like that part is the most brushed over, even in the video. I am trying to make sure I drill the vertical holes in the right spot. There are two circle indentations, but there is a curved metal just inside the indents. Is this where I am supposed to drill the vertical holes? and does drilling through those circle indents in the top automatically allign with the 2 holes on the bottom? View attachment 295713
I would assume so... it’s been a while. I don’t remember having issues with figuring out the drilling instructions. Post some pictures and maybe I can help a little better.
Welcome to Wayalife by the way! Stop by the give us a wave section!
Sent from my iPhone using WAYALIFE mobile app
Last edited:
Edwrds
Caught the Bug
Does anyone know why LoD didn't include an instructional on the drilling portion of the install? I feel like that part is the most brushed over, even in the video. I am trying to make sure I drill the vertical holes in the right spot. There are two circle indentations, but there is a curved metal just inside the indents. Is this where I am supposed to drill the vertical holes? and does drilling through those circle indents in the top automatically allign with the 2 holes on the bottom? View attachment 295713
The holes are already there. You just need to drill the ones on the side.
Sent from my iPhone using WAYALIFE mobile app
SSRuger
Member
I had to drill out the top 2 holes in my rear cross member.The holes are already there. You just need to drill the ones on the side.
Sent from my iPhone using WAYALIFE mobile app
Sent from my SM-G955U using WAYALIFE mobile app
dshipp2
New member
I would assume so... it’s been a while. I don’t remember having issues with figuring out the drilling instructions. Post some pictures and maybe I can help a little better.
Welcome to Wayalife by the way! Stop by the give us a wave section!
Sent from my iPhone using WAYALIFE mobile app
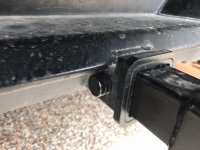
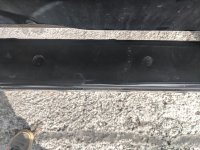
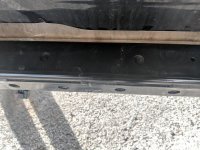
The first two pictures are of the top vertical holes. The third picture, I was curious if you just use the threading that is already there? It's a picture of the forward holes on the side.
Attachments
Jsouder53
Hooked
The first two pictures are of the top vertical holes. The third picture, I was curious if you just use the threading that is already there? It's a picture of the forward holes on the side.
I drilled the vertical holes.
I didn’t have the threading on my frame rails, I used all the hardware from LOD. What bumper style are you replacing?
Sent from my iPhone using WAYALIFE mobile app
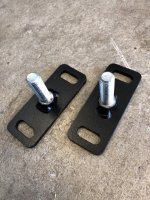
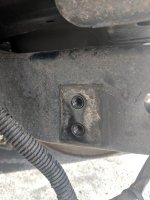
What are these for??? Don’t see them in the instructions, and have ‘em left over. Thanks!
Sent from my iPhone using WAYALIFE mobile app
SSRuger
Member
Those are the highlift jack horizontal mounts. Normally need to be ordered separately.View attachment 296004
What are these for??? Don’t see them in the instructions, and have ‘em left over. Thanks!
Sent from my iPhone using WAYALIFE mobile app
Sent from my SM-G955U using WAYALIFE mobile app
Those are the highlift jack horizontal mounts. Normally need to be ordered separately.
Sent from my SM-G955U using WAYALIFE mobile app
Ah ha!! Thank you. Odd that I got ‘em, but I’ll take it.
Edit: I think I ordered them, haha, was four months ago... because Black Friday wait, and, well, life.
Sent from my iPhone using WAYALIFE mobile app
Last edited:
dshipp2
New member
EXCELLENT thread everyone!! I've been looking for a rear bumper/tire carrier for my JKU and the LoD fit all my requirements and more. I've just ordered it a couple of days ago, so I've likely got a bit of a wait, but I do have a question.
I didn't order a bezel for the rear lights. Can I install them after the bumper is installed or will the bumper have to be removed to install the lights? I would rather do it one time if you know what I mean.
Thanks!!
Clay
you have to install the bezels and the lights with the bumper off... Which once it's all assembled, is not something you are going to want to do.
LōD Offroad
Caught the Bug
The vertical holes are optional 
Does anyone know why LoD didn't include an instructional on the drilling portion of the install? I feel like that part is the most brushed over, even in the video. I am trying to make sure I drill the vertical holes in the right spot. There are two circle indentations, but there is a curved metal just inside the indents. Is this where I am supposed to drill the vertical holes? and does drilling through those circle indents in the top automatically allign with the 2 holes on the bottom? View attachment 295713
Did anyone get the third brakelight attachment? I went to attach the light and it just seemed sloppy, and I didn't like that the back of the assembly and wiring was exposed. Does anyone have other options with this bumper setup?
Any chance you could post a pic? I need to figure out a 3rd brake light solution - running without it now. Pic would help me narrow down options. Thanks!!
Sent from my iPhone using WAYALIFE mobile app
I drilled the vertical holes.
I didn’t have the threading on my frame rails, I used all the hardware from LOD. What bumper style are you replacing?
Sent from my iPhone using WAYALIFE mobile app
I drilled them too, with the bumper on. Should have drilled earlier in the process either he bumper off. I added them because I like the stoutness of having the two big bolts holding vertical load from the toe hitch versus putting the bumper in bending or trusting the horizontal screw’s compression. Overkill but why not, it’s easy and LoD provides the bolts. (BTW I am anal and paint all drilled holes with touch up paint before putting the fasteners in. No likely rust.)
Sent from my iPhone using WAYALIFE mobile app
dshipp2
New member
Any chance you could post a pic? I need to figure out a 3rd brake light solution - running without it now. Pic would help me narrow down options. Thanks!!
Sent from my iPhone using WAYALIFE mobile app
I didn't attach it because I didn't like how it looked. So I don't have the pictures.
I didn't attach it because I didn't like how it looked. So I don't have the pictures.
Got it thx
Sent from my iPhone using WAYALIFE mobile app

