Building the Grendel

Ddays

Hooked
Jesus turned water into wine. If I'm not mistaken, it was while he was working on a Jeep :idontknow:

True statement! Pretty sure he ran out of beer and made the wine to keep his apostle buddies from getting into his bourbon stash. ;)
 

TheGrendel

Active Member
Slabs

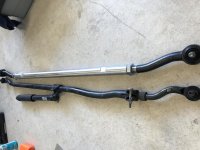
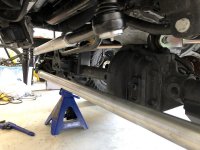
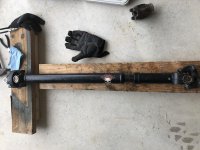
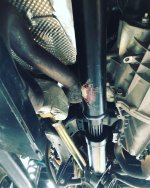
Ok I’m officially tired. But these are bad ass. Thanks to iRonin upgrading to full floaters on Thanos. Allowed me to save a few Ben Franklins.
 

Attachments

  • 4C4D1BDC-9EDF-4D1C-B347-708590F0312A.jpg
    4C4D1BDC-9EDF-4D1C-B347-708590F0312A.jpg
    202.8 KB · Views: 324
  • ECF56A05-A844-4A12-ACB1-8F05381AD433.jpg
    ECF56A05-A844-4A12-ACB1-8F05381AD433.jpg
    176.8 KB · Views: 344

TheGrendel

Active Member
So besides the painstaking process of mounting my tires on the slabs, I finished up the driver side rocker panel. Spun one nursert. Have to do something about that but oh well.

I also changed the oil and installed the Evo protek oil skid. Extremely happy about this mostly because. It went straight on with no problems in a short amount of time. Think it’s the first mod I’ve done go to plan. Lol.

Still need to do transmission skid. But I was too worn out to get to that.
 

Attachments

  • BF346647-431E-4539-8182-067F91688824.jpg
    BF346647-431E-4539-8182-067F91688824.jpg
    94.1 KB · Views: 272
Yesterday, I started on my first mods. The Grendel will be getting built up a little more slowly than my old Gecko JKR.

First some Daystar hood latches to stop hood flutter. I'm too OCD and cannot stand the hood flutter. Amazed that FCA never fixed this.
View attachment 267783

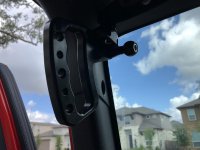
Second, Grabars. These are nice and sturdy now that they are on. But, holy crap, I have never been so pissed at 4 freaking bolts in my life. Took me way, way longer than it should have to get the drivers side put in. Also, dropped a bolt behind the pillar. Just going to leave it unless it starts rattling. :banghead:
View attachment 267782


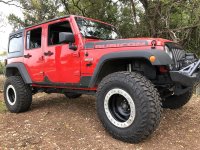
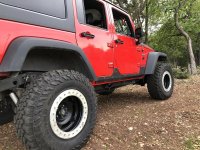
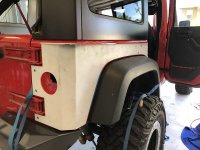
Waiting to be put on. Evo tire carrier and Evo corner skids.

Hahaha. I had the same problem with those bars. Lost a passenger side bolt behind the pillar. Used my fingers to pry the plastic back. I then tortured the fingers on my other hand squeezing them behind there to remove the bolt.


Sent from my iPhone using Tapatalk
 

TheGrendel

Active Member
Replaced my Grabars with Carolina Metal Masters. Always want them. They had a blemish sale. Look great to me. So easy to install.
 

Attachments

  • 906BA90B-79BB-43CB-9AEF-83DF1E945FB8.jpg
    906BA90B-79BB-43CB-9AEF-83DF1E945FB8.jpg
    61.7 KB · Views: 252

TheGrendel

Active Member
Got the fusion 4x4 tie rod and drag link installed. Need to get an alignment done. Effed up the toe because I was tired and hot plus I am an idiot. Otherwise good stuff.
 

Attachments

  • 3E52CCA2-1E4A-4726-BC06-30A97CC9E341.jpg
    3E52CCA2-1E4A-4726-BC06-30A97CC9E341.jpg
    104.6 KB · Views: 315
  • FB93591A-8634-4B34-9B25-1AA688B46D46.jpg
    FB93591A-8634-4B34-9B25-1AA688B46D46.jpg
    92.3 KB · Views: 323
  • D19F35CE-2E00-4BA1-A7DF-2DDCFE38A9C1.jpg
    D19F35CE-2E00-4BA1-A7DF-2DDCFE38A9C1.jpg
    99.5 KB · Views: 325

TheGrendel

Active Member
Fixed my toe for the most part. But taking it in for an alignment tomorrow, so I can see the numbers. Want to know what my caster is as well.

Also I picked up an Adams driveshaft awhile back. I wanted to rebuild it with solid u joints. I didn’t need to do this but I’m happy I did as I know it’s new and have the knowledge to do it if I ever break a u joint on the trail.
 

Attachments

  • 44AFBD2F-4E86-4BEB-A716-78C7DA68DF7C.jpg
    44AFBD2F-4E86-4BEB-A716-78C7DA68DF7C.jpg
    113.4 KB · Views: 257

wjtstudios

Hooked
You’ll love the fusion tie rod. I bounced mine hard off a rock this past weekend and barely a scratch and it when right back to straight. That’s the huge advantage to the aluminum. It has a memory and try’s to return itself to straight


Sent from my iPhone using WAYALIFE mobile app
 

TheGrendel

Active Member
After too much work I finally got my used Adams driveshaft rebuilt and installed with sold u joints and cv yoke (after I messed up the original). Learned a lot. Also adjusted my control arms to get my caster back into spec. Based on my angle finder and the alignment read out, I should be just over 4 degrees.
 

Attachments

  • 1F5FA373-8BD2-4EE5-AFE4-0CE4ADE4CA1F.jpg
    1F5FA373-8BD2-4EE5-AFE4-0CE4ADE4CA1F.jpg
    118.8 KB · Views: 237

TheGrendel

Active Member
Finally getting going on these Evo corners.
 

Attachments

  • 13E01779-4BAC-4B92-80B3-A6B8694D4879.jpg
    13E01779-4BAC-4B92-80B3-A6B8694D4879.jpg
    87.7 KB · Views: 223

tigerpaw7

New member
Motobilt Bumper

well i got moved into our new home finally. still having to hound the builder to fix some lingering issues. but, it's nice to not be working in a condo garage anymore.

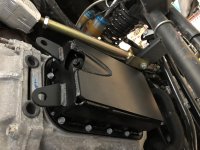
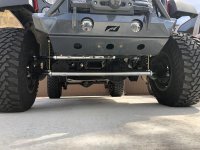
so, i've had this Motobilt bumper for a few months now. i've also been sitting on my Warn Zeon winch and lower skid plate.

let me just i don't always agree with this board on vendors. but, i sure wish i had seen the crap Motobilt pulled, so i would not have bought this pile of shit. and let me tell you, it is exactly that. a huge pile of shit.

the fog lights are way too narrow and the brackets interfere with trying to bolt down the winch. but, the worst part is the lower skid. it is so much harder to mount than it should be. plus, they don't have any directions.

alas, i can't afford to toss it in the garbage right now with new house. so, i'll just have to live it for awhile.

View attachment 289625

Hey dude,

We have the exact same Motobilt bumper. I plan on installing mine this weekend. I know there’s no provided instructions or videos out there to help so I was curious if you had any advice regarding the install.

Thanks in advance.
 
Top Bottom