Installing Evo Long Arm on half at a Time

phillypete

New member
Looking online there seem to be some couplers which maybe you can find at a local auto parts store. Hopefully it works out. How's progress coming?

Sent from my 2PYB2 using WAYALIFE mobile app

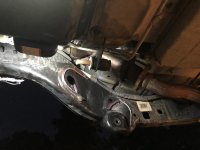
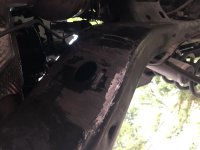
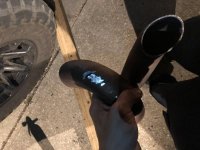
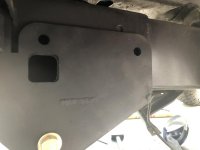
I used a 3/16 compression fitting to mend it for now. From what i’ve read a compression fitting is a ticking time bomb on hydraulic lines, so i’ll try to find a place to hook up full repair first thing tomorrow. In the mean time I’ll take the slow roads and be ready on the e-brake.
 

jesse3638

Hooked
Harbor freight has angle grinders for like $14.99. Get one or two if you think it’s gonna fail. I have two and have had them for years with no issues.


Sent from my iPhone using WAYALIFE mobile app
^^^This^^^ Although I don't like the constant on switch. I prefer a trigger or paddle switch in case I slip and let go it turns off. Two work well so you have one for cutting and one for grinding.

Look for a 4" 30 grit flap wheel for the angle grinder 60 if you can't find the 30. It makes clean up grinding take a minute or two. They remove a lot of material. I did not know this when I did my install and a grinding wheel takes forever. I had a 180 and 220 grit which worked well for paint prep but not much else.

Finally, where's the pics?..haha

Sent from my 2PYB2 using WAYALIFE mobile app
 

phillypete

New member
First you can see the difference between strategic use of the sawzall and just hacking it off.

Then there is the damage my loop too in the removal.

My dogs were getting upset because I was out front all weekend and not giving them attention so I tied the big one to a tire and the little one to a planter. Hard to get more redneck than me this weekend!

Finally I bought these cool Mechanix gloves because I thought they’d save me from busting my knuckles in the tight spaces under the Jeep. They did this, the back padding works, however the fingers wore through. For what I paid these should last more than one use.
 

Attachments

  • 46204762-78D0-4E9F-AC4E-4AAA6F22F317.jpg
    46204762-78D0-4E9F-AC4E-4AAA6F22F317.jpg
    67.2 KB · Views: 191
  • 5C7EAAC2-B10A-4276-8AF0-EECD61C3A3D3.jpg
    5C7EAAC2-B10A-4276-8AF0-EECD61C3A3D3.jpg
    61.1 KB · Views: 175
  • AD9E0EA9-496D-4F79-A7CB-C29A9F212AC6.jpg
    AD9E0EA9-496D-4F79-A7CB-C29A9F212AC6.jpg
    76 KB · Views: 197
  • D79892FD-2BF1-48C5-9B10-4D7F686174CF.jpg
    D79892FD-2BF1-48C5-9B10-4D7F686174CF.jpg
    140.1 KB · Views: 200
  • 00A42C84-10A2-42EC-9909-28060287D888.jpg
    00A42C84-10A2-42EC-9909-28060287D888.jpg
    198.7 KB · Views: 206
  • 28DA7198-D5CE-4630-8A1F-25CDD532DE4D.jpg
    28DA7198-D5CE-4630-8A1F-25CDD532DE4D.jpg
    171.7 KB · Views: 202

jdofmemi

Active Member
First, nice work on getting this done and recorded for others to learn from.

Shocking about the gloves. I had been considering a pair, but after seeing this, I will just keep using the cheaper ones, they seem to do better than those.
 

TheGrendel

Active Member
i think i'd take the gloves back to the store and ask for a warranty replacement or contact mechanix. that's ridiculous.
 

OverlanderJK

Resident Smartass
^^^This^^^ Although I don't like the constant on switch. I prefer a trigger or paddle switch in case I slip and let go it turns off. Two work well so you have one for cutting and one for grinding.

Look for a 4" 30 grit flap wheel for the angle grinder 60 if you can't find the 30. It makes clean up grinding take a minute or two. They remove a lot of material. I did not know this when I did my install and a grinding wheel takes forever. I had a 180 and 220 grit which worked well for paint prep but not much else.

Finally, where's the pics?..haha

Sent from my 2PYB2 using WAYALIFE mobile app

Push the switch half way up and it isn’t constant.


Sent from my iPhone using WAYALIFE mobile app
 

DWiggles

Caught the Bug
First you can see the difference between strategic use of the sawzall and just hacking it off.

Then there is the damage my loop too in the removal.

My dogs were getting upset because I was out front all weekend and not giving them attention so I tied the big one to a tire and the little one to a planter. Hard to get more redneck than me this weekend!

Finally I bought these cool Mechanix gloves because I thought they’d save me from busting my knuckles in the tight spaces under the Jeep. They did this, the back padding works, however the fingers wore through. For what I paid these should last more than one use.

Nice progress! :thumb:
You're almost halfway there! :brows:
 

Coop

Caught the Bug
Great thread! My hats off to you for doing it your self! Can’t wait to hear how the second half goes.


Sent from my iPhone using WAYALIFE mobile app
 

Mybadjk

Caught the Bug
Good work! Thanks for the pointers on the do’s and donts. Lol learner nice and slow part when doing my rear tire carrier. Now just to do the rear![emoji1303]


Sent from my iPhone using WAYALIFE mobile app
 

PEACEMAKER1

New member
Looking really good! I thank you for your nice write-up and helping prepare me for my long arm install in Sep. when my new axles come. I am impatiently waiting and living vicariously through your install! Can't wait to see the finish!
 

phillypete

New member
How does it feel driving it with only half done?

It’s not earth shatteringly different, but it’s definite better. The rest of my suspension is from the MOPAR kit and my draglink is still standard. Also I
Haven’t really aligned anything yet, only straightened the steering wheel.

The bumps in the highway are slightly more subdued, and it seems to track better. I’m excited to get the rear finished and fully align this bad mofo.
 

phillypete

New member
Hey guys,

I started the rear install this weekend... more to come on that... but here is my question real quick like:

Passenger side rear bracket. The two top holes. What fasteners go in there.
 

Attachments

  • image.jpg
    image.jpg
    40.3 KB · Views: 76
Top Bottom