A few weeks back, I started hearing some belt slipping on our 2012 Jeep JK Wrangler Rubicon Unlimited known to most as, Rubicat. Figuring it was just really cold and wet out, I figured it was nothing and just ignored it or at least, until I started see drip marks from under the engine area. After determining the drips were power steering fluid and coming from all over the place, I did a thorough cleaning of the steering box, power steering pump, reservoir and all the hydraulic lines just so that I can get a better idea of where it was coming from. After everything was dry, I started up the engine but, before I could go for a test drive, I discovered the leak was in fact coming from the Delphi steering box, right where the PSC snout was bolted up to it. Needless to say, I had a bad O-ring and it needed to be replaced.
This step-by-step write-up will show you how to remove the power steering box (or "steering gear" as some like to call it) from your Jeep JK Wrangler as well as show you how to separate the snout and replace the O-Ring inside.
What you will need
• PSC Repack Kit for Jeep JK Wrangler Steering Box
• 13, 17, 18, 19, 21, 34mm Wrenches & Sockets
• Socket Extension
• Pitman Arm Puller
• Torque Wrench
• Impact Wrench or Breaker Bar
• Dental Pick
• Red Lock-Tite
• Blue Lock-Tite
• Ratchet Strap
• Petroleum Jelly
• Brake Cleaner
• Oil Catch Pan
• Power Steering Fluid
• Floor Jack
• 2 Jack Stands
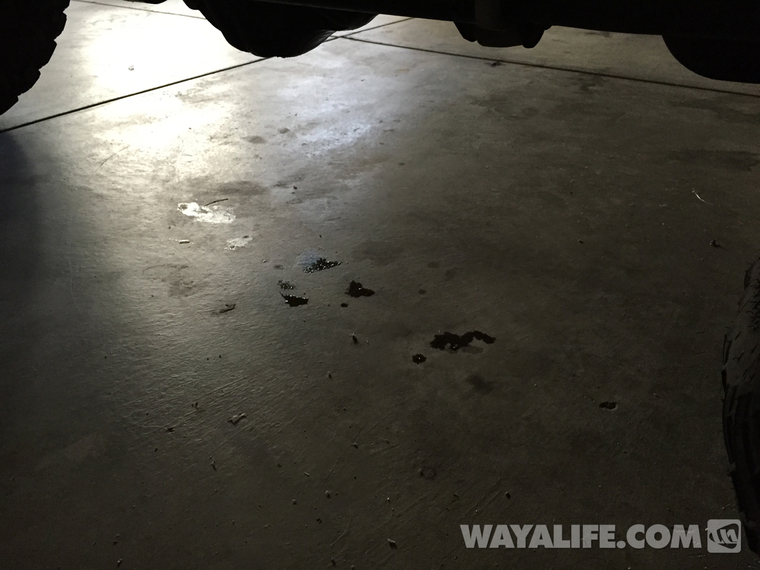
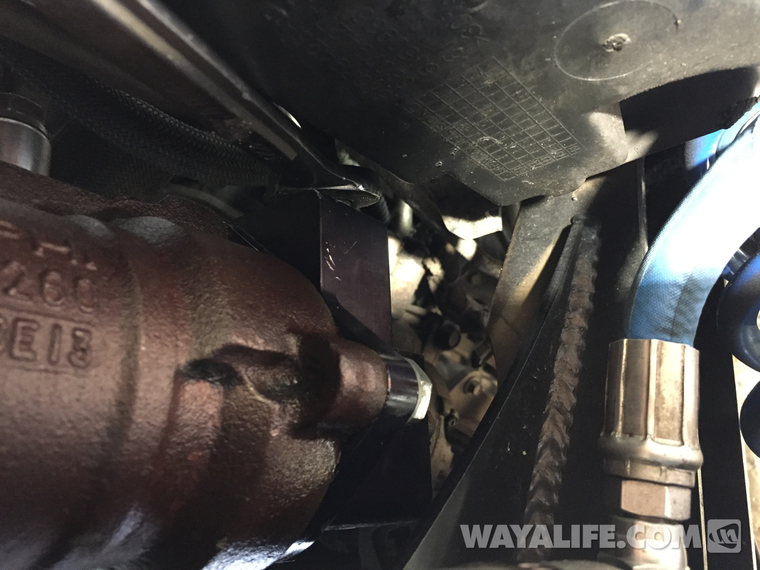
Here's a shot of the drips I was starting to see under my Jeep.
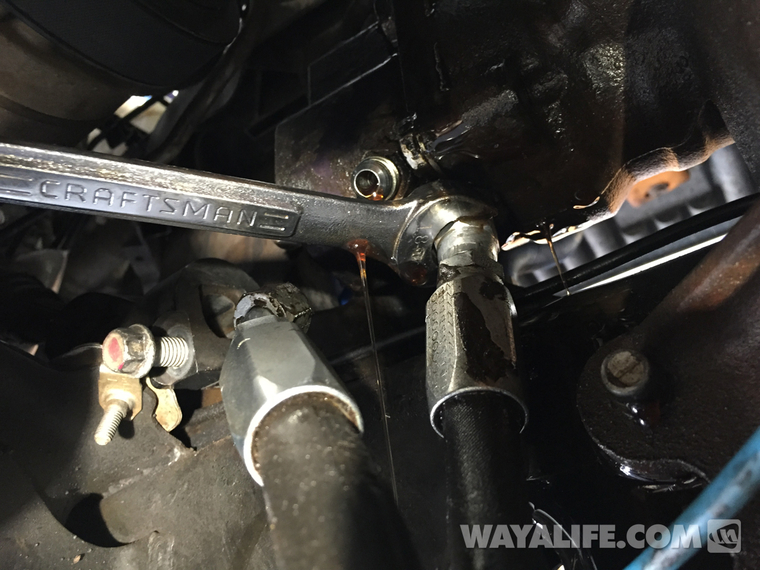
After cleaning things up, I found power steering fluid oozing out from where the PSC snout was bolted up to the steering box.

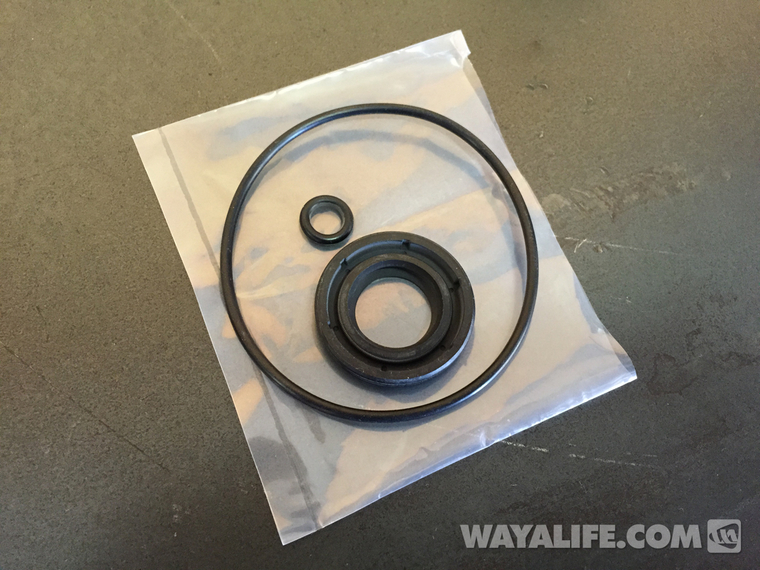
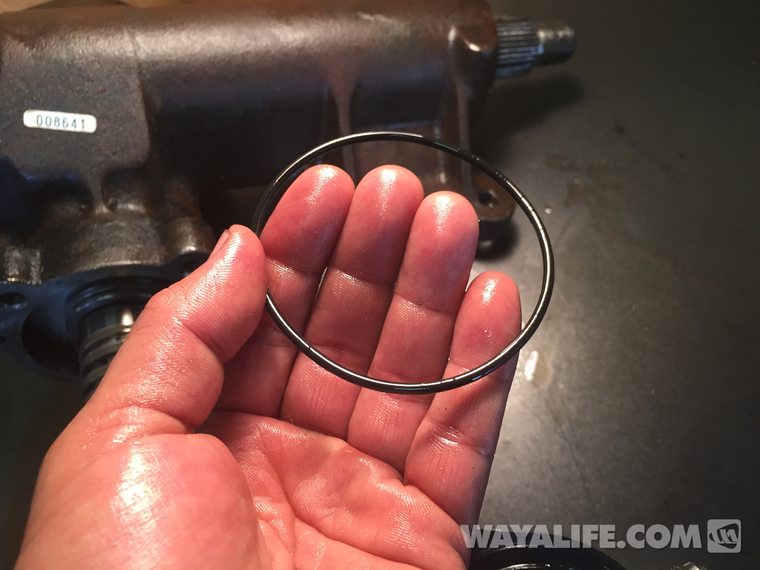
This is what the PSC O-ring and seal kit looks like.
Instructions
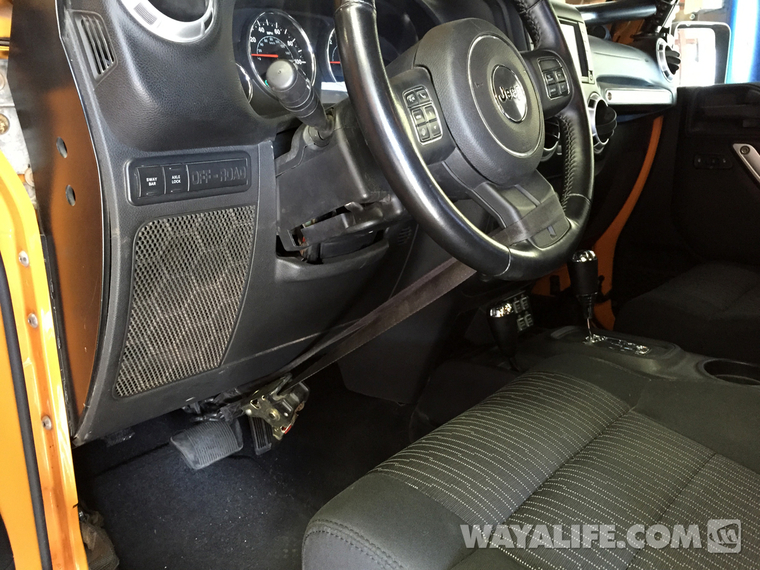
1. If you have a 2007-10 Jeep JK Wrangler, turn your steering wheel until it locks in place. You will need to have your key out of the ignition to make this work. If you have a 2011-up, hook a ratchet strap around the base of your steering wheel and secure it to the brake pedal as shown.
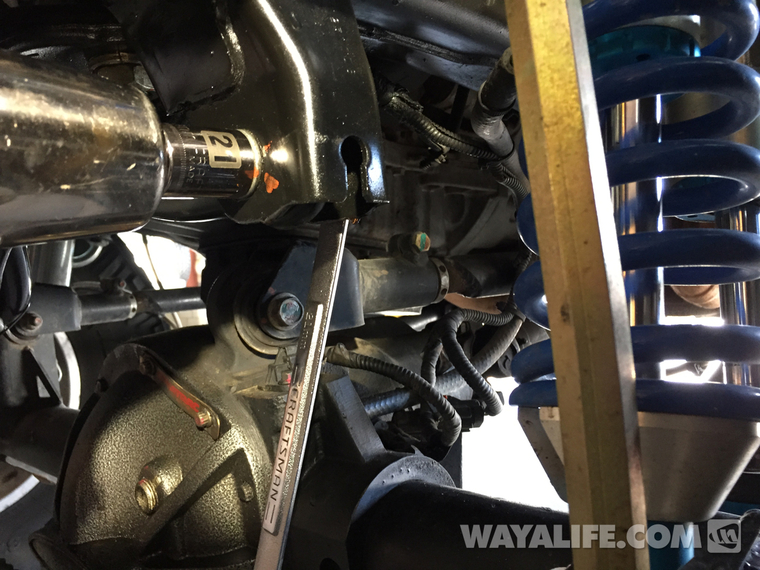
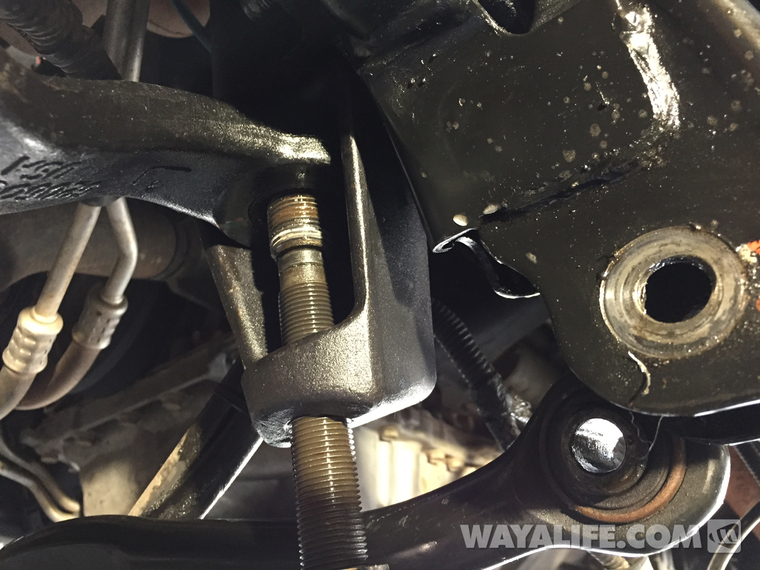
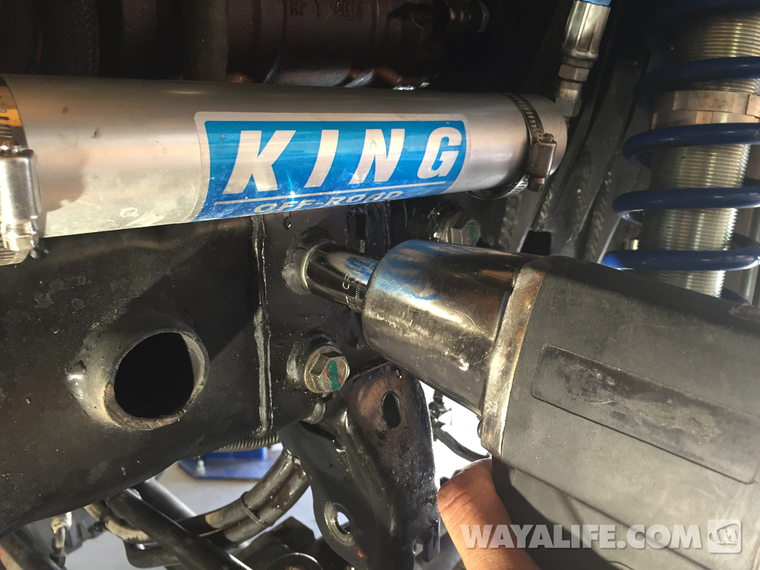
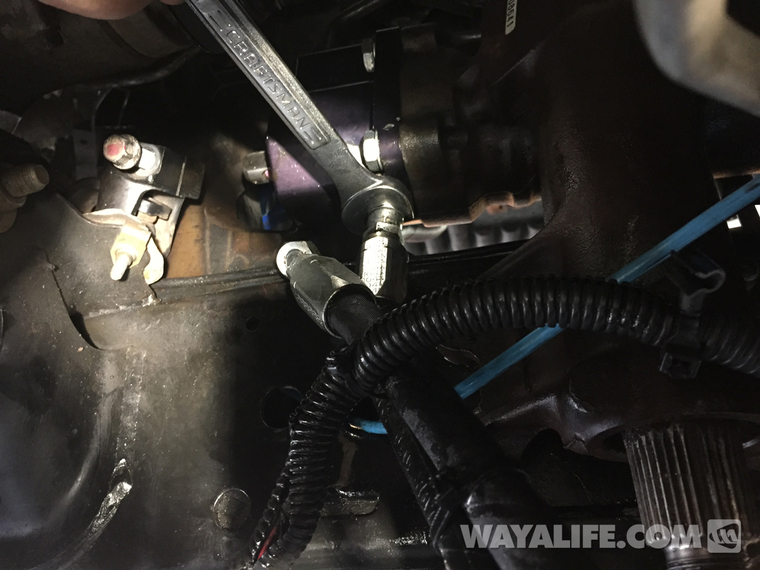
2. Use a 21mm socket and wrench to remove the front track bar bolt and nut from the frame.
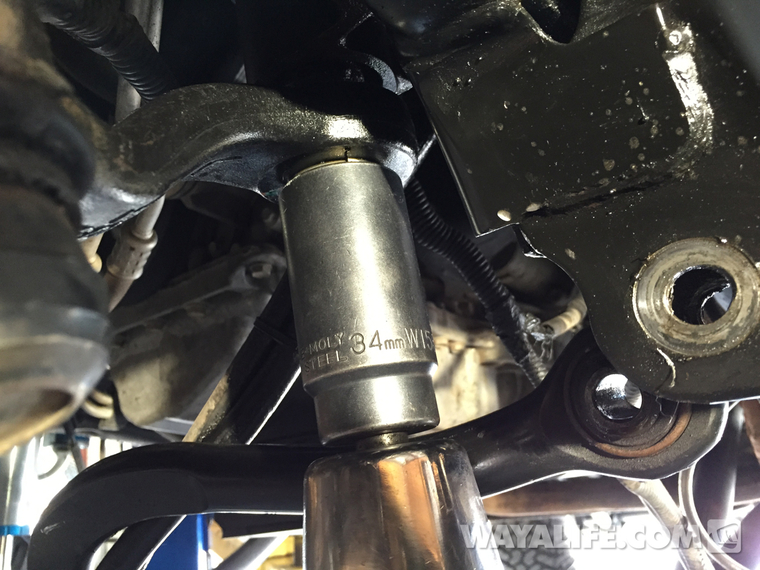
3. Use a 34mm socket to remove the pitman arm nut. An impact wrench or breaker bar will be needed to remove the nut.
4. Use a pitman arm puller to remove the pitman arm from the steering box sector shaft.
5. Use a 13mm socket to remove the bolt securing the steering shaft yoke to the steering box.
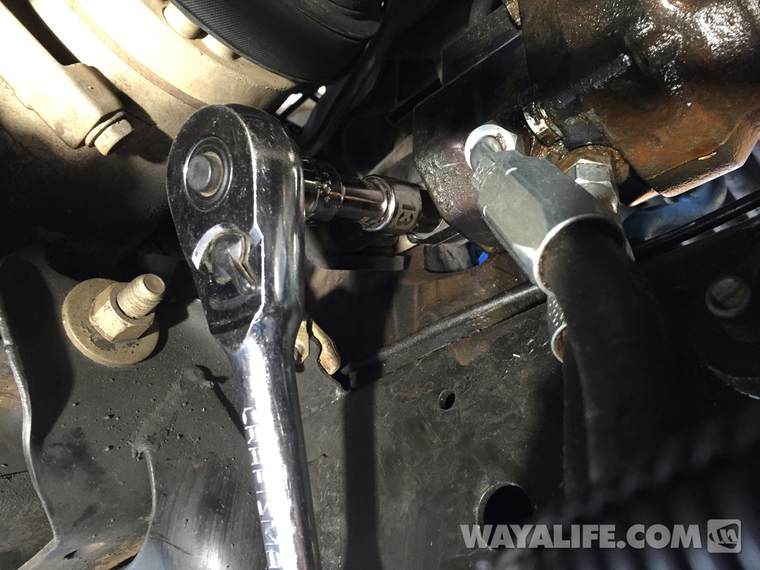
6. If your steering box has been ported for a PSC Ram Assist, use an 18mm wrench to disconnect the two hydraulic hoses from the bottom as shown. Make sure you have an oil catch pan in place as power steering fluid will come pouring out.
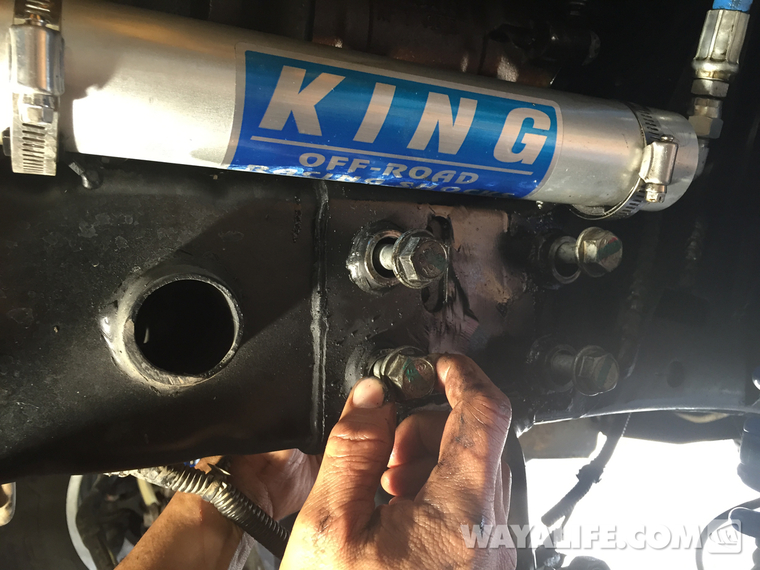
7. Using an 18mm socket, remove the 2 upper and 1 rear lower bolts securing your steering box to the frame of your JK. Loosen but do not remove the remaining bottom and forward most bolt.
8. With 3 of the steering box bolts removed and the last one loosened, you should be able to wiggle downward and out enough to give you plenty of room to remove the 2 hard lines connected to the top of the box. You will need an 18mm wrench for this job.
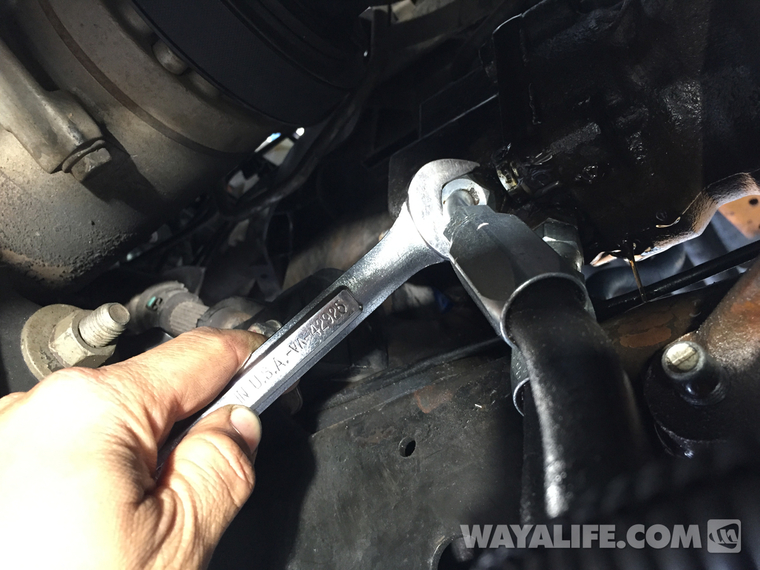
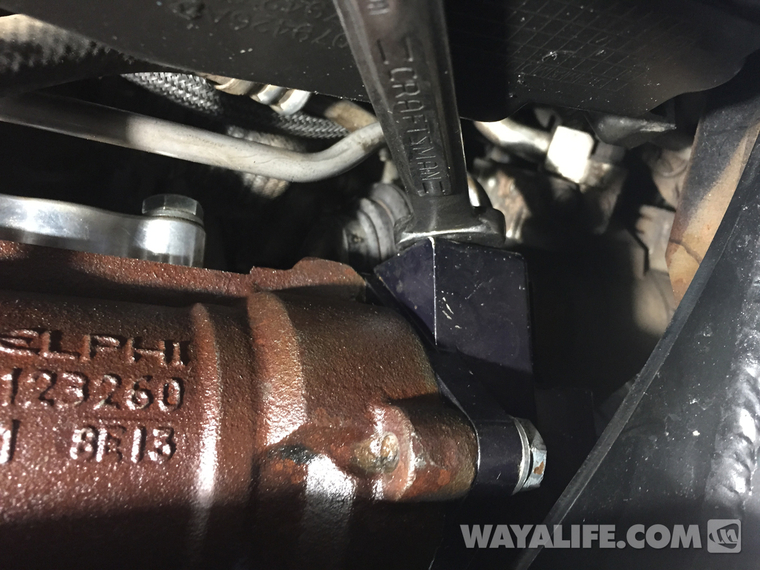
9. With all the hydraulic lines disconnected, remove the last bolt securing the steering box to the frame, pull the box out from under your Jeep and place it on a work bench. Then, use an 18mm socket to remove the hose connector in front of the snout bolt as shown.
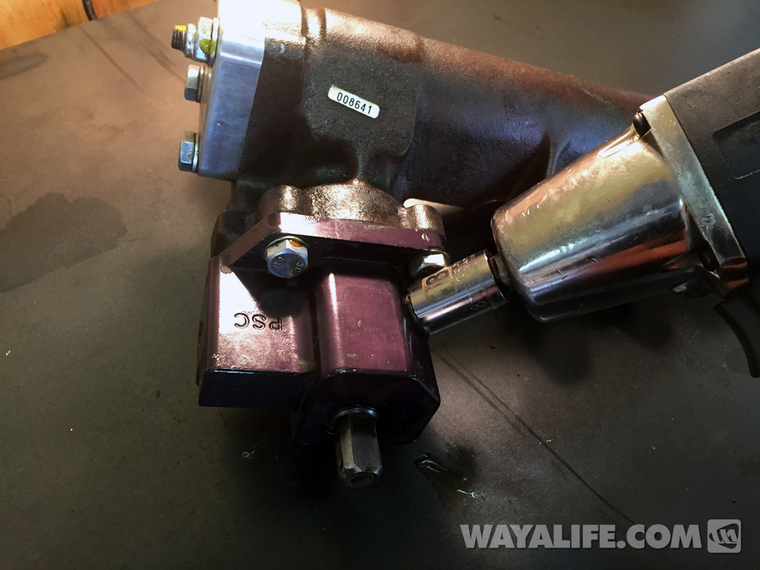
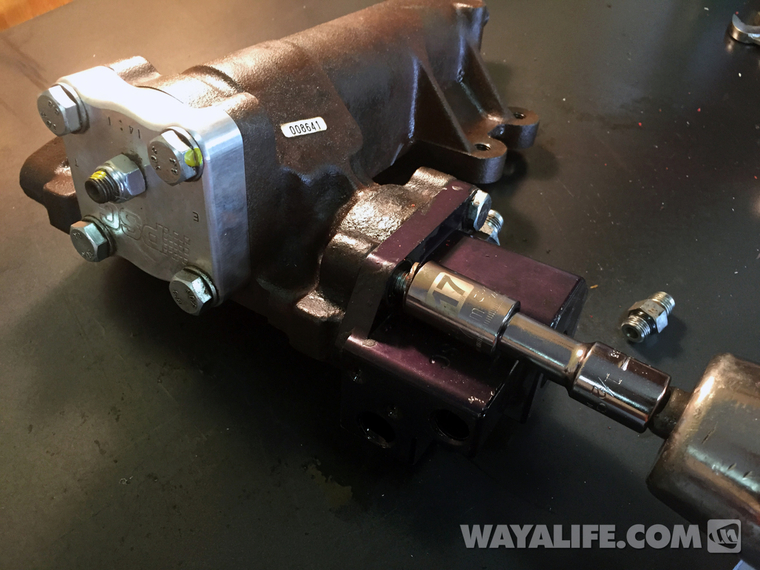
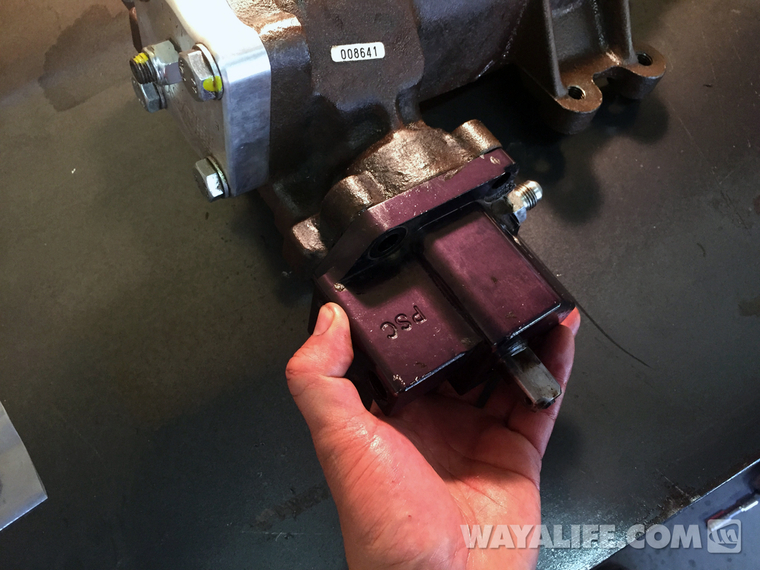
10. Use a 17mm socket to remove the 3 bolts securing the snout to the steering box.
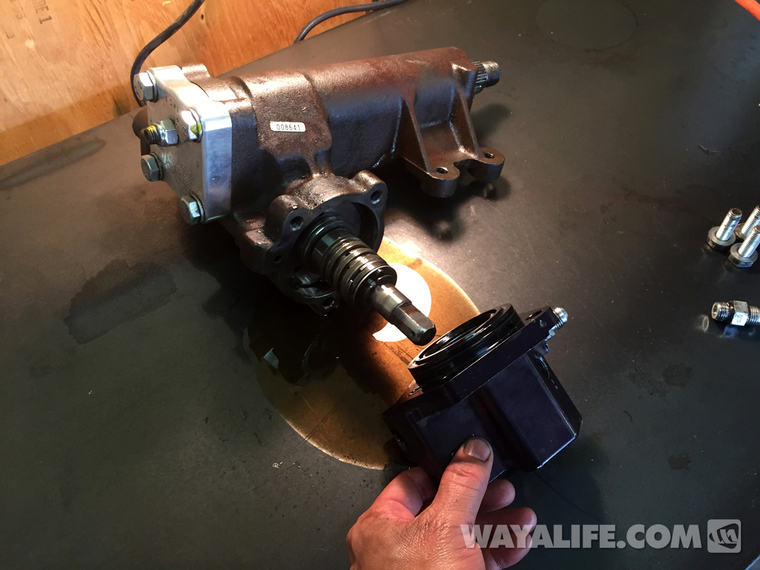
11. With the bolts removed, carefully pull on the snout until it separates from the steering box. Be sure to have some paper towels or a rag handy as power steering fluid will come pouring out.
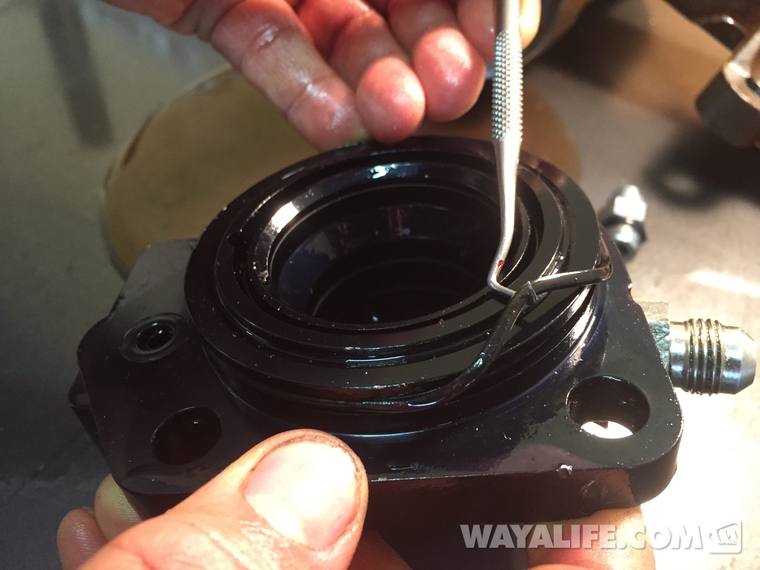
12. Using a dental pick or something similar, carefully hook and remove the o-ring off the snout. Make sure that you DO NOT scratch the surface of the snout.
13. Apply a thin coat of petroleum jelly or grease to the new O-Ring and install it on to the PSC snout.
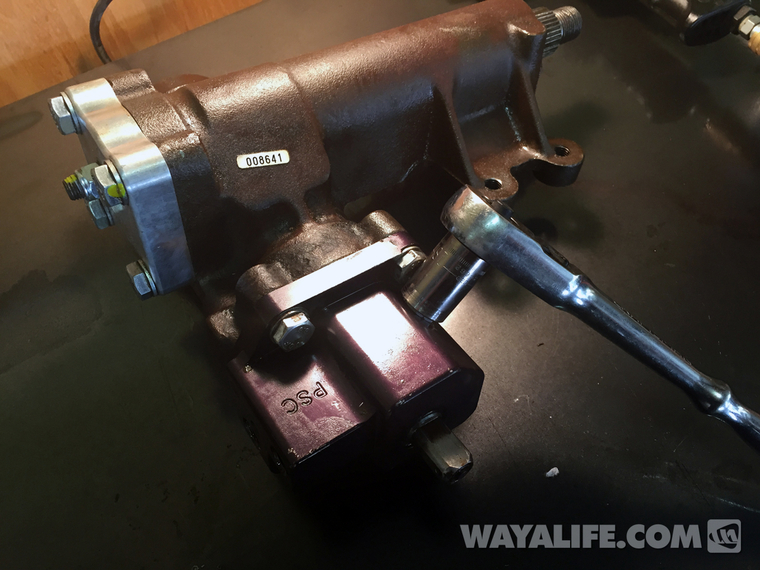
14. Carefully push the PSC snout back on to the steering box until the mating surfaces are flush together again. Be mindful of the new o-ring as you do not want to pinch or damage it in the process.
15. Put a dab of red lock-tite on the threads of the 3 snout bolts.
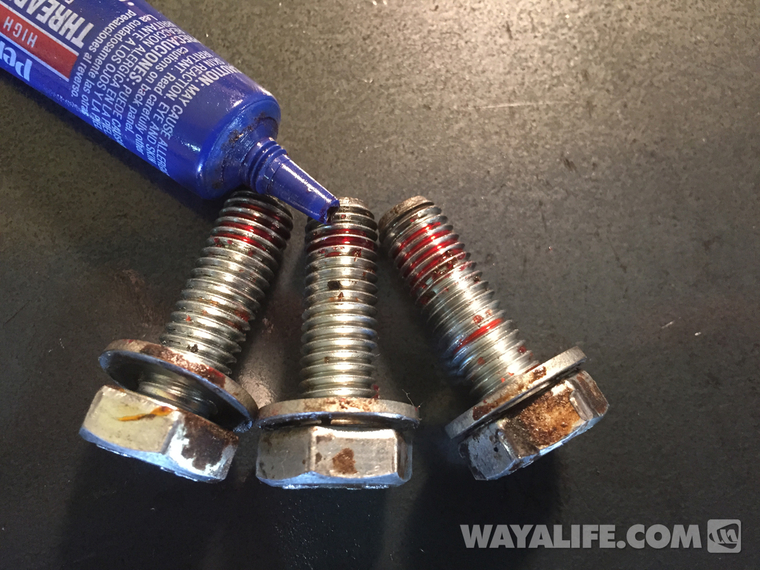
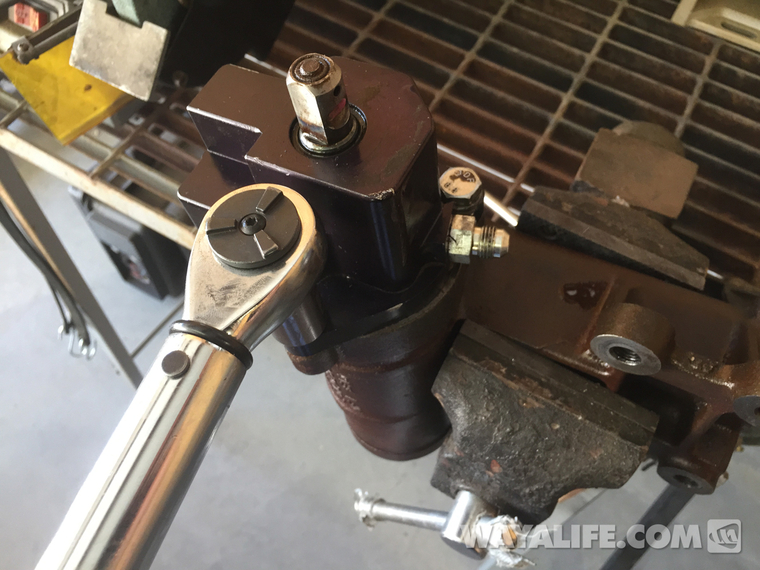
16. Using a torque wrench, secure the snout in place by tightening the 3 bolts to 60-65 ft. lbs. of torque.
17. Reinstall the hose connector onto the snout. Tighten this bolt to 27 ft. lbs. of torque.
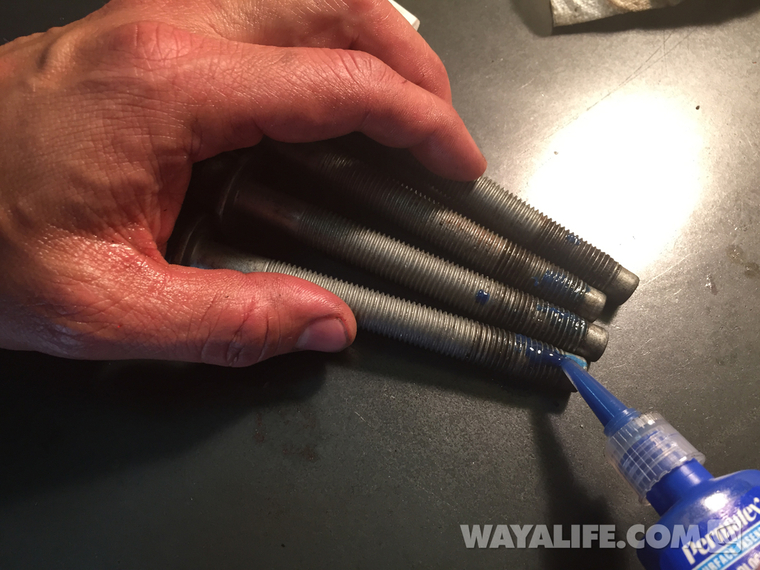
18. Apply some blue lock-tite to the threads of the power steering box frame bolts.
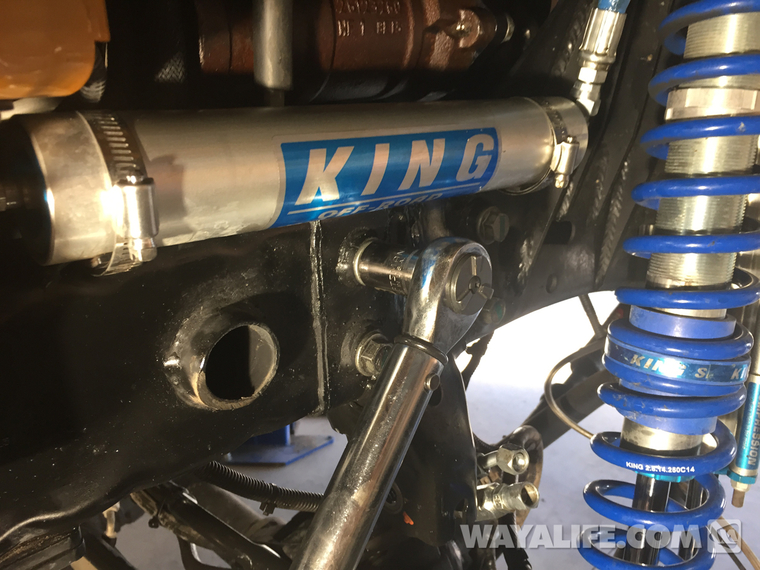
19. Secure the steering box back onto the frame of your JK by loosely threading in the bolts as shown.
20. Use an 18mm wrench to reconnect the 2 hard lines on to the top of the steering box.
21. Tighten the steering box bolts to 70 ft. lbs. of torque.
22. Use an 18mm wrench to reconnect the 2 hydraulic lines to the bottom of the steering box.
23. Use a 13mm socket to reinstall the bolt securing the steering shaft yoke to the steering box.
24. Reinstall the pitman arm onto the sector shaft. It is a keyed fit so you may find it necessary to have someone turn the steering wheel just a bit to the right or left until the pitman arm slips on. Once in place, use a 34mm socket to tighten the nut to 185 ft. lbs. of torque.
25. Remove the ratchet strap from your steering wheel and then have someone rotate it until you can line up the track bar bushing to the mounting hole on the frame. Reinstall the nut and bolt and tighten it to 125 ft. lbs. of torque using a 21 socket and wrench.
26. Refill your power steering reservoir with power steering fluid. Use a floor jack to raise your front axle up and rest it back down on 2 jacks stands. You want to be high enough to just get the tires off the ground. Proceed to bleed the steering system by slowly turning your steering wheel all the way to the right and then all the way back to the left. Repeat this process 10 times and add more power steering fluid to the reservoir as needed. Your steering should start to turn with ease again once all the air is out of the system.
That should be it. You should now have a steering box that is no longer leaking.
This step-by-step write-up will show you how to remove the power steering box (or "steering gear" as some like to call it) from your Jeep JK Wrangler as well as show you how to separate the snout and replace the O-Ring inside.
What you will need
• PSC Repack Kit for Jeep JK Wrangler Steering Box
• 13, 17, 18, 19, 21, 34mm Wrenches & Sockets
• Socket Extension
• Pitman Arm Puller
• Torque Wrench
• Impact Wrench or Breaker Bar
• Dental Pick
• Red Lock-Tite
• Blue Lock-Tite
• Ratchet Strap
• Petroleum Jelly
• Brake Cleaner
• Oil Catch Pan
• Power Steering Fluid
• Floor Jack
• 2 Jack Stands
Here's a shot of the drips I was starting to see under my Jeep.
After cleaning things up, I found power steering fluid oozing out from where the PSC snout was bolted up to the steering box.
This is what the PSC O-ring and seal kit looks like.
Instructions
1. If you have a 2007-10 Jeep JK Wrangler, turn your steering wheel until it locks in place. You will need to have your key out of the ignition to make this work. If you have a 2011-up, hook a ratchet strap around the base of your steering wheel and secure it to the brake pedal as shown.
2. Use a 21mm socket and wrench to remove the front track bar bolt and nut from the frame.
3. Use a 34mm socket to remove the pitman arm nut. An impact wrench or breaker bar will be needed to remove the nut.
4. Use a pitman arm puller to remove the pitman arm from the steering box sector shaft.
5. Use a 13mm socket to remove the bolt securing the steering shaft yoke to the steering box.
6. If your steering box has been ported for a PSC Ram Assist, use an 18mm wrench to disconnect the two hydraulic hoses from the bottom as shown. Make sure you have an oil catch pan in place as power steering fluid will come pouring out.
7. Using an 18mm socket, remove the 2 upper and 1 rear lower bolts securing your steering box to the frame of your JK. Loosen but do not remove the remaining bottom and forward most bolt.
8. With 3 of the steering box bolts removed and the last one loosened, you should be able to wiggle downward and out enough to give you plenty of room to remove the 2 hard lines connected to the top of the box. You will need an 18mm wrench for this job.
9. With all the hydraulic lines disconnected, remove the last bolt securing the steering box to the frame, pull the box out from under your Jeep and place it on a work bench. Then, use an 18mm socket to remove the hose connector in front of the snout bolt as shown.
10. Use a 17mm socket to remove the 3 bolts securing the snout to the steering box.
11. With the bolts removed, carefully pull on the snout until it separates from the steering box. Be sure to have some paper towels or a rag handy as power steering fluid will come pouring out.
12. Using a dental pick or something similar, carefully hook and remove the o-ring off the snout. Make sure that you DO NOT scratch the surface of the snout.
13. Apply a thin coat of petroleum jelly or grease to the new O-Ring and install it on to the PSC snout.
14. Carefully push the PSC snout back on to the steering box until the mating surfaces are flush together again. Be mindful of the new o-ring as you do not want to pinch or damage it in the process.
15. Put a dab of red lock-tite on the threads of the 3 snout bolts.
16. Using a torque wrench, secure the snout in place by tightening the 3 bolts to 60-65 ft. lbs. of torque.
17. Reinstall the hose connector onto the snout. Tighten this bolt to 27 ft. lbs. of torque.
18. Apply some blue lock-tite to the threads of the power steering box frame bolts.
19. Secure the steering box back onto the frame of your JK by loosely threading in the bolts as shown.
20. Use an 18mm wrench to reconnect the 2 hard lines on to the top of the steering box.
21. Tighten the steering box bolts to 70 ft. lbs. of torque.
22. Use an 18mm wrench to reconnect the 2 hydraulic lines to the bottom of the steering box.
23. Use a 13mm socket to reinstall the bolt securing the steering shaft yoke to the steering box.
24. Reinstall the pitman arm onto the sector shaft. It is a keyed fit so you may find it necessary to have someone turn the steering wheel just a bit to the right or left until the pitman arm slips on. Once in place, use a 34mm socket to tighten the nut to 185 ft. lbs. of torque.
25. Remove the ratchet strap from your steering wheel and then have someone rotate it until you can line up the track bar bushing to the mounting hole on the frame. Reinstall the nut and bolt and tighten it to 125 ft. lbs. of torque using a 21 socket and wrench.
26. Refill your power steering reservoir with power steering fluid. Use a floor jack to raise your front axle up and rest it back down on 2 jacks stands. You want to be high enough to just get the tires off the ground. Proceed to bleed the steering system by slowly turning your steering wheel all the way to the right and then all the way back to the left. Repeat this process 10 times and add more power steering fluid to the reservoir as needed. Your steering should start to turn with ease again once all the air is out of the system.
That should be it. You should now have a steering box that is no longer leaking.
")