Clifford33
Caught the Bug
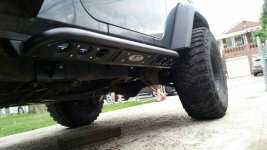
I'm pretty dead set on these sliders my wife needs a good step
I called LOD about the installation trouble, lack of hardware, and they were less than helpful, to say the least. Supposedly the missing hardware is on the way, but as far as the installation goes, I got an overly grumpy incomprehensible explanation hurled at me my a "Chris" who clearly thought I was an idiot.
In fact, I learned they don't do returns, period. I am been alive 53 years and this is the first company I have run into that does no returns. It does say they don't do them on their website, but to me this seems a bit inflexible, and frankly it never occurred to me to look for that, since like I said in 53 years every single company I have dealt with has done returns. I was told it was because they, in so many words, have been burned by people improperly packing the items for return, and that then they are out the dollars on the return, the shipping, and the item.
This makes little sense, to me at least. First, they (the first guy, not Chris, to be precise) said I would have to pay the return shipping, and I am fine with that and said so, so the return shipping costing them money is not a valid argument. On the rest, why not return it conditional on the items arriving in resale worthy condition? I would certainly take that deal. I have the original packaging, and used to be a mover. I'd bet I could get it there safer than they got it here. Their box actually come apart. No, in my opinion, as my wife says, there is a simple reason this is the only company we have ever run across that takes no returns, and it needs no articulation.
On top of all this they considered my reason for wanting to return them unworthy. If you all notice, every picture on their website is from an angle that makes them look good installed, mostly from a low-angle looking up. When they are on, you are almost always standing and looking at them, or in another car ... that is, looking down. These sliders look pretty rough installed from that angle, in my opinion.
These are just my opinions and experiences, but you might consider them when making your own purchase decision. I wish I had known all of this before I made my first, last, and only dealing with them. There is never a good reason to be rude to the customer.
I just did this a week ago and didn't have any issues drilling the holes. I did have to persuade the skid plate down so that the mounting flange of the slider could sit against the frame. The rear mount wouldn't sit flush against the frame because the gap between the skid plate and frame was too small. I pried down the lip of the skid plate to slide the slider in. I don't have a picture to clear it up. Don't know if that helps.
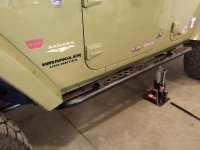
Got mine on this afternoon, write up made for an easy install!View attachment 221367View attachment 221368
Those look awesome!! I know my wife would love to have that step.
These look great. Definitely next on the upgrade list! Has anyone welded them on? Any feedback on that. Seems easier and potentially stronger?