You are using an out of date browser. It may not display this or other websites correctly.
You should upgrade or use an alternative browser.
You should upgrade or use an alternative browser.
Oso Build Thread
- Thread starter dchew
- Start date
piginajeep
The Original Smartass
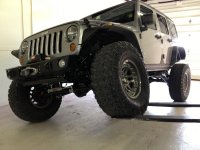
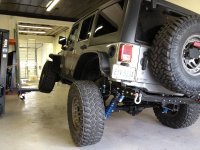
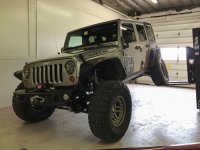
Did you disconnect? You need to go higher with the fork lift
Prime8
New member
Dave. Can you please send me the exact dimensions of your custom fabbed hydro ram bracket on your EVO bracket? I need thickness of plate, length and width of the top/bottom. I will also need how far in you welded the tabs and drilled the holes and the gap between tabs. I really appreciate it brother! Trying to reproduce yours! Or if its easier, you could just fab up another and send it out! 
BrandonDetrick
New member
Doesn't seem like that's all the flex you can get man
dchew
Active Member
Dave. Can you please send me the exact dimensions of your custom fabbed hydro ram bracket on your EVO bracket? I need thickness of plate, length and width of the top/bottom. I will also need how far in you welded the tabs and drilled the holes and the gap between tabs. I really appreciate it brother! Trying to reproduce yours! Or if its easier, you could just fab up another and send it out!
I will measure and let you know. Actually what I did was cut the bottom off of the PSC bracket, and welded the vertical face right onto the flip kit bracket. That vertical face has the mounting point on it.
Prime8
New member
I will measure and let you know. Actually what I did was cut the bottom off of the PSC bracket, and welded the vertical face right onto the flip kit bracket. That vertical face has the mounting point on it.
Yeah, I'd rather not pay $100 for a bracket I'm going to chop. Getting my whole system setup for $665!! Piecing it together myself.
MTG
Caught the Bug
Did you disconnect? You need to go higher with the fork lift
I thought the same thing...doesn't look disconnected.
Prime8
New member
Yeah I agree. The light was on but maybe it never really disengaged? It did not stuff like it should.
Was it solid or blinking?
dchew
Active Member
Thanks John, you should bring over the springs and shocks today; maybe we could throw them on this afternoon! Not sure if Chris' lift will handle your short wheelbase, but regardless we have a lot of jacks & jack stands. :yup:
I will send you a note later when I figure out what time.
Dave
I will send you a note later when I figure out what time.
Dave
Glad to be here, thought I had registered a while back. Definitely have been lurking just didn't realize I wasn't registered.
Not sure how much of a resource I can be, as I'm really crushed all the time at work and don't want to let anyone down. Got seriously backed up creating shift schedules for people with the Superchips trans tune, and the reality was I was just trying to give people the resources to do the work themselves. Just tough as there are so many different tire size, model year and differential ratios to put them together, and I was getting hit up 4 and 5 times to put them together. Just had to pull the plug and felt pretty bad about it.
Anyway, your project is simply awesome and it was good to lend a hand for a bit today (I can hold stuff as good as anyone). Chris was simply a super nice guy and I really enjoyed looking at his toys. When the weather clears I'll definitely need to drop the $50 in fuel to bring the Chevelle out. It could definitely use a good run like that as I don't think I've ran it more 10 miles at a crack the last 5 years.
dchew
Active Member
John,
It would be great to see you out there with your Chevelle!
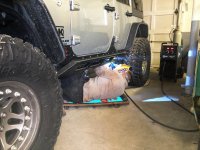
Got the sliders installed (thanks for the help jpop!). Here is Dale (welder) going at it:
Prime8, here are some dimensions for the passenger side ram mount:
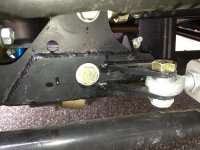
Plate thickness 1/8" - I can't measure it very well because of the weld. It might be 3/16 but I doubt it. That plate is just welded flat onto the front face of the EVO bracket.
It is 8" long on the bottom and 6-1/2" on top. 2-1/4" high. Flush with the EVO bracket on the bottom and on the driver side.
The mounting tabs for the ram are made out of 1/4" steel. They are 2-3/4" long at the base, and the bolt hole center is 1-5/8 inches from the face. They are 3/4" between the two tabs for fitting the ram attachment in between.
There is a lot of adjustment in the ram for positioning left/right. It is up/down that is the more-critical measurement. I can't get in there to get an accurate measurement, but I think each would be a little different anyway. I recommend making the back plate without mounting tabs, then fitting it over the EVO bracket. Mark the hole for that 5/8" (?) bolt in the face of the EVO bracket. Cut that hole, then mount your new plate right on there. Mock up the ram in place above the tie rod and fit the mounting tabs wherever they need to go to make the ram level.
If you put the bolt through the mounting tabs / pass end of the ram, then tighten it up, they should all lock together so you can fit it wherever it needs to be. Then tack it in place.
PM me if you have any specific questions.
It would be great to see you out there with your Chevelle!
Got the sliders installed (thanks for the help jpop!). Here is Dale (welder) going at it:

Prime8, here are some dimensions for the passenger side ram mount:
Plate thickness 1/8" - I can't measure it very well because of the weld. It might be 3/16 but I doubt it. That plate is just welded flat onto the front face of the EVO bracket.
It is 8" long on the bottom and 6-1/2" on top. 2-1/4" high. Flush with the EVO bracket on the bottom and on the driver side.
The mounting tabs for the ram are made out of 1/4" steel. They are 2-3/4" long at the base, and the bolt hole center is 1-5/8 inches from the face. They are 3/4" between the two tabs for fitting the ram attachment in between.
There is a lot of adjustment in the ram for positioning left/right. It is up/down that is the more-critical measurement. I can't get in there to get an accurate measurement, but I think each would be a little different anyway. I recommend making the back plate without mounting tabs, then fitting it over the EVO bracket. Mark the hole for that 5/8" (?) bolt in the face of the EVO bracket. Cut that hole, then mount your new plate right on there. Mock up the ram in place above the tie rod and fit the mounting tabs wherever they need to go to make the ram level.
If you put the bolt through the mounting tabs / pass end of the ram, then tighten it up, they should all lock together so you can fit it wherever it needs to be. Then tack it in place.
PM me if you have any specific questions.

Last edited:
Prime8
New member
John,
It would be great to see you out there with your Chevelle!
Got the sliders installed (thanks for the help jpop!). Here is Dale (welder) going at it:
View attachment 21127
Prime8, here are some dimensions for the passenger side ram mount:
Plate thickness 1/8" - I can't measure it very well because of the weld. It might be 3/16 but I doubt it. That plate is just welded flat onto the front face of the EVO bracket.
It is 8" long on the bottom and 6-1/2" on top. 2-1/4" high. Flush with the EVO bracket on the bottom and on the driver side.
The mounting tabs for the ram are made out of 1/4" steel. They are 2-3/4" long at the base, and the bolt hole center is 1-5/8 inches from the face. They are 3/4" between the two tabs for fitting the ram attachment in between.
There is a lot of adjustment in the ram for positioning left/right. It is up/down that is the more-critical measurement. I can't get in there to get an accurate measurement, but I think each would be a little different anyway. I recommend making the back plate without mounting tabs, then fitting it over the EVO bracket. Mark the hole for that 5/8" (?) bolt in the face of the EVO bracket. Cut that hole, then mount your new plate right on there. Mock up the ram in place above the tie rod and fit the mounting tabs wherever they need to go to make the ram level.
If you put the bolt through the mounting tabs / pass end of the ram, then tighten it up, they should all lock together so you can fit it wherever it needs to be. Then tack it in place.
PM me if you have any specific questions.
View attachment 21130
Dave, thanks a ton for the very thorough instructions! The tabs that come with the ram should be good, right?
http://www.pscmotorsports.com/1-75-x-6-75-assist-cylinder.html//

