Over the years, I have installed and tested out a few different CB Radios of different makes and models and while they all did the job, they all lack options that I wanted and their performance was always just okay at best. In fact, some were difficult to hear, a couple were temperamental and others simply died after a short amount of use. Needless to say, when it came time to look for a new CB Radio for our Orange Jeep JK Wrangler, I decided to do some research and if necessary, spend a bit more money to get a better product. And, what I finally ended up getting was a Cobra 29, or more specifically, the LTD BT version of it.
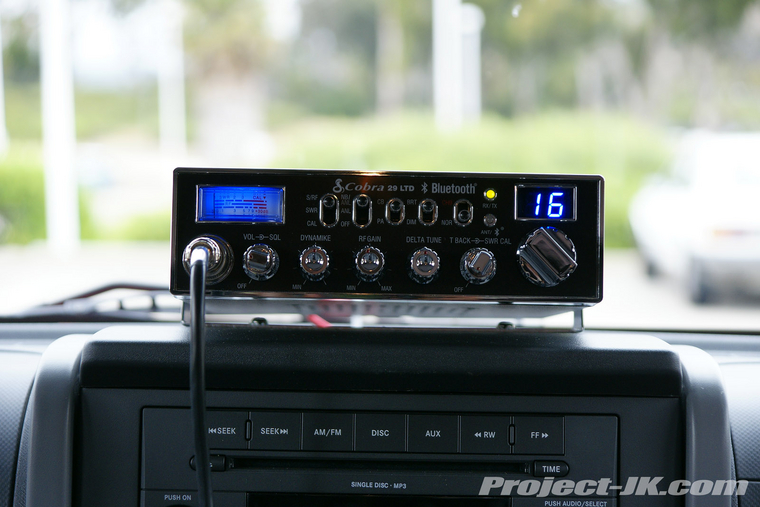
In addition to coming complete with a PA and having adjustments for RF Gain, Delta Tune and Dynamic, the Cobra 29 LTD BT also features a built in SWR meter and Bluetooth system which allows you to sync it up your smart phone. As far as performance goes, this is definitely the single best CB radio that I’ve ever owned. It sounds great, it broadcasts to everyone else amazingly well and so far, I haven’t had any problems with it.
Because of it’s size, there really isn’t a whole lot of places that you can install a Cobra 29 in a 2007-10 Jeep JK Wrangler especially if you don’t have a sport cage installed. This write-up will show you how I installed mine on top of the dash over the center console.
What you will need
• 7,10mm Socket & Wrench
• Trim Panel Tool
• Flathead Screwdriver
• Phillips Head Screwdriver
• Ratchet
• 3" Ratchet Drive Extension
• 14 Gauge Red Insulated Wire
• 14 Gauge Black Insulated Wire
• Soldering Gun or Iron
• Solder & Flux
• Solderless Wire Connectors
• Solderless Ring Connector (LG)
• Solderless Connector Pliers
• Wire Cutters
• Dremel w/Cutting Bit
• XACTO Knife
• Tape
• Coat Hanger
• Ruler
• Pencil
Installation
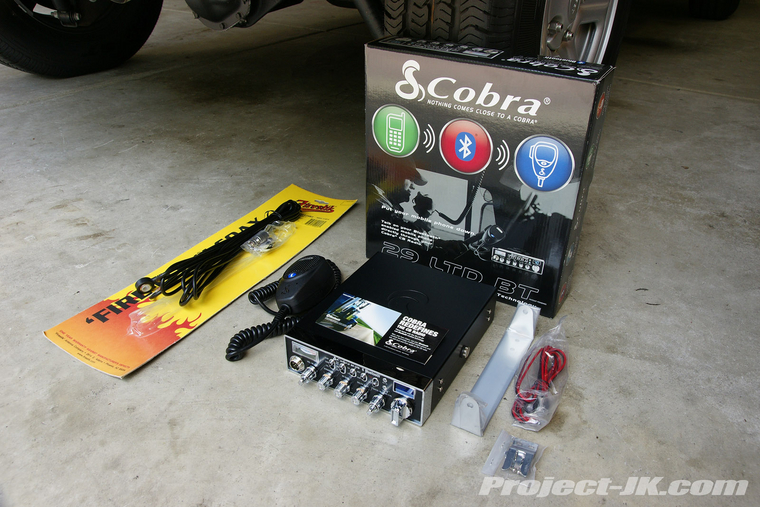
This is a shot of everything that you will get with your Cobra 29 LTD BT CB Radio. The antenna coax cable you see on the left was purchased separately. I already had an extra Firestik II Antenna and so there was no need for me to purchase another.
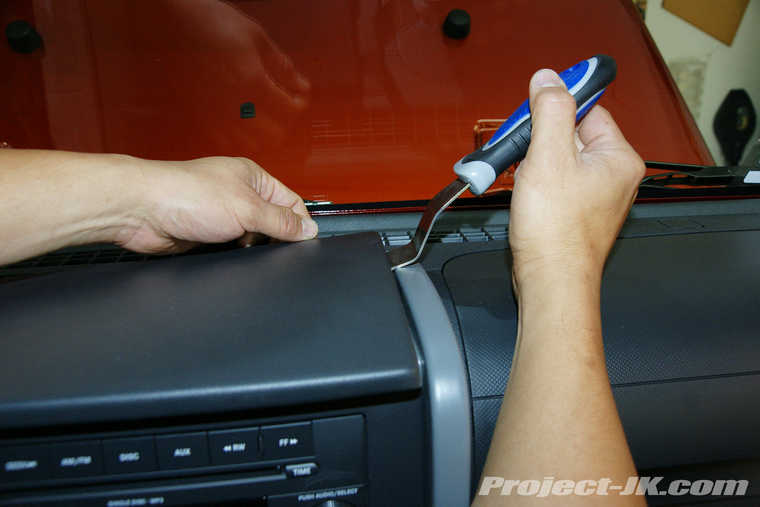
1. The top plate on your center console is held in place by 2 trim tabs which are located near the windshield. Use a trim panel tool to pry the rear corners up and free and then remove the top plate. NOTE: If your Jeep JK Wrangler came equipped with a navigation compass, you will need to detach the compass sensor from the bottom of this top plate.
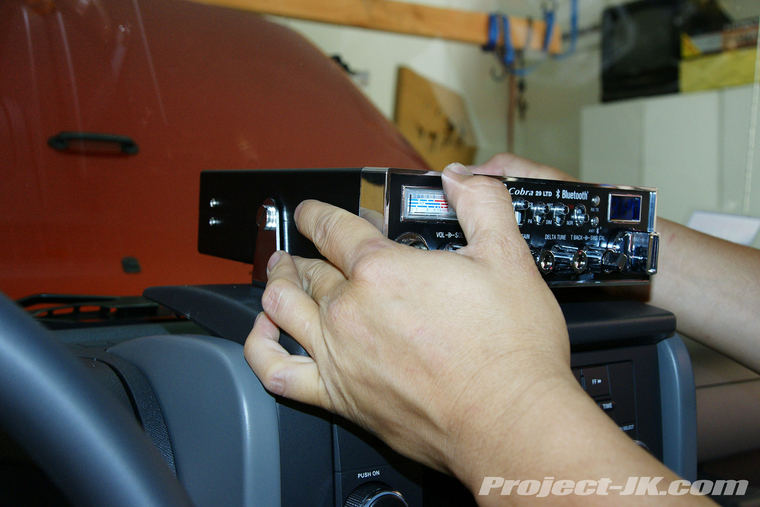
2. Loosely install the mounting bracket to the Cobra 29 using just the mounting screws.
3. Place the Cobra 29 on top of your center console top plate and using a ruler, position it so that it’s centered. NOTE: Again, if your Jeep JK Wrangler came equipped with a navigation compass, try to make sure that the speaker on the CB isn’t positioned directly over where the compass sensor is normally located. The magnet in the speaker will effect how the sensor works.
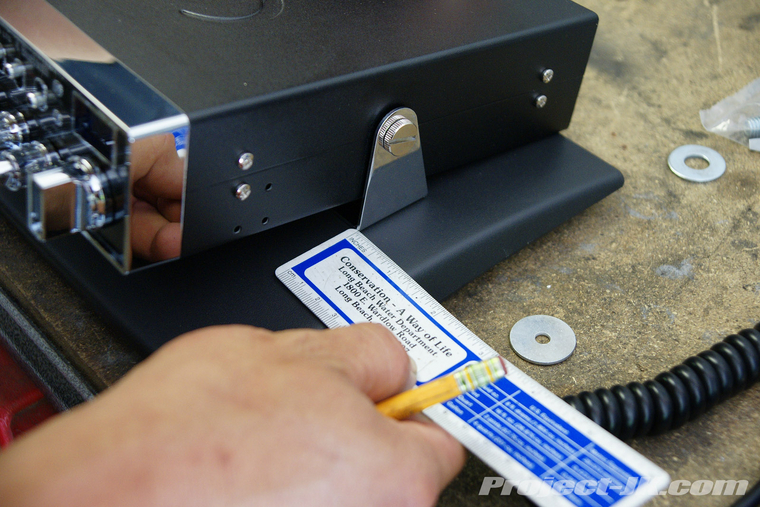
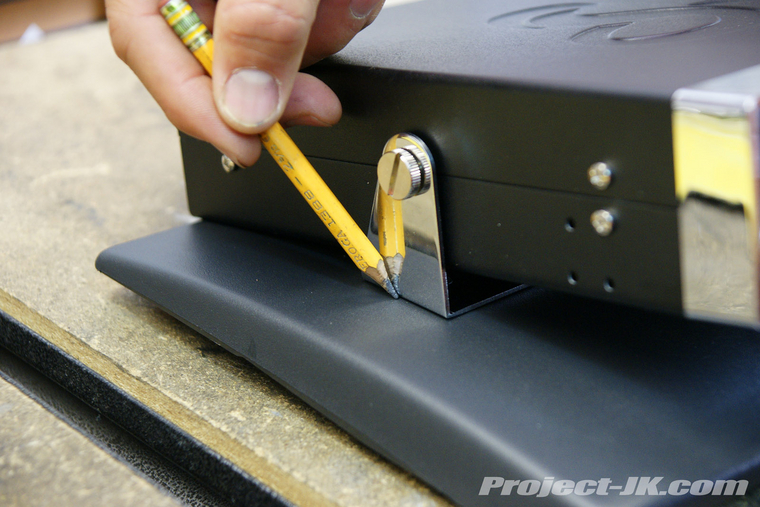
4. Once you have positioned your Cobra 29 to where you want it to be mounted, use a pencil to mark the mounts location as shown.
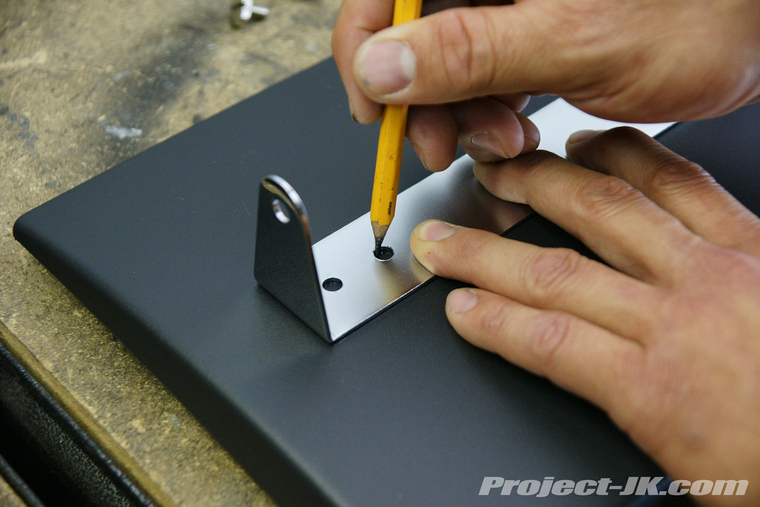
5. Remove the Cobra 29 from the mounting bracket. Then place the bracket back on top of your center console top plate, use it as a template and locate the points where you will secure it in place with screws.
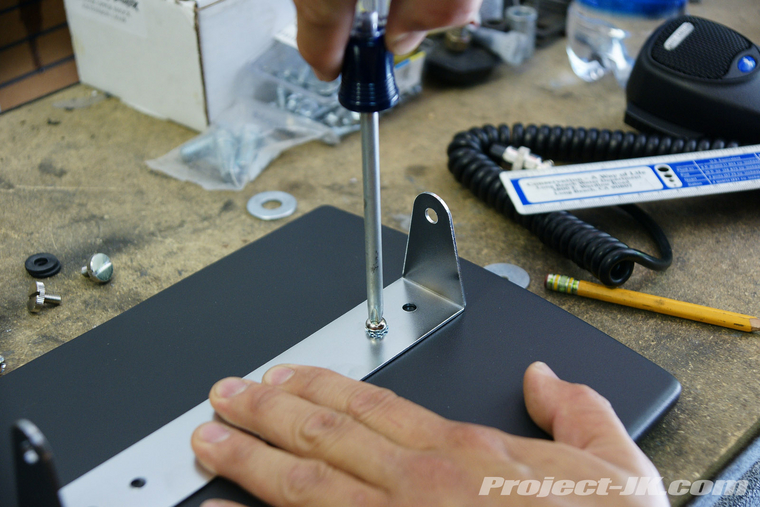
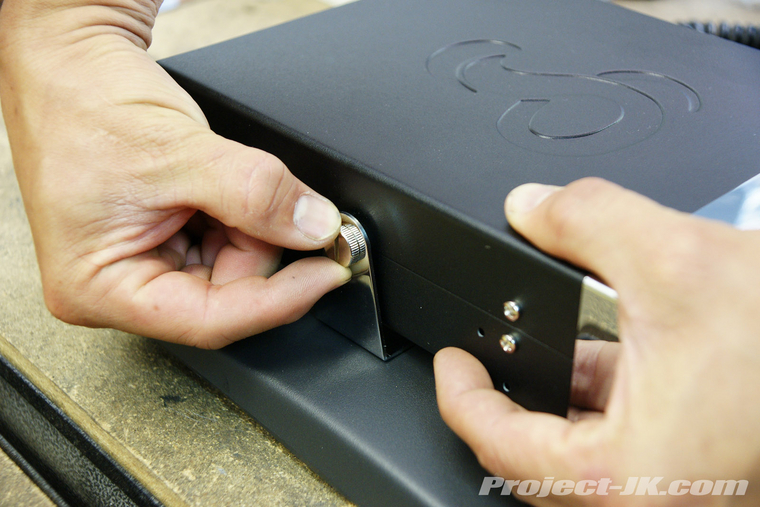
6. Using the screws and spoked washers provided, secure the Cobra 29 mounting bracket to the top plate of your Jeep JK Wrangler’s center console top plate. A phillips head screwdriver will be needed for this job.
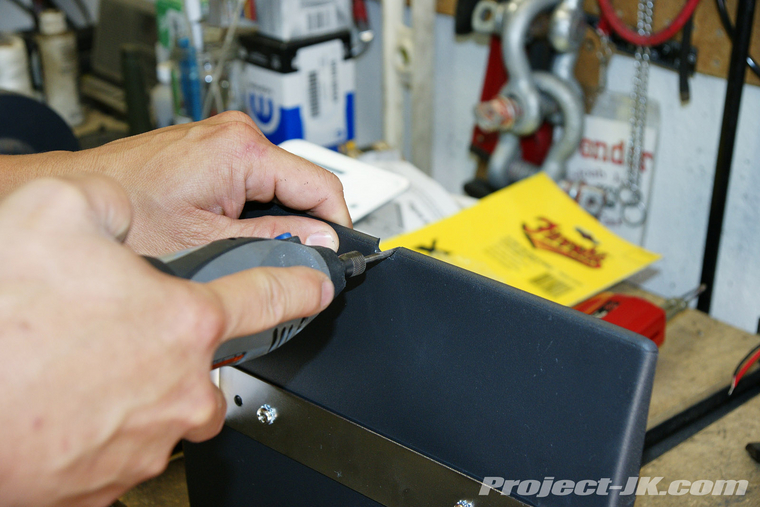
7. Using a Dremel with a cutting bit or an XACTO knife, notch out the back edge of the center console top plate (the side which sits closest to the windshield) so that both the power and antenna cables can be routed through it..
8. Place your Cobra 29 over the mounting bracket and slip the foam washers in between it and the bracket as shown.
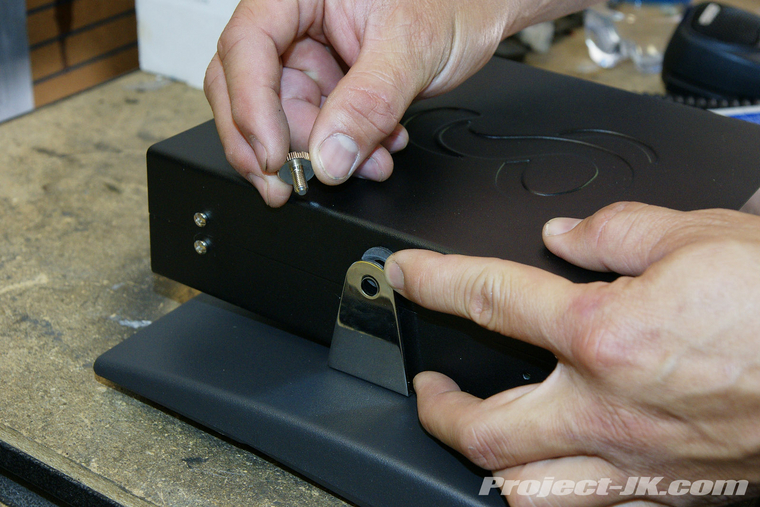
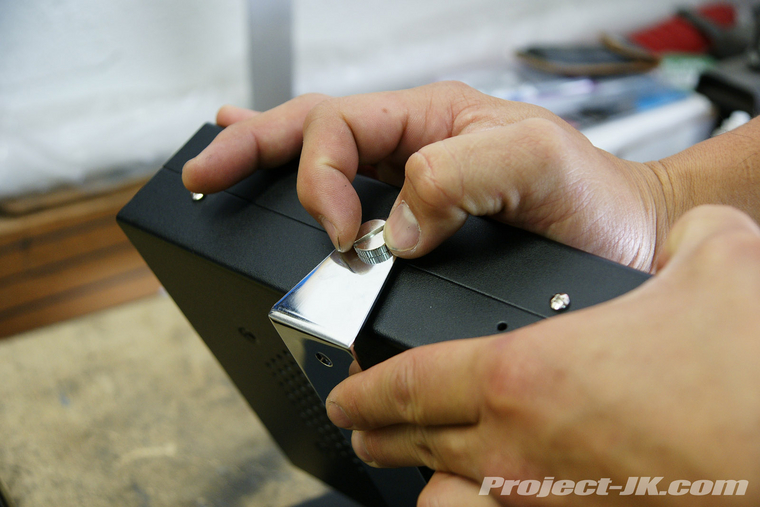
9. Secure the Cobra 29 onto the mounting bracket using the mounting screws provided. A small coin like a penny or nickel will help you to tighten up the screws.
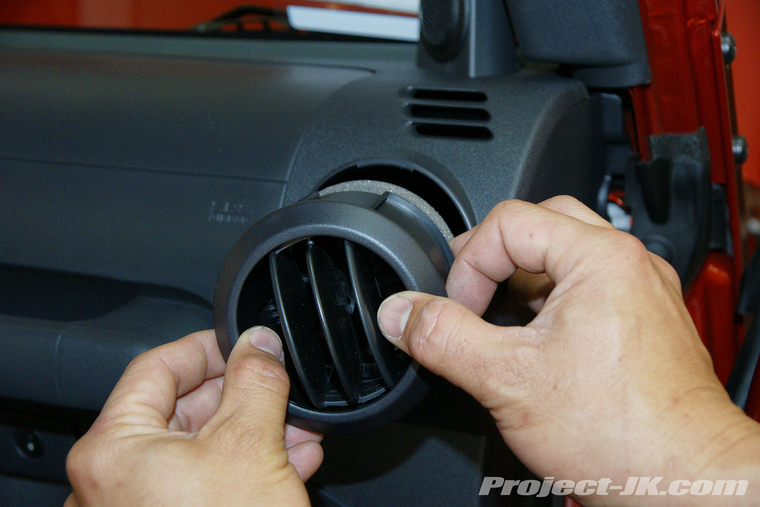
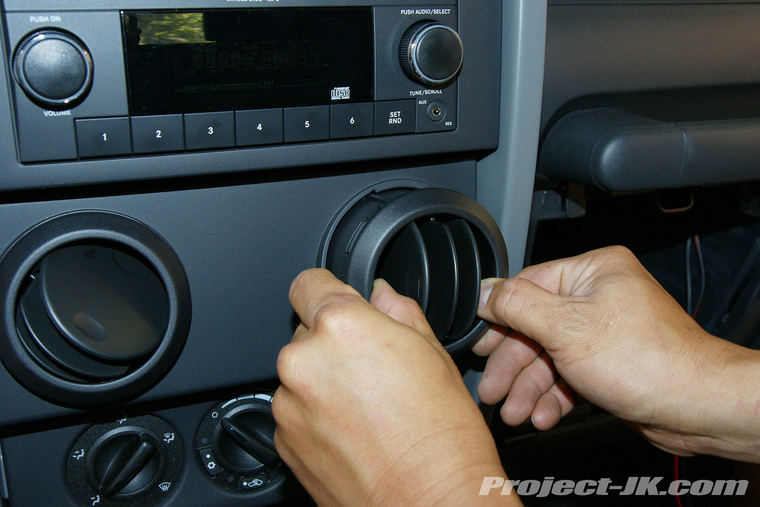
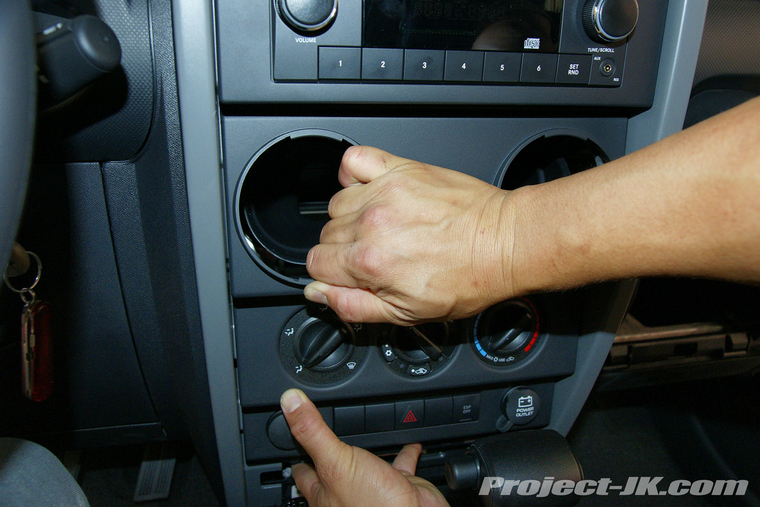
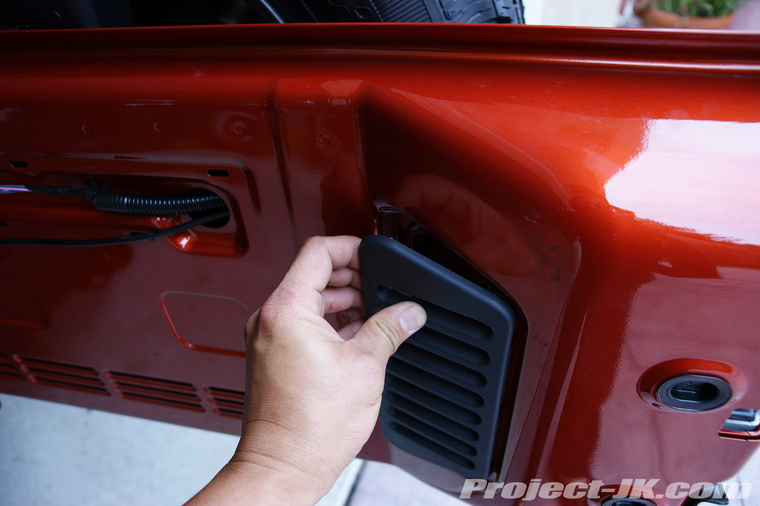
10. Open the passenger side door and remove the air vent baffles by rotating the outer ring and pulling it out as shown. Set the baffles aside.
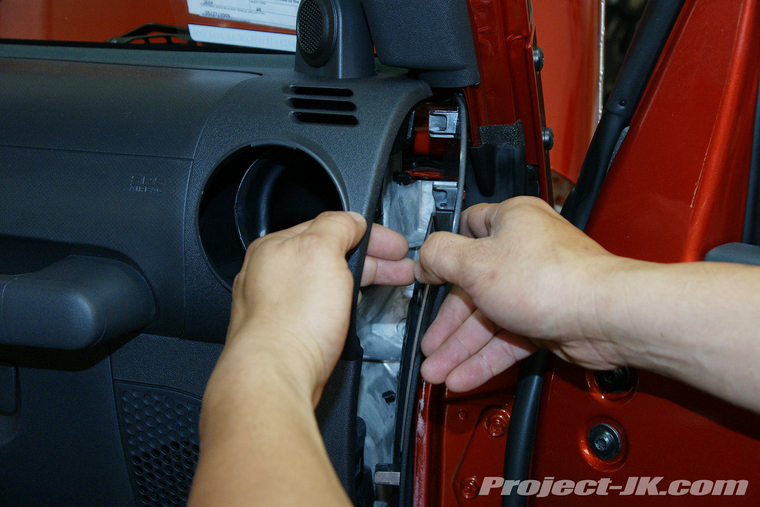
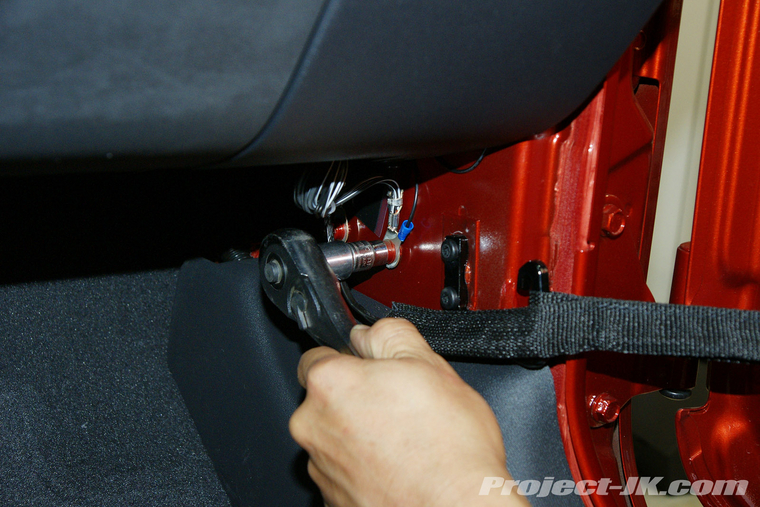
11. Reach through the air vent hole and push out the side panel of your dash as shown. Remove the panel and set it aside.
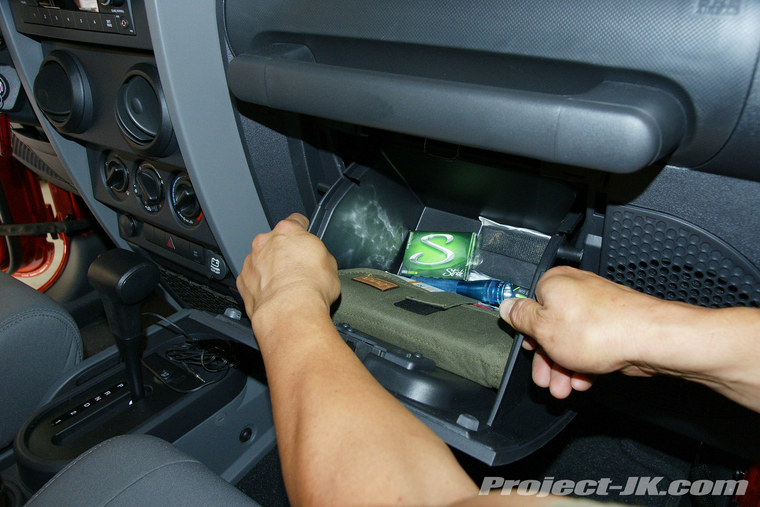
12. Open your glove box, press in the sides of it as shown and then remove it.
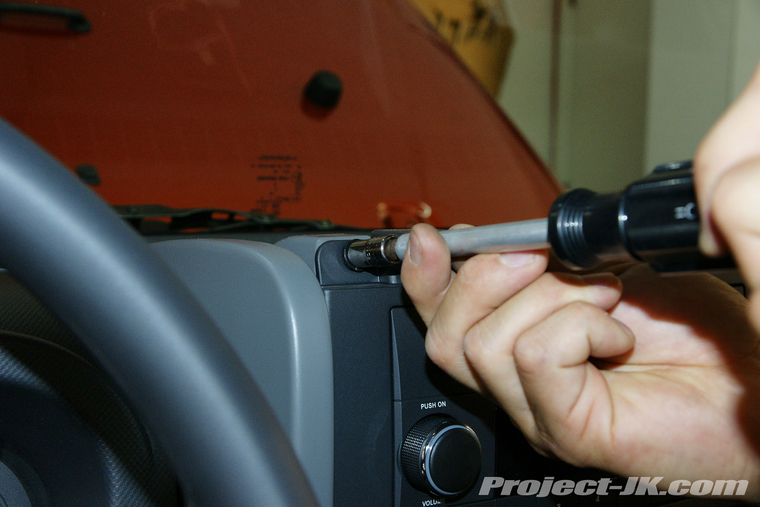
13. Using a 7mm socket or driver, remove the 2 screws located at the top of your center console face plate
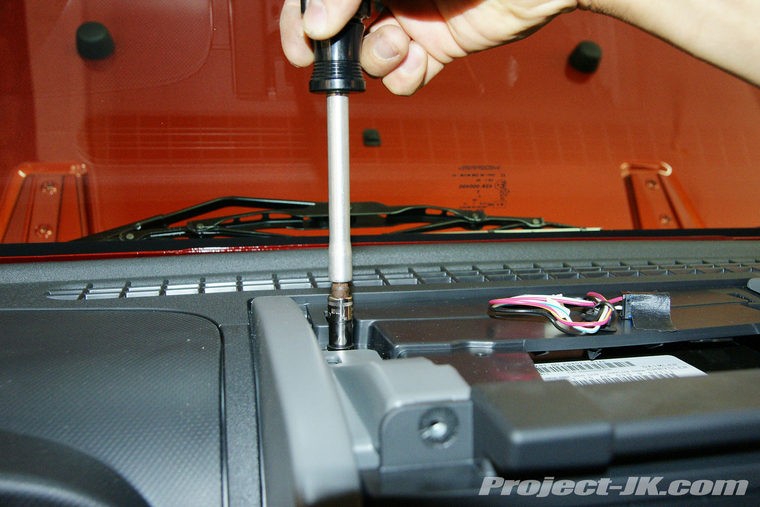
14. Using a 7mm socket or driver, remove the 2 screws located on top and at the back of your head unit.
15. As you did in step #10, remove the air vent baffles by rotating the outer ring and pulling it out as shown. Set the baffles aside.
16. Using a trim panel tool, pry off the lower face plate on your center console as shown.
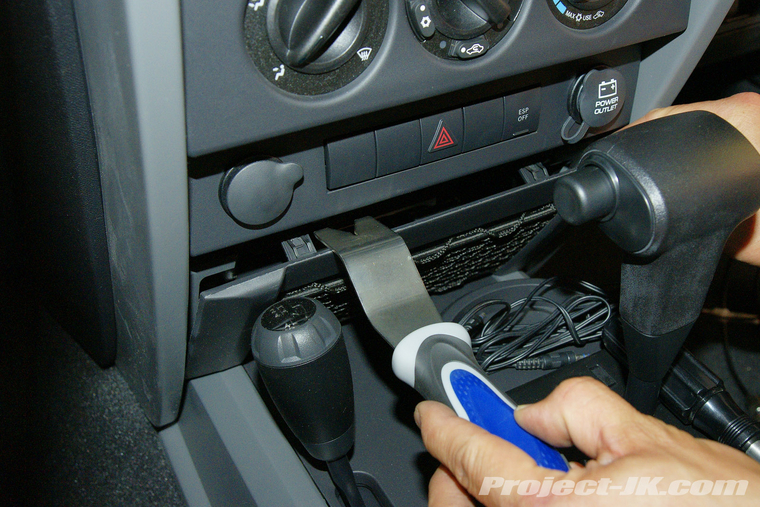
17. Using a 7mm socket or driver, remove the 2 screws located just below the accessories power sockets as shown.
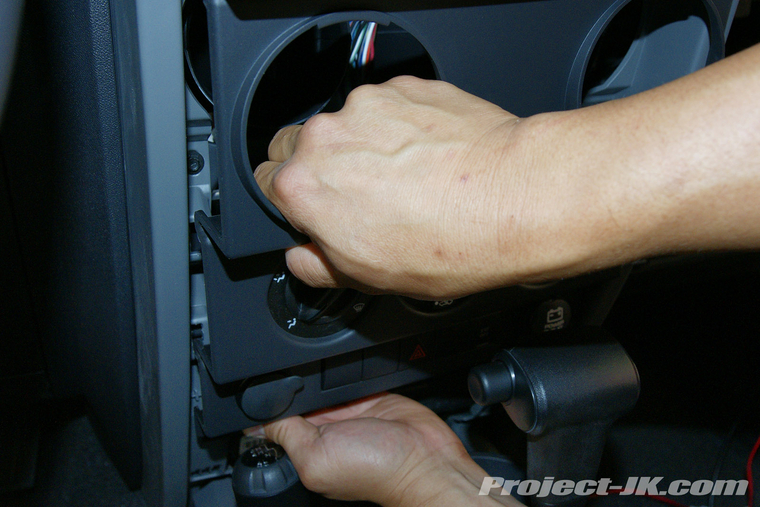
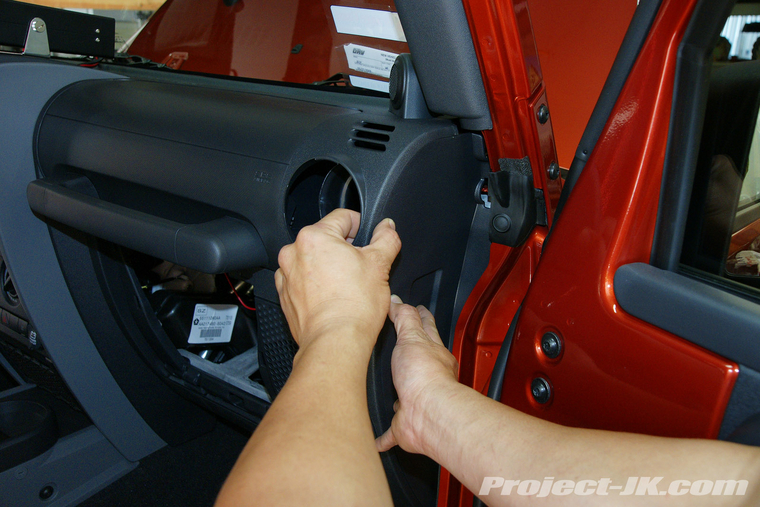
18. The center console face trim is held in place by trim tabs. Grab the top of it and carefully pull it forward to free it from the upper tabs.
19. Grab the center console face trim from the bottom and at the vent holes and pull forward to free it completely from the remaining trim tabs.
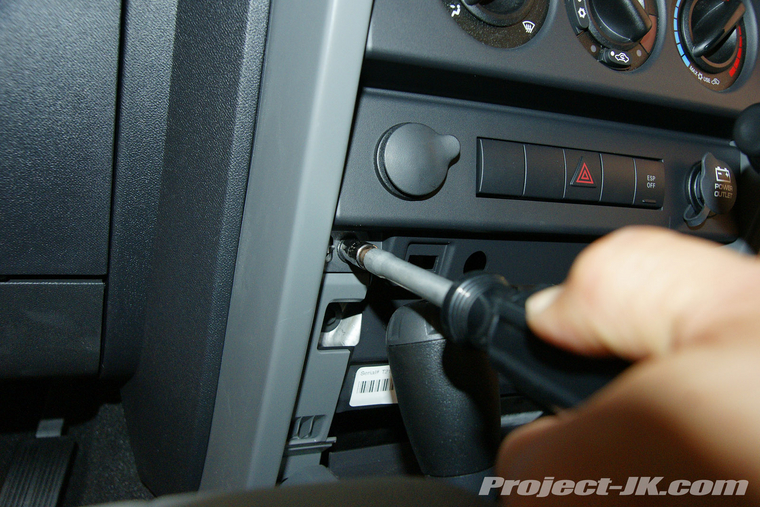
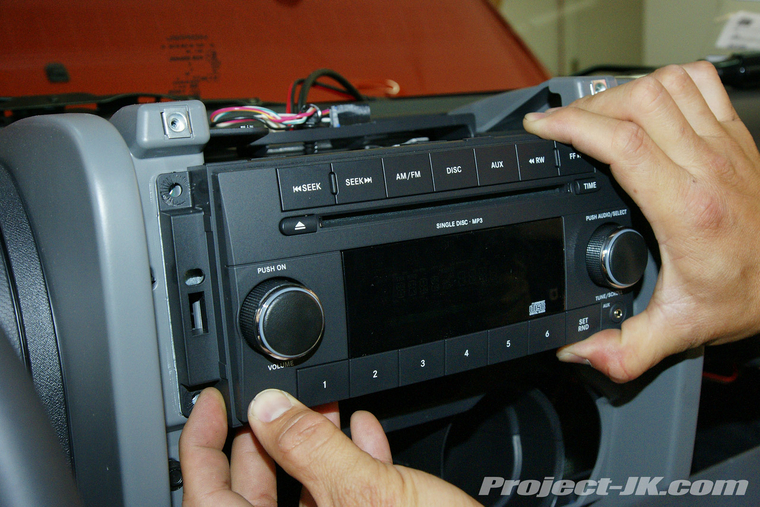
20. Using a 7mm socket or driver, remove the 4 screws securing the front of your head unit in place.
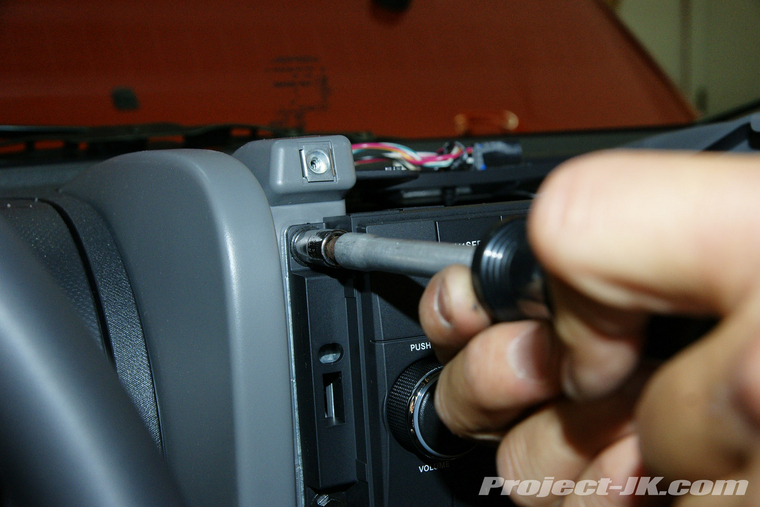
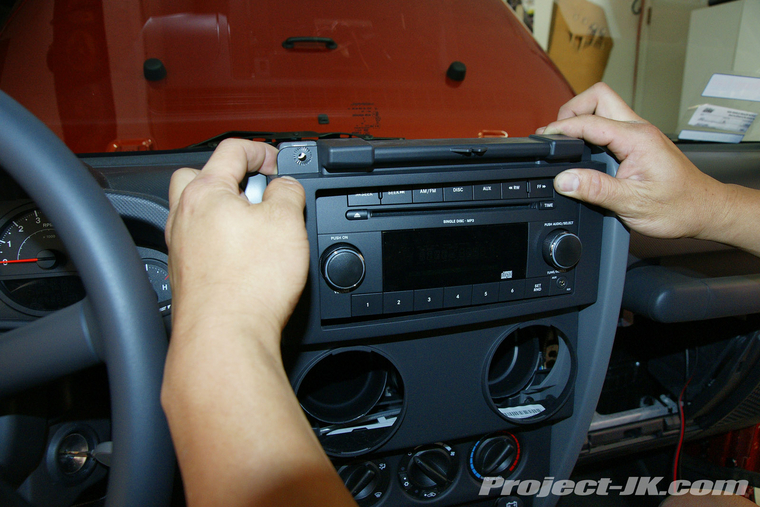
21. Grab the head unit and pull it forward a bit so that you can gain access behind it.
22. Take the power cord that came with your Cobra 29 and your CB antenna coax cable and route them behind the dash through the opening on the passenger side of Jeep as shown.
23. Route the power cord all the way to the center console and pull it up behind where the head unit is located.
24. Route the CB antenna coax cable all the way to the center console and pull it up behind where the head unit is located as well.
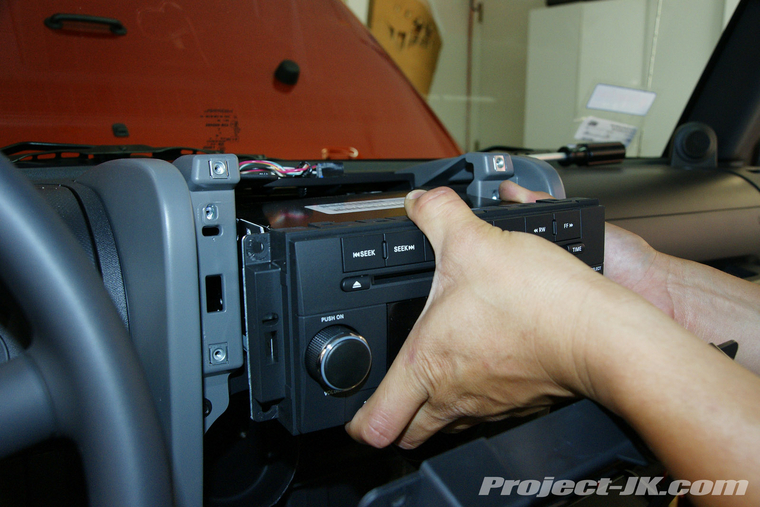
25. Push your head unit back in and secure it in place using the factory screws. A 7mm socket or driver will be needed for this job.
26. Carefully snap your center console face trim back in place and then secure it to the dash using the factory screws. A 7mm socket or driver will be needed for this job.
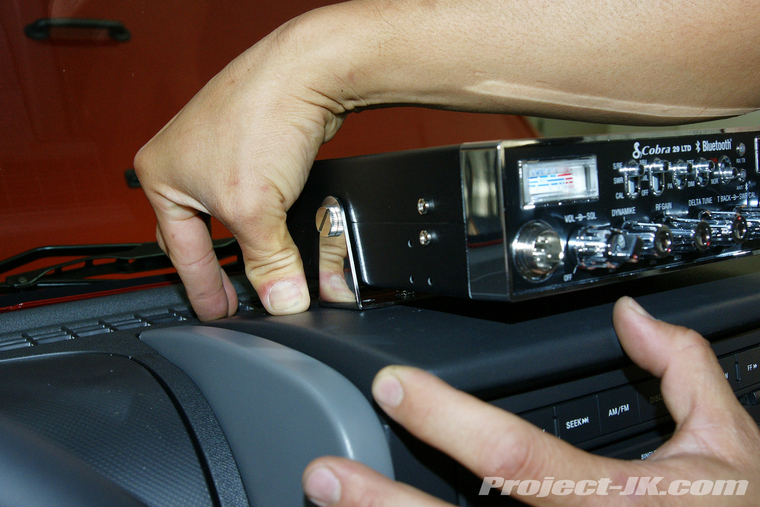
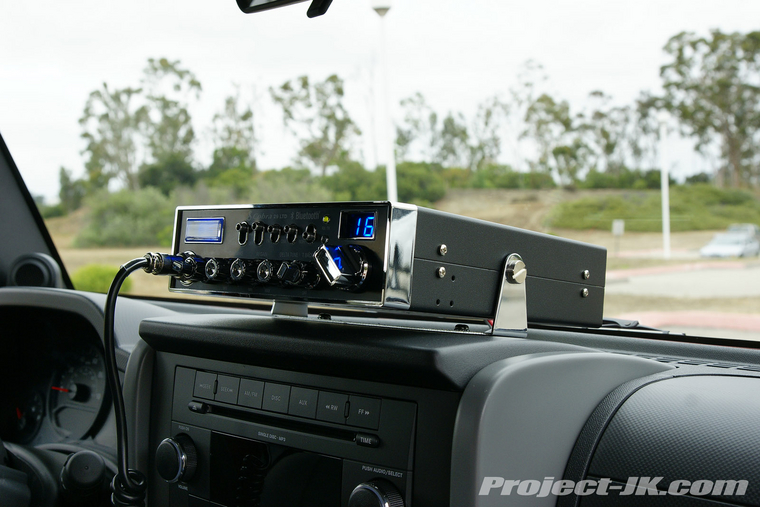
27. Place the center console top plate with Cobra 29 mounted on top of your dash but do not snap it in place just yet.
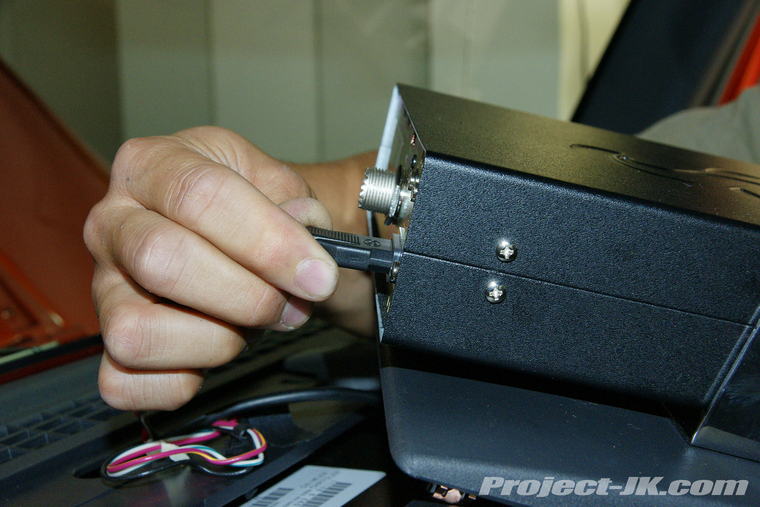
28. Plug in the power cord on to the back of the Cobra 29.
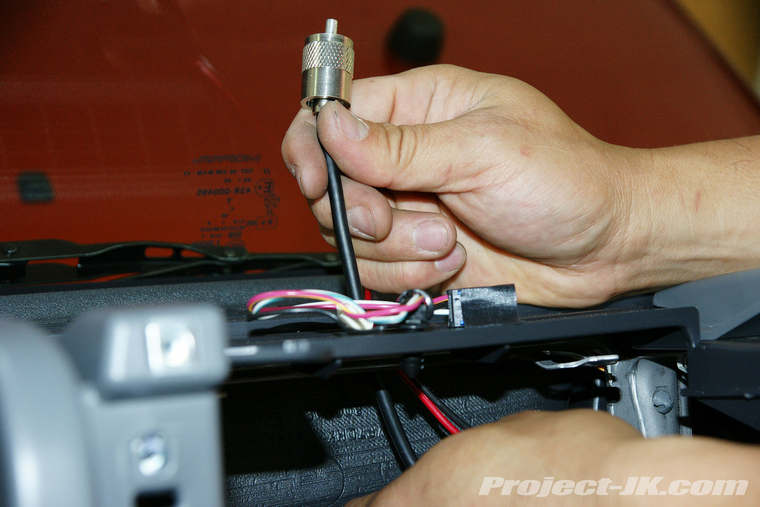
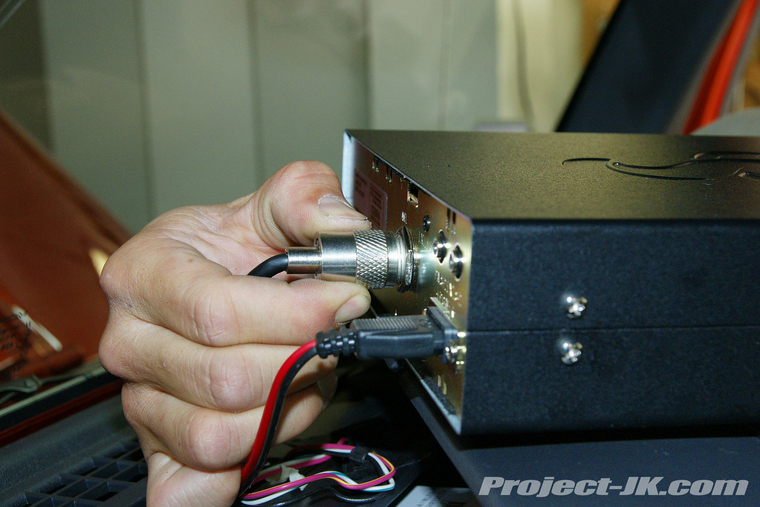
29. Secure the CB antenna coax cable to the back of the Cobra 29.
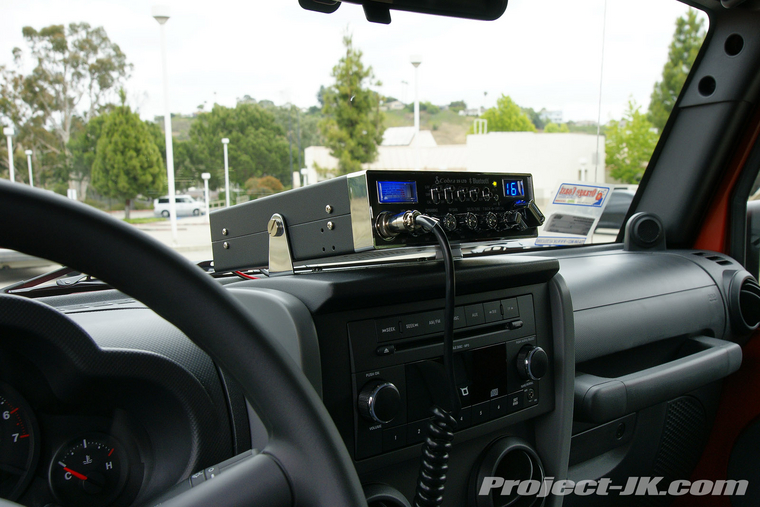
30. Making sure that both the power cord and coax cable are routing through the notch you made back in step #7, carefully snap the top plate in place as shown.
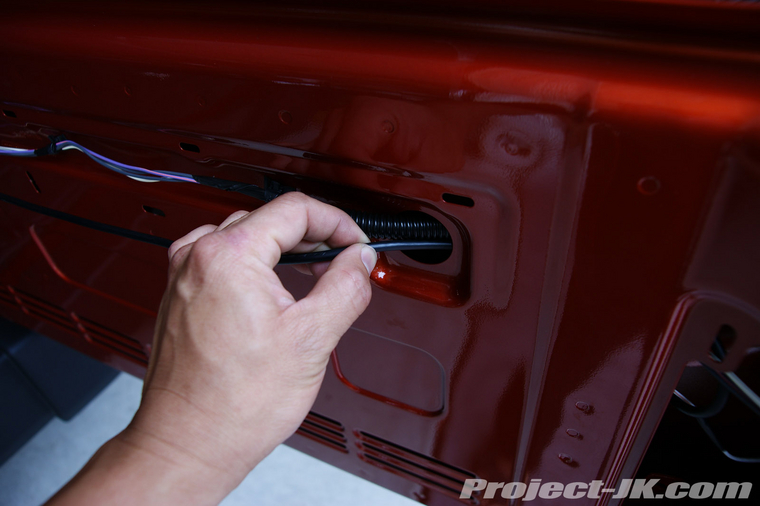
31. Push a straightened out wire coat hanger all the way through the foam filled hole located on your Jeep’s firewall next to the door jam as shown in this pic.
32. Take the wire coat hanger now sticking out from under the cowl and tape wire that you plan on using for power to the end of it as shown.
33. Back inside your Jeep, slowly pull the wire hanger back through the firewall hole until the wire come all the way through. Remove the tape and coat hanger.
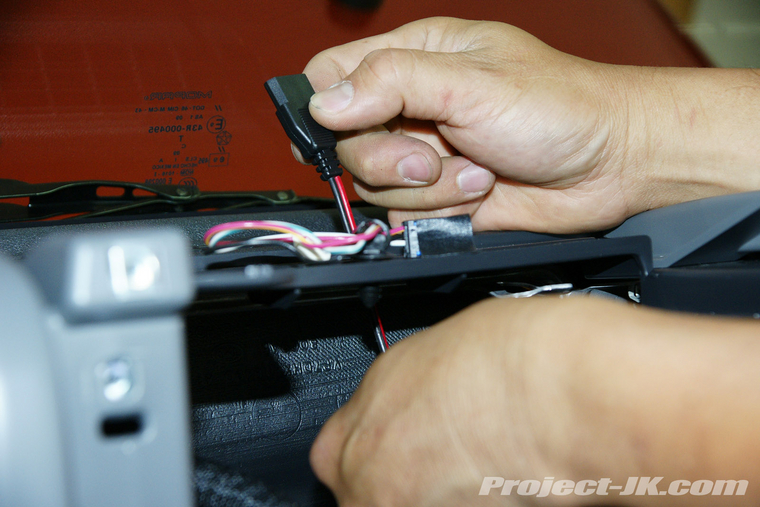
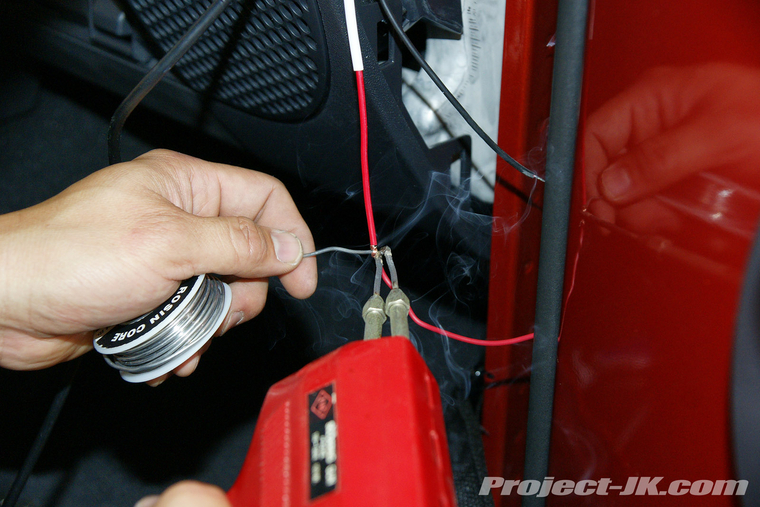
34. Using a soldering gun or solderless connector, attach the wire you just pulled through the fire wall onto the red wire of your Cobra 29 power cord.
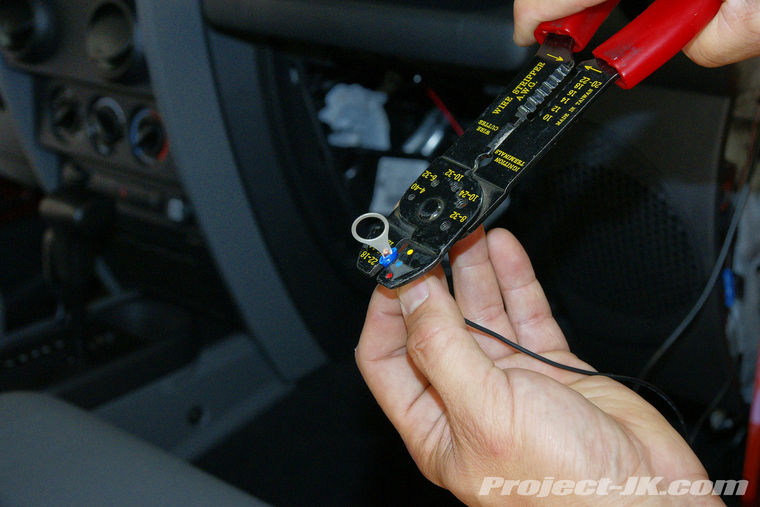
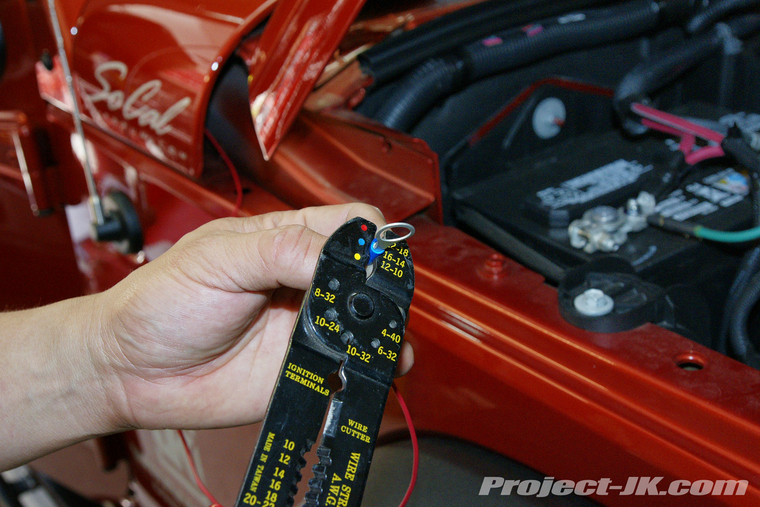
35. Attach a solderless ring connector to the black wire of your Cobra 29 power cord as shown.
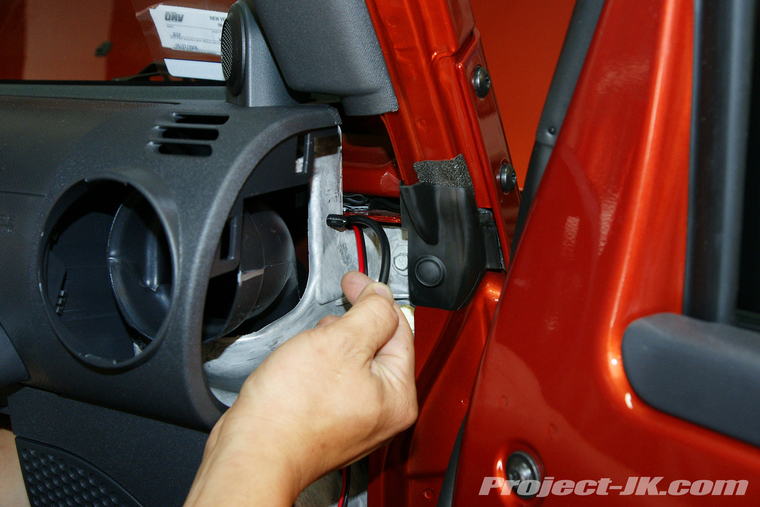
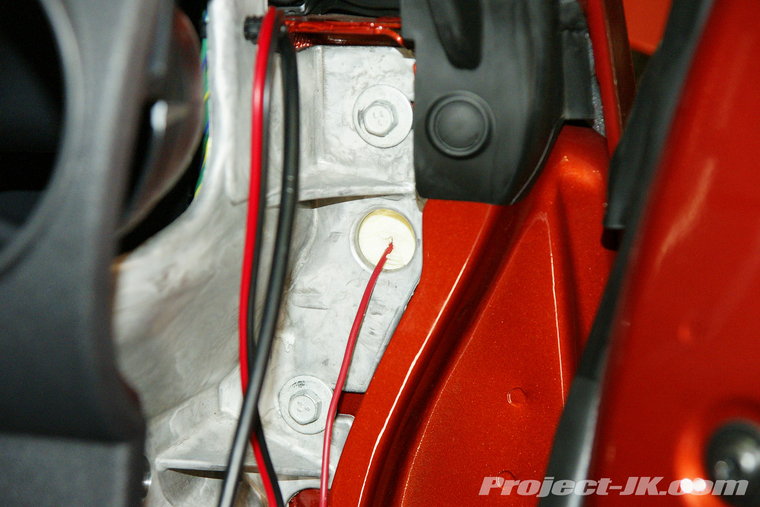
36. Using a 10mm socket, remove the ground nut located on the passenger side foot well of your Jeep and just under the speaker as shown. Attach the black ground wire with ring connector to the stud and secure it in place using the factory nut.
37. Reinstall the side panel of your dash as shown.
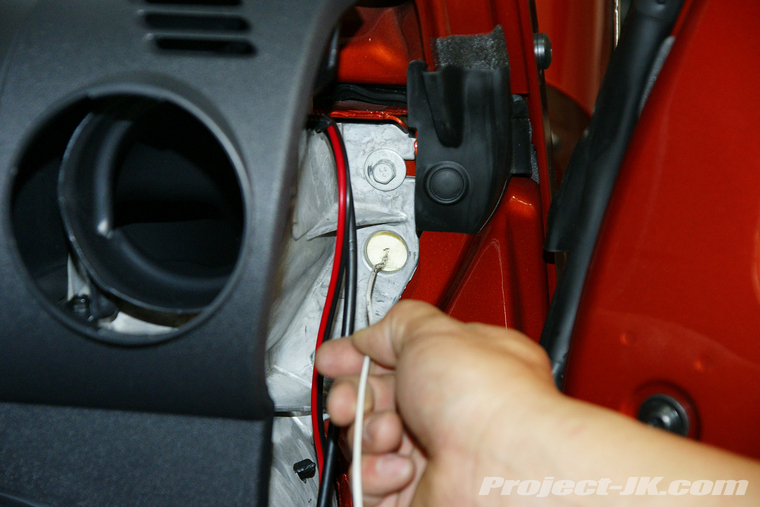
38. Back outside, attach a solderless ring connector to the red wire you had pulled through the firewall back in step #31-#33
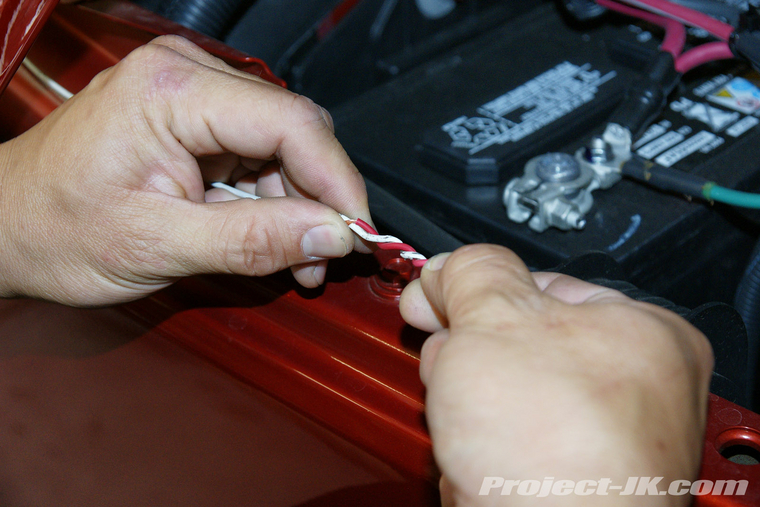
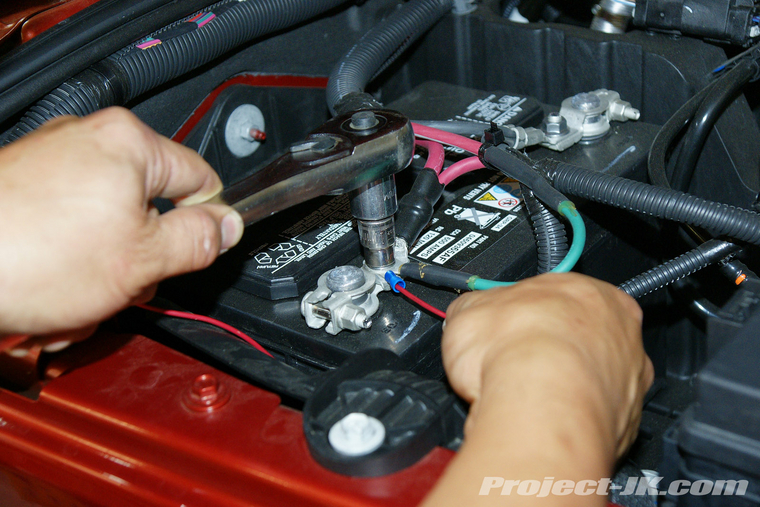
39. Using a 10mm socket remove the nut on top of the positive terminal on your battery, attach the red wire ring connector on to the stud and secure it back in place using the factory nut.
Coax Antenna Cable Installation
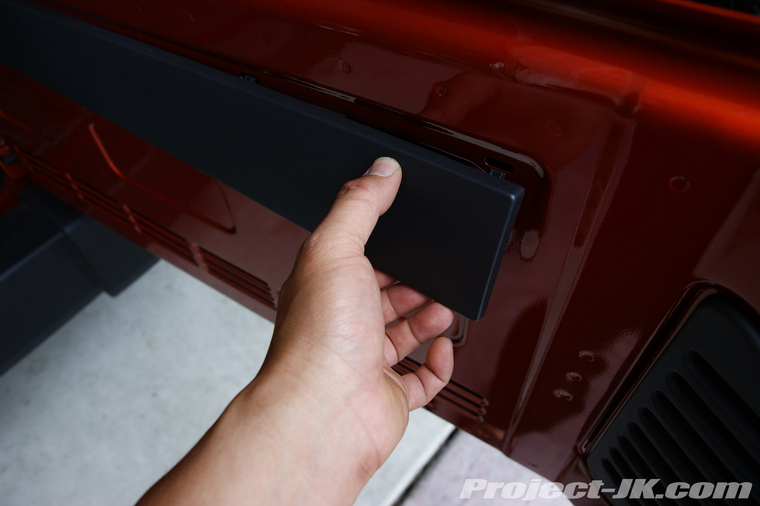
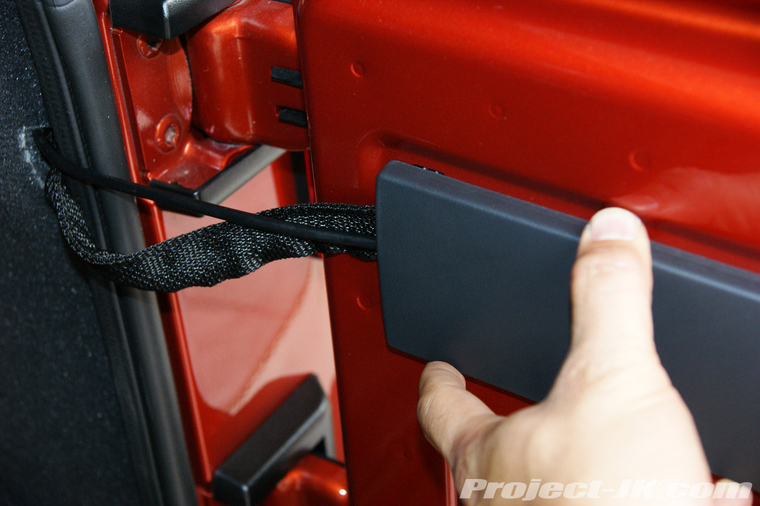
1. Using a trim panel tool, pry up the plastic trim running along the side of your Jeep JK Wrangler’s passenger side front door.
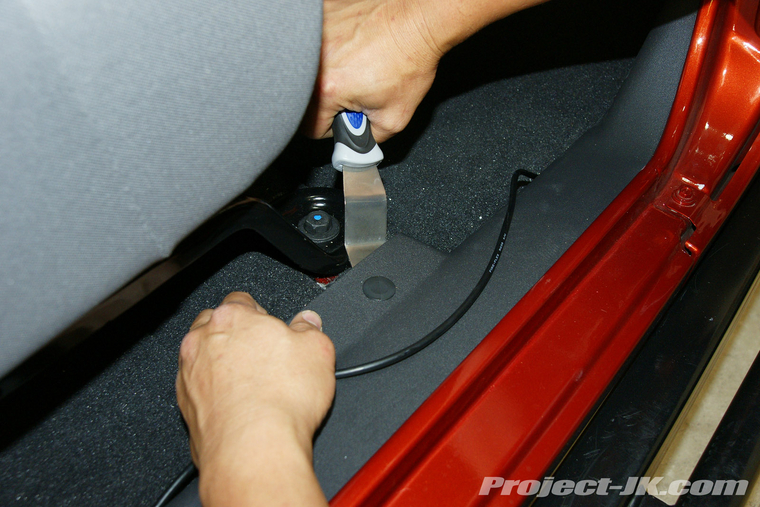
2. Run your CB antenna coax cable underneath the plastic trim as shown in this pic and then push the trim back in place.
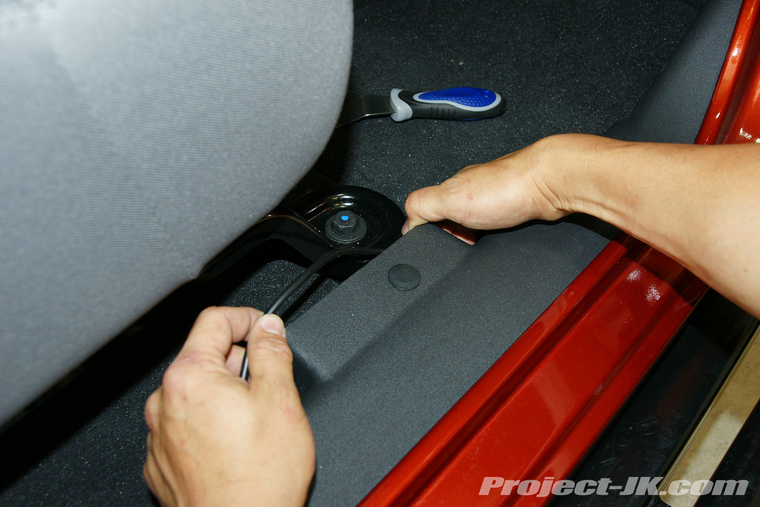
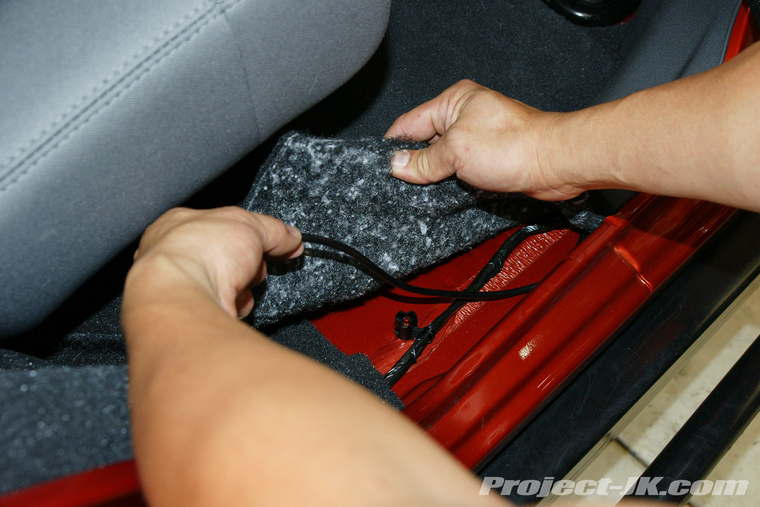
3. Continue to route the CB antenna coax cable towards the back of your Jeep and tuck it behind the plastic trim as you go. When you get to the rear door, there will be no more plastic trim so all you have to do is tuck the coax cable underneath the carpeting all the way to the back.
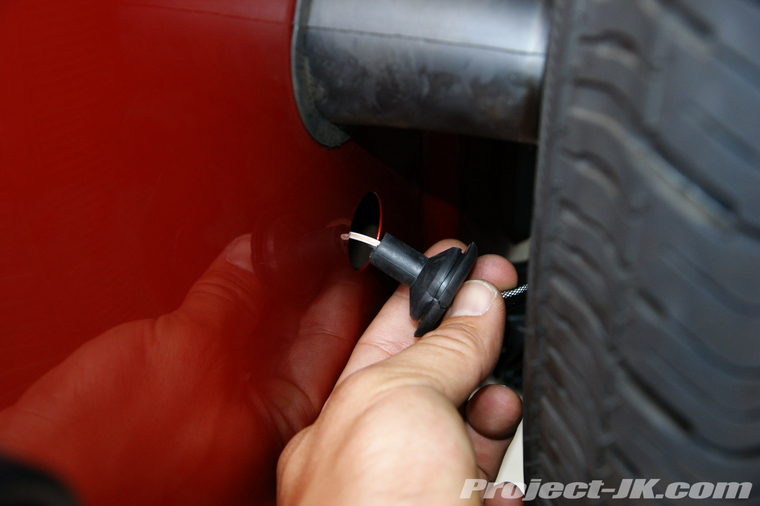
4. If you have a means to mount your CB antenna to the tailgate or tire carrier of your your Jeep, open up the tailgate and then carefully separate the tabs securing the top half of the plastic interior trim piece by pulling down on it as shown.
5. Carefully pry the tailgate vent grill from the left hand side as shown as this is the side where the trim tabs are located.
6. Route your CB antenna coax cable along the back of your Jeep’s tail gate so that it will be hidden once the plastic trim is reinstalled.
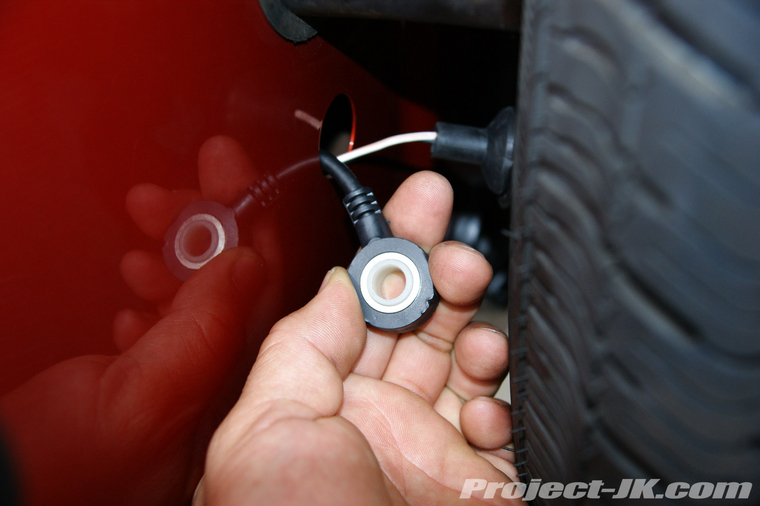
7. On the outside of your Jeep's tailgate, pull out the rubber grommet that has the 3rd brake light wiring harness going through it.
8. Pull your CB antenna coax cable through the hole in your Jeep’s tailgate and route it to your antenna mount.
9. Reinstall the plastic trim back onto the back of your tailgate.
10. Follow the instructions that came with your Cobra 29 and make sure tune your antenna before using it.
After Shots
That’s all there is to it. Your Jeep is now equipped with one of the best CB radios that I’ve ever used and something that every Jeeper should have in their Jeep.
In addition to coming complete with a PA and having adjustments for RF Gain, Delta Tune and Dynamic, the Cobra 29 LTD BT also features a built in SWR meter and Bluetooth system which allows you to sync it up your smart phone. As far as performance goes, this is definitely the single best CB radio that I’ve ever owned. It sounds great, it broadcasts to everyone else amazingly well and so far, I haven’t had any problems with it.
Because of it’s size, there really isn’t a whole lot of places that you can install a Cobra 29 in a 2007-10 Jeep JK Wrangler especially if you don’t have a sport cage installed. This write-up will show you how I installed mine on top of the dash over the center console.
What you will need
• 7,10mm Socket & Wrench
• Trim Panel Tool
• Flathead Screwdriver
• Phillips Head Screwdriver
• Ratchet
• 3" Ratchet Drive Extension
• 14 Gauge Red Insulated Wire
• 14 Gauge Black Insulated Wire
• Soldering Gun or Iron
• Solder & Flux
• Solderless Wire Connectors
• Solderless Ring Connector (LG)
• Solderless Connector Pliers
• Wire Cutters
• Dremel w/Cutting Bit
• XACTO Knife
• Tape
• Coat Hanger
• Ruler
• Pencil
Installation
This is a shot of everything that you will get with your Cobra 29 LTD BT CB Radio. The antenna coax cable you see on the left was purchased separately. I already had an extra Firestik II Antenna and so there was no need for me to purchase another.
1. The top plate on your center console is held in place by 2 trim tabs which are located near the windshield. Use a trim panel tool to pry the rear corners up and free and then remove the top plate. NOTE: If your Jeep JK Wrangler came equipped with a navigation compass, you will need to detach the compass sensor from the bottom of this top plate.
2. Loosely install the mounting bracket to the Cobra 29 using just the mounting screws.
3. Place the Cobra 29 on top of your center console top plate and using a ruler, position it so that it’s centered. NOTE: Again, if your Jeep JK Wrangler came equipped with a navigation compass, try to make sure that the speaker on the CB isn’t positioned directly over where the compass sensor is normally located. The magnet in the speaker will effect how the sensor works.
4. Once you have positioned your Cobra 29 to where you want it to be mounted, use a pencil to mark the mounts location as shown.
5. Remove the Cobra 29 from the mounting bracket. Then place the bracket back on top of your center console top plate, use it as a template and locate the points where you will secure it in place with screws.
6. Using the screws and spoked washers provided, secure the Cobra 29 mounting bracket to the top plate of your Jeep JK Wrangler’s center console top plate. A phillips head screwdriver will be needed for this job.
7. Using a Dremel with a cutting bit or an XACTO knife, notch out the back edge of the center console top plate (the side which sits closest to the windshield) so that both the power and antenna cables can be routed through it..
8. Place your Cobra 29 over the mounting bracket and slip the foam washers in between it and the bracket as shown.
9. Secure the Cobra 29 onto the mounting bracket using the mounting screws provided. A small coin like a penny or nickel will help you to tighten up the screws.
10. Open the passenger side door and remove the air vent baffles by rotating the outer ring and pulling it out as shown. Set the baffles aside.
11. Reach through the air vent hole and push out the side panel of your dash as shown. Remove the panel and set it aside.
12. Open your glove box, press in the sides of it as shown and then remove it.
13. Using a 7mm socket or driver, remove the 2 screws located at the top of your center console face plate
14. Using a 7mm socket or driver, remove the 2 screws located on top and at the back of your head unit.
15. As you did in step #10, remove the air vent baffles by rotating the outer ring and pulling it out as shown. Set the baffles aside.
16. Using a trim panel tool, pry off the lower face plate on your center console as shown.
17. Using a 7mm socket or driver, remove the 2 screws located just below the accessories power sockets as shown.
18. The center console face trim is held in place by trim tabs. Grab the top of it and carefully pull it forward to free it from the upper tabs.
19. Grab the center console face trim from the bottom and at the vent holes and pull forward to free it completely from the remaining trim tabs.
20. Using a 7mm socket or driver, remove the 4 screws securing the front of your head unit in place.
21. Grab the head unit and pull it forward a bit so that you can gain access behind it.
22. Take the power cord that came with your Cobra 29 and your CB antenna coax cable and route them behind the dash through the opening on the passenger side of Jeep as shown.
23. Route the power cord all the way to the center console and pull it up behind where the head unit is located.
24. Route the CB antenna coax cable all the way to the center console and pull it up behind where the head unit is located as well.
25. Push your head unit back in and secure it in place using the factory screws. A 7mm socket or driver will be needed for this job.
26. Carefully snap your center console face trim back in place and then secure it to the dash using the factory screws. A 7mm socket or driver will be needed for this job.
27. Place the center console top plate with Cobra 29 mounted on top of your dash but do not snap it in place just yet.
28. Plug in the power cord on to the back of the Cobra 29.
29. Secure the CB antenna coax cable to the back of the Cobra 29.
30. Making sure that both the power cord and coax cable are routing through the notch you made back in step #7, carefully snap the top plate in place as shown.
31. Push a straightened out wire coat hanger all the way through the foam filled hole located on your Jeep’s firewall next to the door jam as shown in this pic.
32. Take the wire coat hanger now sticking out from under the cowl and tape wire that you plan on using for power to the end of it as shown.
33. Back inside your Jeep, slowly pull the wire hanger back through the firewall hole until the wire come all the way through. Remove the tape and coat hanger.
34. Using a soldering gun or solderless connector, attach the wire you just pulled through the fire wall onto the red wire of your Cobra 29 power cord.
35. Attach a solderless ring connector to the black wire of your Cobra 29 power cord as shown.
36. Using a 10mm socket, remove the ground nut located on the passenger side foot well of your Jeep and just under the speaker as shown. Attach the black ground wire with ring connector to the stud and secure it in place using the factory nut.
37. Reinstall the side panel of your dash as shown.
38. Back outside, attach a solderless ring connector to the red wire you had pulled through the firewall back in step #31-#33
39. Using a 10mm socket remove the nut on top of the positive terminal on your battery, attach the red wire ring connector on to the stud and secure it back in place using the factory nut.
Coax Antenna Cable Installation
1. Using a trim panel tool, pry up the plastic trim running along the side of your Jeep JK Wrangler’s passenger side front door.
2. Run your CB antenna coax cable underneath the plastic trim as shown in this pic and then push the trim back in place.
3. Continue to route the CB antenna coax cable towards the back of your Jeep and tuck it behind the plastic trim as you go. When you get to the rear door, there will be no more plastic trim so all you have to do is tuck the coax cable underneath the carpeting all the way to the back.
4. If you have a means to mount your CB antenna to the tailgate or tire carrier of your your Jeep, open up the tailgate and then carefully separate the tabs securing the top half of the plastic interior trim piece by pulling down on it as shown.
5. Carefully pry the tailgate vent grill from the left hand side as shown as this is the side where the trim tabs are located.
6. Route your CB antenna coax cable along the back of your Jeep’s tail gate so that it will be hidden once the plastic trim is reinstalled.
7. On the outside of your Jeep's tailgate, pull out the rubber grommet that has the 3rd brake light wiring harness going through it.
8. Pull your CB antenna coax cable through the hole in your Jeep’s tailgate and route it to your antenna mount.
9. Reinstall the plastic trim back onto the back of your tailgate.
10. Follow the instructions that came with your Cobra 29 and make sure tune your antenna before using it.
After Shots
That’s all there is to it. Your Jeep is now equipped with one of the best CB radios that I’ve ever used and something that every Jeeper should have in their Jeep.

