Rock Hard 4x4 JK Sport Cage Installation Write-Up

M_Savage

Caught the Bug
Test fit done(ish) ;)

I need to pull the hardtop to finish the upper bars and rear, but it looks good enough for me to trust having it painted. I also need to drill the holes in the door frame, but that shouldn't take long.

IMG_20141223_111029518_HDR.jpg


is it just me or is the upper crossbar suppose to go the other way; with the bends facing to the front of the jeep?
 

jman_12

New member
Can this be installed on a 2 door fairly easy? I just wondered if the rear sections would work also lol
 
I've been meaning to add these... I wasn't able to find anything to give me a warm fuzzy on the cut that is needed on the dash so I thought I would add these to help others.

I will add that when researching the install, it seems some have been able to install this cage without cutting the dash. In my case, the dash puckered up and new A-pillars didn't fit right without it. I called Rockhard to confirm the cut and they said it was in fact needed yet only offered a verbal description of the needed cut. This really isn't that hard to figure out, but I would've liked this picture when I was test fitting to verify what I thought was needed.

In this picture you might be able to see the pencl mark (green circle) where I needed to start the cut/notch. Note: I later also ground down the dash support a bit (circled in red) to allow the side to fit more inside the dash.

IMG_20141222_175515644_mark.jpg


Here is the cut from the side, before I cleaned it up with a file.

IMG_20141223_094519879.jpg


Same cut and after a little filing.

IMG_20141223_094446333.jpg


I used a good (new) razor knife. (the kind that has the notches to break off for a sharp tip) I took my time and it worked very well... Anyway I hope this helps someone.
 

Chili

New member
I wanted to offer my sincerest thanks to the author of this thread, as well as to the many subsequent contributors since the original post. This thread was a better resource than the instructions that were included with the cage! Thanks again! :thumb:

 
I like this sports cage. Where can I find the best price on this ?

Google.... :thinking:

I got mine from Northridge. The discount and more importantly the free shipping made the difference. I am purchasing a second from Rockhard directly because it has some special things being done.
 

big dr

New member
I just did mine 2 days ago. Level of difficulty is hard to say. You have to remember, Rock Hard has a template they make these things from. Welding can warp metal, and believe it or not,, Our Jeeps are not perfectly square, so each install is just a tiny bit different. My passenger side went in like butter. My drivers side was a pain in the ass. If you do all the things suggested in this thread ( re tap all holes, place gorilla tape over dash to prevent scratching, pre install prior to paint/powder) it will make the install easier. I would rate the difficulty of my install as a 3-4. There was no major issue I couldn't work through, and it only took me about 4 hours. I installed on tues,, then took it out for powder on wednesday. You can only hope everything works out for your particular install. Take special care in drilling the door jam holes! If you mess up on that I can see the difficulty going up a few notches.
 

mackey

Member
I just did mine 2 days ago. Level of difficulty is hard to say. You have to remember, Rock Hard has a template they make these things from. Welding can warp metal, and believe it or not,, Our Jeeps are not perfectly square, so each install is just a tiny bit different. My passenger side went in like butter. My drivers side was a pain in the ass. If you do all the things suggested in this thread ( re tap all holes, place gorilla tape over dash to prevent scratching, pre install prior to paint/powder) it will make the install easier. I would rate the difficulty of my install as a 3-4. There was no major issue I couldn't work through, and it only took me about 4 hours. I installed on tues,, then took it out for powder on wednesday. You can only hope everything works out for your particular install. Take special care in drilling the door jam holes! If you mess up on that I can see the difficulty going up a few notches.

Thanks for the feedback.
 

colo dean

Member
Just got my cage and started the install. Have spent about 5 hrs and am not making progress. I will be calling them on Monday but maybe someone here can help. I used hints from here as well as the supplied limited directions.

Started on the drivers side. Removed everything inside that was called out. Trial fit and trimmed the dash and a small amount of metal on the dash support that was hitting the plate. Reinstalled and marked the holes with the plate attached at the top. Measured a few times and finally drilled some the holes. This is where things started going down hill. I made sure the template was lined up straight prior to drilling. Re installed the plate and found that the plate sits at a slight angle and the holes were off a bit. No problem, drilled out two of the holes a bit and was able to get all three bolts started along with the two top bolts. The bigger problem is there is a large, I say large, (1/8" or so) gap between the dash towards the bottom and the plate. This wont allow the door to close without hitting the plate. I did received 2 thick and 1 thin shims in the hardware kit. I have no idea how you would shim the top or middle hole just due to lack of access but I was able to use the largest shim in the bottom hole. This seemed to twist the plate and almost increase the gap rather than moving it over to be able to clear the door. It's almost like the plate needs to be bent in at the bottom to tuck in closer to being flush with the side of the dash.

I'm pretty mechanically inclined but I'm kind of at my wits end trying to figure out how this is supposed to work. A couple bottles of mind relaxer and I still didn't have any good ideas. Anyone here able to shed some light on how to go about installing this cage and maybe have some pics of the side of the dash towards the bottom. Almost forgot, 2014 2 door.
 

JES

Member
If I remember correctly when I installed mine the dash bar when tightened down did have an affect with a slight drawing in / twisting of the vertical bars. Although I didn't have to use the shims provided. Mine went in pretty straight forward with zero trimming other than the upper windshield trim and relocation of the hands free mic.
 

CCTX50

Member
Rock Hard is supposed to be doing an install video that should be out this week. I have had my cage now for over a month and still have not installed it. Waiting on this video to come out.

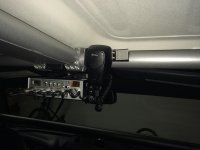
Where is everyone relocating their hands free mic?
 

10frank9

Web Wheeler
I used this Velcro aluminum block with the mic hanger on the top bar. Keeps it up out of the way. I used a KC light mount to attach the CB. ImageUploadedByWAYALIFE1421632041.912193.jpg

Edit:

Looks like I misunderstood. The Bluetooth mic is in almost the same spot. I'll post a photo in a few.
 
Last edited:
Top Bottom