The build/re-build of Gruff

benatc1

Hooked
That's next, kind of. I had to remove all my wiring to my A pillar switches because they wouldn't clear the Cage. I still have to install my SwitchPro, and reconnect everything. It took me a while to do the Cage. Just lots of steps. Like cutting the soft top positioners on each side. I tried using a hack saw. Finally said fuck it and whipped out the Dremel. Chasing the threads took a lot of time. The amount of metal crud I cleaned out told me it was worth it. RH must have used their old taps on my threads. I also had to remove my overhead Tuffy CB mount and the radio. Eddies suggestion to use the KC HiLites mount is genius! This is perfect. It was two weekends for everything. I did the rear overhead plate plus the B Piller brace with the front belt connections and the rear seat belt bar. I figured this would brace the rear factory cage bars. I didn't get the C pillar brace. This would be another weekend I think. Not sure if I'll do this or not, IDK.


Sent from my iPhone using WAYALIFE mobile app

I used the Kc clamp for both CB and switch pros panel, worked great for both


Sent from my iPhone using WAYALIFE mobile app
 

Ddays

Hooked
That's next, kind of. I had to remove all my wiring to my A pillar switches because they wouldn't clear the Cage. I still have to install my SwitchPro, and reconnect everything. It took me a while to do the Cage. Just lots of steps. Like cutting the soft top positioners on each side. I tried using a hack saw. Finally said fuck it and whipped out the Dremel. Chasing the threads took a lot of time. The amount of metal crud I cleaned out told me it was worth it. RH must have used their old taps on my threads. I also had to remove my overhead Tuffy CB mount and the radio. Eddies suggestion to use the KC HiLites mount is genius! This is perfect. It was two weekends for everything. I did the rear overhead plate plus the B Piller brace with the front belt connections and the rear seat belt bar. I figured this would brace the rear factory cage bars. I didn't get the C pillar brace. This would be another weekend I think. Not sure if I'll do this or not, IDK.Sent from my iPhone using WAYALIFE mobile app


I used the Kc clamp for both CB and switch pros panel, worked great for both Sent from my iPhone using WAYALIFE mobile app
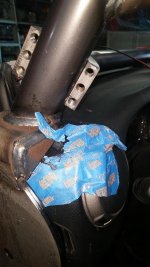
Thanks for the heads up on that - KC clamp ordered!

By the way, I think camo paint would be cool for your cage! Ha!

Haha. I'm sure all the rednecks by me would approve!
 

Ddays

Hooked
Rock Hard cage install

Well, yesterday was supposed to be install day but plans got switched around. Started early this AM & got started with the pre-fit.

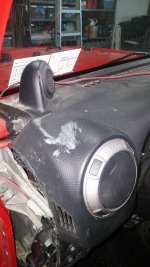
I gotta tell ya, when I tried to get the first side support piece in the instructions say twist a little and it drops in. Uh-huh. Not on mine. I thought I got a screwed up piece it was off so bad. So I had Eddies instructions on my laptop that I was following but I had to go to Rock Hards' youtube install video. It wasnt much help either because their piece dropped right in. I'm calling bullshit on that. These do not drop right in. You have to really muscle it into place and in doing so, be prepared to scratch up your dash.

1.jpg

2.jpg

Honestly, its not a big deal and I'm not really upset at all, just know going in that you MAY have to really wrestle these pieces into place. The scratches get covered up pretty much so, meh.

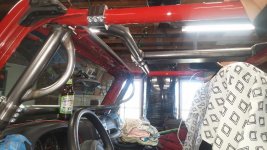
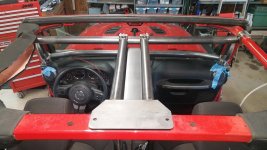
Dry fit all done!

3.jpg

4.jpg
 

scull20

New member
Well, yesterday was supposed to be install day but plans got switched around. Started early this AM & got started with the pre-fit.

I gotta tell ya, when I tried to get the first side support piece in the instructions say twist a little and it drops in. Uh-huh. Not on mine. I thought I got a screwed up piece it was off so bad. So I had Eddies instructions on my laptop that I was following but I had to go to Rock Hards' youtube install video. It wasnt much help either because their piece dropped right in. I'm calling bullshit on that. These do not drop right in. You have to really muscle it into place and in doing so, be prepared to scratch up your dash.

View attachment 245945

View attachment 245946

Honestly, its not a big deal and I'm not really upset at all, just know going in that you MAY have to really wrestle these pieces into place. The scratches get covered up pretty much so, meh.

Dry fit all done!

View attachment 245947

View attachment 245948

Looking good...a little bit of Rausch water and a rag, shit'll buff right out.
 

Ddays

Hooked
Paint time

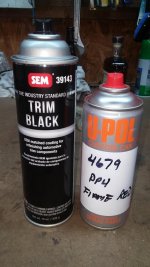
I went to a local body shop supply and got a couple rattle cans made to match my Flame Red. Give them the paint code and they mix them up right there. Pretty cool. Pricey ($22 per can) but cheaper than powdercoat. For the dash bar I used this SEM trim paint. This is what I used an all my armor, sliders, etc. It's an eggshell finish and it blends in perfectly when you do touch-ups.

5.jpg

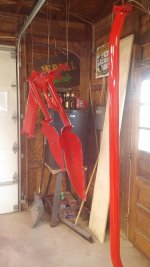
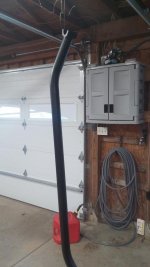
Painted and drying now.


6.jpg

7.jpg
 

benatc1

Hooked
Looking good man! I had to wrestle a lot too but oddly the passenger side took all I had, so I wasn't to excited when I got to the drivers side but that one fell right in. Best part is you get to do it all over again when it's finished!!


Sent from my iPhone using WAYALIFE mobile app
 

black pearl

Hooked
I went to a local body shop supply and got a couple rattle cans made to match my Flame Red. Give them the paint code and they mix them up right there. Pretty cool. Pricey ($22 per can) but cheaper than powdercoat. For the dash bar I used this SEM trim paint. This is what I used an all my armor, sliders, etc. It's an eggshell finish and it blends in perfectly when you do touch-ups.

View attachment 245949

Painted and drying now.


View attachment 245950

View attachment 245951

Looks good [emoji1303]


Sent from my iPhone using WAYALIFE mobile app
 

Ddays

Hooked
Looking good man! I had to wrestle a lot too but oddly the passenger side took all I had, so I wasn't to excited when I got to the drivers side but that one fell right in. Best part is you get to do it all over again when it's finished!!


Sent from my iPhone using WAYALIFE mobile app
Precision pieces of machinery these things aren't! Yeah, I hope I don't scratch it up too bad putting it back in tomorrow. Oh well. I'm not sweating it too much.
 

Coop

Caught the Bug
Precision pieces of machinery these things aren't! Yeah, I hope I don't scratch it up too bad putting it back in tomorrow. Oh well. I'm not sweating it too much.

Hopefully yours doesn't pull to the front like mine did. The template is right on the bolt holes so sighting that in is critical. This is done blind. Drivers side was better than passenger. Paint looks good!


Sent from my iPhone using WAYALIFE mobile app
 

notnalc68

That dude from Mississippi
I went to a local body shop supply and got a couple rattle cans made to match my Flame Red. Give them the paint code and they mix them up right there. Pretty cool. Pricey ($22 per can) but cheaper than powdercoat. For the dash bar I used this SEM trim paint. This is what I used an all my armor, sliders, etc. It's an eggshell finish and it blends in perfectly when you do touch-ups.

View attachment 245949

Painted and drying now.


View attachment 245950

View attachment 245951

That looks good. I think it will look great in your Jeep! [emoji1303]


Sent from my iPhone using WAYALIFE mobile app
 

Ddays

Hooked
Hopefully yours doesn't pull to the front like mine did. The template is right on the bolt holes so sighting that in is critical. This is done blind. Drivers side was better than passenger. Paint looks good!Sent from my iPhone using WAYALIFE mobile app
Yep. it did some. I had to re-drill two of the damn holes bigger. I used a centerpunch but I had one hole right on the edge of a spotweld and kinda figured that was gonna happen. The other one I don't know what the hell I did. I must have shiftd. Once you start tightening those collars down you hear all kinds of creaking! :crazyeyes:

That looks good. I think it will look great in your Jeep! [emoji1303]Sent from my iPhone using WAYALIFE mobile app

Thanks! Paint came out ok. Not concours quality but for an end of February job I can live with it!

Sweet. Looking forward to seeing it installed.

Thanks - hopefully tomorrow! You ever think of one of these? I should have done this a long time ago. I'm gonna add the rear center bar sometime this year.
 

scull20

New member
A quick note on the body shop rattle cans...if they don't ask you, go for a two stage can that has the basecoat and clearcoat mixed together in the can. Versus single stage which is just basecoat.
 

cozdude

Guy with a Red 2-Door
Jerry I have found that some armor all cleans up the scratches really well and brings the black back to the plastic. You will not even notice they are scratched. I just douches a microfiber cloth in some and smeared it in lol
 

Ddays

Hooked
A quick note on the body shop rattle cans...if they don't ask you, go for a two stage can that has the basecoat and clearcoat mixed together in the can. Versus single stage which is just basecoat.

I was going to do the two stage but ended up going with the regular paint. If it was an exterior piece I would have definitely tried that out. Figured with the cage it'll be covered up most of the time. Have you used it before? Whats the process? Just spray normally?

Jerry I have found that some armor all cleans up the scratches really well and brings the black back to the plastic. You will not even notice they are scratched. I just douches a microfiber cloth in some and smeared it in lol

Yeah, I think that's what I'll do. Honestly its not a big deal because it gets mostly covered up. I was more concerned that I wasn't installing those side supports the right way. I really had to shove them in place. I'm in the process of actually cleaning the interior this week so that'll be on the list.

I can't believe I haven't cleaned my interior since we left for Moab last July. Holy Hell. I found my missing pocket knife, some bolts, crackers, basically all kinds of shit under the seats. icon_crazy:
 
Top Bottom