10abadilla/jk
New member
Awesome! Did you buy the seal tool or did you make one?
Sent from my LG-H900 using WAYALIFE mobile app
Awesome! Did you buy the seal tool or did you make one?


I have open diffs not a locker. But I believe you pull the plug on the e locker plug and then yes just pull it out But be sure to keep track of shims on each side and put it back the same way it came out.Gonna use the old seals and a pipe.
View attachment 265951View attachment 265952
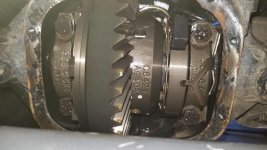
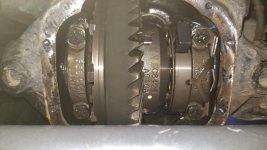
Heres my Differential, is it just take it out and put it back in???
Need help!!
Sent from my SM-G950U using WAYALIFE mobile app
Are tbose 4 bolts in tbe picture tbe ring gear bolts? And if so is the proper torque 100ftlbs?
Sent from my SM-G950U using WAYALIFE mobile app

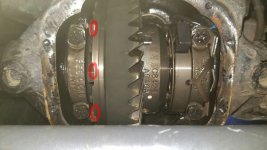
What i did is took those caps, the u shaped ones with 2 bolts on each side facing front off and kept there orientation. I then pulled the carrier and locker, pounded the seals out, cleaned it all up then put the carrier and locker back id. On the left side as you look at it:Those 4 bolts are the carrier bearing cap bolts and I'm pretty confident that the torque is 80 ft lbs, but verify this yourself. I colored the ring gear bolts in the picture below. To pull the carrier out, the ring gear bolts do not need to be removed.
View attachment 265991
When you pull that carrier, mark the caps first. They MUST go back in the same spot and in the same orientation. What I like to do is loosen the bolts to where they are almost out but have a few threads holding them on. Then use a prybar to pull the carrier out. It's heavy and the caps will keep it from falling on you. Once it's loose, remove the caps the rest of the way. Then as you pull the carrier out, you must keep the shims in the same spots. Be organized with this.
The gear facing the front is the carrier and that doesn't need to go back in exactly the way it came out just the caps and shims right? See the numbers and white dot?Those 4 bolts are the carrier bearing cap bolts and I'm pretty confident that the torque is 80 ft lbs, but verify this yourself. I colored the ring gear bolts in the picture below. To pull the carrier out, the ring gear bolts do not need to be removed.
View attachment 265991
When you pull that carrier, mark the caps first. They MUST go back in the same spot and in the same orientation. What I like to do is loosen the bolts to where they are almost out but have a few threads holding them on. Then use a prybar to pull the carrier out. It's heavy and the caps will keep it from falling on you. Once it's loose, remove the caps the rest of the way. Then as you pull the carrier out, you must keep the shims in the same spots. Be organized with this.
Correct, the shims are what set your bearing preload and align your gears so you want those to be right. The carrier can only go in one way and the rotation does not matter (the white dot) since it spins to drive the wheels.The gear facing the front is the carrier and that doesn't need to go back in exactly the way it came out just the caps and shims right? See the numbers and white dot?
Sent from my SM-G950U using WAYALIFE mobile app
I'm so happy, I did not want to take that apart again!Correct, the shims are what set your bearing preload and align your gears so you want those to be right. The carrier can only go in one way and the rotation does not matter (the white dot) since it spins to drive the wheels.
Sent from my SM-P550 using WAYALIFE mobile app
Right? That job is not an expensive one but it is a lot of work. Ty for the help, much appreciated.Congrats on doing it yourself. Hope there are no more leaks.
Right? That job is not an expensive one but it is a lot of work. Ty for the help, much appreciated.
Sent from my SM-G950U using WAYALIFE mobile app
About 6.5 hours. Im not a mechanic but, i thi k i coukd get that down to 4 to 5 now. I also did it in a small condo garage. [emoji16]Wow, congrats on doing this yourself. How long did the whole job take you?
Sent from my iPhone using WAYALIFE mobile app
About 6.5 hours. Im not a mechanic but, i thi k i coukd get that down to 4 to 5 now. I also did it in a small condo garage. [emoji16]
Sent from my SM-G950U using WAYALIFE mobile app
Yup i have to go to the dealer and get a new electical locker connector, mounts at top of pumpmin to the right. Can remember what its called.Nice [emoji108], great work. I not much of a mechanic either but I get more and more comfortable with taking my jeep apart lol. Not counting easy shit like bumpers, lights, winch, sound system etc. My first big job was ball joints. I came in around 8 hrs on that plus a trip to a dealer for a new abs sensor that I broke on one side. I can probably do ball joints much faster now.
Sent from my iPhone using WAYALIFE mobile app
Congrats on getting that done. I had to go through that early this year when I replaced the locker magnet.I'm so happy, I did not want to take that apart again!
Thanks!!
Sent from my SM-G950U using WAYALIFE mobile app
No i ended up breaking the connector at the top. So now i need to go to the dealer.Just curious how did you address the locker sensor when putting the carrier back in? Did you use a short wood dowel tied to a string?
No i ended up breaking the connector at the top. So now i need to go to the dealer.
Sent from my SM-G950U using WAYALIFE mobile app
